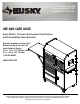
SKU #1004 350 353 THD.com #1004 207 287 Model #HOTC4412BN1S USE AND CARE GUIDE Husky HD 44 in 12-Drawer Ext Deep Tool Chest/Cabinet with Extended Side Table, Matte Red Questions, problems, missing parts? Before returning to the store, call Husky Customer Service 8 a.m.- 7 p.m., EST, Monday-Friday 9 a.m.- 6 p.m., EST, Saturday 1-888-HD-HUSKY HUSKYTOOLS.COM THANK YOU We appreciate the trust and confidence you have placed in Husky through the purchase of this chest/cabinet.
Table of Contents Table of Contents.....................................................................2 Assembly............................................................................6 Safety Information...................................................................2-3 Operation...........................................................................9 Warranty.......................................................................................3 Maintenance................................
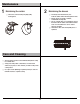
Safety Information (continued) WARNING : Do not use outdoors. WARNING: The chest-cabinet is intended for household use. WARNING : For loading always put heavier items at the bottom and not near the top in order to help prevent the possibility of the chest-cabinet tipping over. DANGER : To reduce the risk of electric shock, always unplug this chest-cabinet from the electrical outlet before cleaning. This device complies with Part 15 of the FCC Rules.
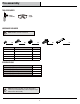
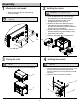
Pre-assembly TOOLS REQUIRED Phillips screwdriver Safety goggles HARDWARE INCLUDED NOTE: Hardware not shown to actual size. AA BB CC Part Description Quantity AA Screw M4x10L 16 BB Bolt M6x15L 4 CC Bolt M6x12L 6 DD Bolt M8x15L 16 EE 10 mm / 13 mm Wrench DD 1 SPECIFICATIONS Maximum capacity (per drawer) 120 lbs. Maximum capacity (chest) Maximum capacity (cabinet) Maximum capacity (side table) Maximum capacity (total unit) 800 lbs. 1100 lbs. 100 lbs. 2000 lbs.
Pre-assembly (continued) PACKAGE CONTENTS M A B S N L R K C O I D J E Q P G H F Part Description Quantity A Gas lift 2 Part B Top chest 1 K Lock 3 C Bracket 2 L Cord bracket (set) 2 D Side handle 1 M Drawer Liner 12 E Rolling cabinet 1 N Grommet 3 F Swivel caster with brake 2 O Power strip 2 G Drawer slide (pair) 13 P Shelf clips 4 H Regular caster 2 Q Shelf 1 I Drawer 12 R Supporting leg holder 1 J Key (set) 2 S Extendable side table 1 5
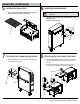
Assembly 1 Attaching the side handle 2 Installing the casters □ Attach the side handle (D) to the rolling cabinet (E) using four bolts (BB). CAUTION: Do not over tighten the screws. □ Ensure all cabinet drawers are securely locked into place using the key lock on the rolling cabinet (E). □ Lay the rolling cabinet (E) on its back. Use the packaging material to protect the finish. □ Mount the two swivel casters with brake (F) to the rolling cabinet (E) using four bolts (DD) per caster.
Assembly (continued) 5 Installing the drawer liner 6 Installing the cord brackets □ Place the drawer liners (M) in appropriately sized drawers and the chest lid area to protect the surface. NOTE: The holes in the cabinet are tapped and do not require nuts. □ Attach the cord bracket (L) to the cabinet using two screws (AA) per bracket. □ Tighten all screws securely.
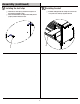
Assembly (continued) 9 Installing the shelf clips 10 Installing the shelf □ Install the shelf (Q) inside the storage area so that it sits on top of the four shelf clips (P) flush and level. □ Install the four shelf clips (P) inside the storage area at the desired shelf height location. □ Ensure all shelf brackets are aligned horizontally and are properly seated in the bracket slots.
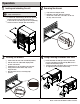
Operation 1 Locking and unlocking the unit 2 Removing the drawers □ Fully extend and empty the drawer. □ Depending on the slide, either lift or lower the release lever on both sides so the slides can ride over the stops. Pull out to remove. IMPORTANT : The drawers must be fully closed before locking / unlocking the unit. □ To lock the unit, insert the key (J) into the lock cylinder (K) and turn it 1/4-turn to the left. Then remove the key.
Maintenance 1 2 Maintaining the casters □ Grease the casters annually using high quality bearing grease. Care and Cleaning □ This steel product has been coated with industrial powder coating for a durable finish. □ To help protect the powder coated finish, do not allow harsh chemicals (oil, grease, or other chemical) to remain on the powder coating surface. □ Use a glass cleaner (Windex R or equivalent product) to clean and maintain all surfaces of powder coating.
Service Parts M A S N L R K C O D J Q P G H F Part Description Quantity Part Description Quantity A Gas lift 2 L Cord bracket (set) 2 C Bracket 2 M Drawer Liner 12 D Side handle 1 N Grommet 3 F Swivel caster with brake 2 O Power strip 2 G Drawer slide (pair) 13 P Shelf clips 4 H Regular caster 2 Q Shelf 1 J Key (set) 2 R Supporting leg holder 1 K Lock 3 S Extendable side table 1 11 HUSKYTOOLS.
Questions, problems, missing parts? Before returning to the store, call Husky Customer Service 8 a.m.-7 p.m., EST, Monday-Friday, 9 a.m. - 6 p.m. EST Saturday 1-888-HD-HUSKY HUSKYTOOLS.COM Retain this manual for future use.
SKU núm. 1004 350 353 THD.com Núm. 1004 207 287 Modelo N úm. HOTC4412BN1S GUÍA DE USO Y MANTENIMIENTO Baúl/gabinete de herramientas Husky HD con 12 cajones y mesa lateral de extensión, en rojo mate, 44 plg (1.12 m) ¿Preguntas, problemas o piezas faltantes? Antes de devolver a la tienda, llama al servicio al cliente de Husky de lunes a viernes, entre 8:00 a.m. y 7:00 p.m. (ESTE) y los sábados entre 9:00 a.m. y 6:00 p.m. (ESTE), por el teléfono 1-888-HD-HUSKY HUSKYTOOLS.
Tabla de contenido Tabla de contenido..................................................................2 Ensamblaje........................................................................6 Información de seguridad.....................................................2-3 Funcionamiento...............................................................9 Garantía........................................................................................3 Mantenimiento...............................................
Información de seguridad(continuación) Seguridad con enchufes y tomacorrientes ADVERTENCIA : Al colocar objetos, pon los más pesados en la parte inferior y alejados de la parte superior para evitar que el artefacto se vuelque. ADVERTENCIA: Las cajas para herramientas/gabinetes etiquetadas con “Grounding Required” (requiere conexión a tierra) tienen una barra multicontacto con un cordón de tres cables y un enchufe de conexión a tierra de tres espigas.
Preensamblaje HERRAMIENTAS NECESARIAS Destornillador Phillips Gafas de seguridad HERRAJES INCLUIDOS NOTA: No se muestra el tamaño real de los herrajes. AA Pieza BB Descripción CC DD Cantidad AA Tornillo M4x10L 16 BB Perno M6x15L 4 CC Perno M6x12L 6 DD Perno M8x15L 16 EE Llave de 10 mm/13 mm 1 ESPECIFICACIONES Capacidad máxima (por cajón) 54.4 kg Capacidad máxima (cajón del baúl) 362.8 kg Capacidad máxima (cajón del gabinete) 498.9 kg Capacidad máxima (mesa lateral) 45.
Preensamblaje (continuación) CONTENIDO DEL PAQUETE M A B S N L R K C O I D J E Q P G H F Pieza Descripción Cantidad Pieza Descripción Cantidad A Alzador neumático 2 B Caja superior 1 C Soporte 2 D Asa lateral 1 E Gabinete con ruedas 1 F Rueda giratoria con freno 2 G Corredera del cajón (par) 13 H Rueda regular 2 Q Presilla para repisa del gabinete Repisa del gabinete I Cajón 12 R Soporte de pata de apoyo 1 J Llave (juego) 2 S Mesa lateral extensible 1 K Ce
Ensamblaje 1 Cómo colocar el asa lateral 2 Cómo instalar las ruedas □ Instala el asa lateral (D) en el gabinete con ruedas (E) usando 4 pernos (BB). PRECAUCIÓN: No aprietes demasiado los tornillos. □ Asegúrate de que todos los cajones del gabinete estén firmemente cerrados en su lugar, usando la cerradura con llave del gabinete con ruedas (E). □ Acuesta el gabinete con ruedas (E) sobre su parte trasera. Usa el material del empaque para proteger el acabado.
Ensamblaje (continuación) instalar el revestimiento de los 5 Cómo cajones 6 Cómo instalar los soportes de cable NOTA: Los orificios en el gabinete están roscados y no necesitan tuercas. □ Coloca los revestimientos de los cajones (M) en los cajones de tamaño adecuado y el área de la tapa de la caja para herramientas para proteger la superficie. □ Fija el soporte de cable (L) al gabinete usando dos tornillos (AA) por soporte . □ Aprieta bien todos los tornillos .
Ensamblaje (continuación) 9 Cómo instalar las presillas de la repisa 10 Cómo instalar la repisa □ Instala los cuatro presillas de la repisa (P) dentro del área de almacenaje a la altura deseada de la repisa. □ Garantiza que las presillas de la repisa queden alineados horizontalmente y estén debidamente asentados en sus ranuras. □ Instala la repisa (Q) dentro del área de almacenaje de manera que se asiente sobre las cuatro presillas correspondientes (P) al ras y nivelada.
Funcionamiento 1 Cómo cerrar y abrir la unidad 2 Cómo quitar los cajones □ Extiende completamente el cajón y vacíalo. □ Dependiendo de la corredera, levanta o baja las palancas de liberación en ambos lados para que las correderas pasen por encima de los topes. Hala hacia afuera para retirar. IMPORTANTE:Los cajones deben estar completamente cerrados antes de cerrar o abrir la unidad. □ Para cerrar la unidad, inserta la llave (J) en la cerradura (K) y gírala 1/4 de vuelta hacia la izquierda.
Mantenimiento 1 2 Cómo dar mantenimiento a las ruedas □ Engrasa las ruedas anualmente usando grasa de alta calidad para cojinetes de bola. Mantenimiento y limpieza □ Este producto de acero ha sido revestido con cubierta granular industrial para lograr un acabado duradero. □ Para ayudar a proteger el acabado pulvirrevestido, no permitas que haya químicos fuertes (aceite, grasa u otro químico) en su superficie.
Piezas de repuesto M A S N L R K C O D J Q P G H F Pieza Descripción Cantidad Pieza Descripción Cantidad A Alzador neumático 2 L Soporte de cable (juego) 2 C Soporte 2 M Revestimiento de cajones 12 D Asa lateral 1 N Remache 3 F Rueda giratoria con freno 2 O Barra multicontacto 2 G Corredera del cajón (par) 13 P H Rueda regular 2 J Llave (juego) 2 K Cerradura 3 11 Q Presilla para repisa del gabinete Repisa del gabinete R Soporte de pata de apoyo 1 S
¿Preguntas, problemas o piezas faltantes? Antes de devolver a la tienda, llama al Servicio al cliente de Husky, de lunes a viernes, entre 8:00 a.m. y 7:00 p.m. (hora estándar del Este), y los sábados de 9:00 a.m. a 6:00 p.m. (hora estándar del Este). 1-888-HD-HUSKY HUSKYTOOLS.COM Conserva este manual para uso futuro.