
Instructions / Assembly


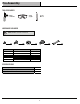


Assembly
1
Installing the legs
2
Attaching the tray
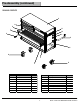
□
Lay the cart upside down. Use the packaging material
to protect the wood top from damage during assembly.
NOTE: The holes in the tool cart are tapped and do not
require nuts.
□
NOTE: Two people may be required to complete
this step.
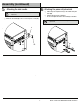
3
Securing the tray
NOTE: The holes in the tool cart are tapped and do not
require nuts.
□
6
C
BB
Mount the four legs (C) to the cart using eight screws (BB)
□
per leg. Do not install four of the screws (BB) in the legs of the
Clip the tray (E) to the four legs (C).
E
C
Ensure all cabinet drawers are securely locked into
place using the lock (J) on the cart.
□
Secure the tray (E) to the legs (C) using four screws (BB)
□
per leg.
□
tool cart on the side adjacent to the Husky badge.
The side handle (B) will be mounted here in a later step.
□
BB
E
C
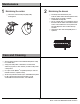
Installing the casters
□
□
□
□
Mount the two swivel casters with brake (D) to the tray (E)
using four bolts (DD) and nuts (CC) per caster.
The swivel casters with brake (D) should be installed on
Mount the two rigid casters (G) to the tray (E) using four
bolts (DD) and nuts (CC) per caster.
Tighten all bolts with a 13 mm wrench.
Carefully return the tool cart to its upright position.
the same side as the side handle (B).
CAUTION: Do not over tighten the bolts.
D
E
CC
DD
G
4