
Installation Guide


2019-11-05 • DOC-376_EN REV02
The front face of the mounting plate must be a few millimeters inside the finished wall
surface!
b. Pass a piece of bent coat hanger into the inlet then into the mounting plate. Holding the mounting plate
with the bent coat hanger, install the inlet using the screws provided in the installation kit. Do not cement
the inlet - a sealing gasket is already installed in the mounting plate. If the screw at the level of the pipe
is too long and could pierce the pipe, use the shorter screw provided with the installation inlet.
c. Raise (or lower, as required) the pipe inside the wall and insert it into the Universal Elbow with a
twisting motion. Make sure the installation can be done correctly. Repeat the exercise but this time with
cement at the end of the pipe.
on The floor
If construction does not permit installing the inlet on the wall, it can always be positioned on the floor close to the
baseboard. You can then opt for a metal inlet for greater durability. Install the inlet about 2 ins (5cm) from the wall in
a location with little traffic where there is no risk of it being stepped on. You may need an Inlet Extension depending on
the thickness of the floor.
easy plaCes for insTallaTion
If construction doesn’t allow for installation inside the walls, easy and unobtrusive installation may be made by running
the piping through a room that is seldom visited. Proceed normally with installation of the vacuum inlets and piping.
These locations make installation easy:
• along existing piping (vent ducting, plumbing, etc.)
• under stairs
• along joists in open ceilings
• behind appliances
• in closets or other storage rooms
• down a laundry chute
• in the bottom of a large fitted wardrobe
• in the attic
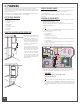
for new ConsTruCTion
Install piping before partitions are enclosed. The mounting plate can be
attached directly adjacent to the studs using its installation support.
Some mounting plates come with a plaster guard. Install it so that the
vacuum inlet is not blocked when plastering the wall.
It is good practise to use a combination of 45 degree fittings so that
screws from the vacuum inlet are not in line with the pipe. This will
prevent piercing the pipe during inlet installation.
for homes wiTh no aTTiC or on a ConCreTe slab
If construction does not permit installing piping in the walls or in locations such as a closet or storage room, install it
outside. Make sure to fill the gap between the pipe and the exterior wall for insulation. Run piping along the exterior
walls and line up the low voltage wiring with the rear of the pipe. Fasten the piping every 4 to 6 feet (1.2m to 1.8m).
If the piping needs to be buried, dig a trench 12 to 18 in deep (30cm to 46cm). Ideally, install the piping and low
voltage wiring in a conduit before burying them. This will give them more protection.
LEAK TESTING
NOTE
» If the installation was done according to the instructions in this installation
manual, there should not be any air leaks. Nevertheless, the most practical
and easiest way to detect any air leakage is as follows:
a. Check that the installation is well and truly finished;
b. Make sure that all vacuum inlets are closed;
c. Start the Power Unit;
• If you have a system with low voltage wire or a basic wireless system, remove the wires from the
Power Unit and short circuit the module terminal. This will start the Power Unit;
• If you have a two-way wireless system, bypass the external module since it is equipped with an
automatic stop function when the system is blocked. To do this, disconnect the module cords and
connect them to each other. Caution, this will immediately start the Power Unit.
d. Place your hand over of the exhaust pipe about 5cm from the end.
After 5 to 10 seconds you should not feel any more air exhausting if the
installation has been done properly. Otherwise, there is a leak;
NOTE
» if you have installed the exhaust so that the air is directed outside the
building, it is recommended to disconnect a section close to the Power Unit
or have an assistant stand outside to evaluate the airflow, if possible.
CAUTION!
do not run this test longer than 20 seconds to avoid overheating the motor!
IMPORTANT!
if you have to repeat the test, wait 5 minutes before restarting!
e. Locate leak, if any;
• An easy way to locate a leak is to place the ear close to the installation (branches, piping, inlets) and listen for
air flow.
f. Make repairs and repeat if necessary.
CLEANING AND MAINTENANCE
When piping has been properly installed, no maintenance is required.
Vacuum inlets may be cleaned with a damp cloth and mild soap.
Never use solvents or abrasive cleaners to clean inlets to avoid damaging their surface.
SERVICE
The Nuera Air Central Vacuum has been designed with care and precision. We have given it special attention so that it
will give you complete satisfaction for many years. However, if your central vacuum needs to be checked, contact us and
we will recommend a qualified technician or distributor in your area.
For any information send us an email at: info@nuera-air.com
Or write to us at: NUERA-AIR Inc.
Customer Service
3695 Desserte des Laurentides (A-15) E
Laval, QC H7L 3H7 CANADA
5. ADDITIONAL INFORMATION