QT3590X EN User manual
CONTENTS 1. 2. 3. 4. 5. 6. 7. 8. 9. SAFETY INSTRUCTIONS . . . . . . . . . . . . . . . . . . . . . . . . . . . . . . . . . . . . . . . . . . . . . . . . . . . . . . 3 CONTROL PANEL . . . . . . . . . . . . . . . . . . . . . . . . . . . . . . . . . . . . . . . . . . . . . . . . . . . . . . . . . . . 5 DAILY USE . . . . . . . . . . . . . . . . . . . . . . . . . . . . . . . . . . . . . . . . . . . . . . . . . . . . . . . . . . . . . . . . . 7 HELPFUL HINTS AND TIPS . . . . . . . . . . . . . . . . . . . . . .
ENGLISH 1. 3 SAFETY INSTRUCTIONS In the interest of your safety and to ensure the correct use, before installing and first using the appliance, read this user manual carefully, including its hints and warnings. To avoid unnecessary mistakes and accidents, it is important to ensure that all people using the appliance are thoroughly familiar with its operation and safety features.
WARNING! Any electrical component (power cord, plug, compressor) must be replaced by a certified service agent or qualified service personnel to avoid hazard. 1. • • • • Power cord must not be lengthened. 2. Make sure that the power plug is not squashed or damaged by the back of the appliance. A squashed or damaged power plug may overheat and cause a fire. 3. Make sure that you can come to the mains plug of the appliance. 4. Do not pull the mains cable. 5.
ENGLISH • The appliance must not be located close to radiators or cookers. • Make sure that the mains plug is accessible after the installation of the appliance. • Connect to potable water supply only (If a water connection is foreseen). ozone layer, in either its refrigerant circuit or insulation materials. The appliance shall not be discarded together with the urban refuse and rubbish.
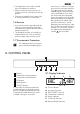
2.2 Switching on 2.5 Ice maker function To switch on the appliance do these steps: 1. Connect the mains plug to the power socket. 2. Press the ON/OFF button if the display is off. 3. The alarm buzzer could operate after few seconds. To reset the alarm refer to “High temperature alarm”. 4. If "dEMo" appears on the display, the appliance is in demonstration mode. Refer to "What to do if..." paragraph. 5. The temperature indicators show the set default temperature.
ENGLISH 2. Press the Temperature colder button or the Temperature warmer button to change the Timer set value from 1 to 90 minutes. 3. Press the OK button to confirm. The Minute Minder indicator is shown. The Timer start to flash (min). At the end of the countdown the Minute Minder indicator flashes and an audible alarm sounds: 1. Remove any drinks contained in the freezer compartment. 2. Press OK button to switch off the sound and terminate the function.
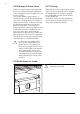
3.2 Storage of frozen food 3.3 Thawing When first starting-up or after a period out of use, before putting the products in the compartment let the appliance run at least 2 hours. The freezer baskets ensure that it is quick and easy to find the food package you want. If large quantities of food are to be stored, remove all drawers except for the bottom basket which secures good air circulation. The two plastic frames supporting the large drawers also need to be removed.
ENGLISH 3.5 Dispensing of ice The dispensing of ice start when you turn the knob counter clockwise. Stop delivery by turning the knob back to the starting position.
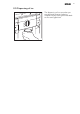
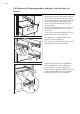
3.6 Removal of freezing baskets and glass shelves from the freezer 2 1 Some of the freezing baskets have a limit stop to prevent their accidental removal or falling out. At the time of its removal from the freezer, pull the basket towards yourself and, upon reaching the end point, remove the basket by tilting its front upwards At the time of putting it back, slightly lift the front of the basket to insert it into the freezer. Once you are over the end points, push the basket back in their position.
ENGLISH 11 3.7 Cleaning the interior Before using the appliance for the first time, wash the interior and all internal accessories with lukewarm water and some neutral soap so as to remove the typical smell of a brand-new product, then dry thoroughly. Do not use detergents or abrasive powders, as these will damage the finish. Check that the drain hose at the rear of the cabinet discharges into the drip tray 4. HELPFUL HINTS AND TIPS 4.
5. CARE AND CLEANING CAUTION! Unplug the appliance before carrying out any maintenance operation. This appliance contains hydrocarbons in its cooling unit; maintenance and recharging must therefore only be carried out by authorized technicians. 5.1 Periodic cleaning The equipment has to be cleaned regularly: • clean the inside and accessories with lukewarm water and some neutral soap. • regularly check the door seals and wipe clean to ensure they are clean and free from debris.
ENGLISH 13 If the cabinet will be kept on, ask somebody to check it once in a while to prevent the food inside from spoiling in case of a power failure. 5.5 Cleaning the ventilation grille The ventilation grille can be removed for washing. Make sure the door is open and then: • Loosen the lower edge of the grille by pulling outward/upward. • Pull the grille straight out to completely remove it. • Vacuum clean under the cabinet. 6.
Problem Possible cause Solution “dEMo” appears on the display. The appliance is in demonstration mode. Keep pressed approximately 10 sec the OK button since a long sound of buzzer is heard and the display shut off for a short while: appliance start works regularly. The compressor runs The Temperature regula- Set a warmer temperature. continuously. tor may be set incorrectly. There is too much frost and ice. The door is not closed correctly. Refer to "Closing the door".
ENGLISH Problem 15 Possible cause Solution The appliance has no power. There is no voltage in the mains socket. Connect another electrical appliance to the mains socket. Check fuse. Contact a qualified electrician. The ice maker is not switched on. Refer to “Switching on and off the ice maker”. No water supply. Carry out the necessary measures on the water supply. The lamp is defective. Refer to "Replacing the lamp". The door has been open to long. Close the door.
7.2 Location 50 mm 7.3 Electrical connection Before plugging in, ensure that the voltage and frequency shown on the rating plate correspond to your domestic power supply. The appliance must be earthed. The power supply cable plug is provided with a contact for this purpose. If the do- To ensure best performance, if the appliance is positioned below an overhanging wall unit, the minimum distance between the top of the cabinet and the wall unit must be at least 40 mm.
ENGLISH 17 7.5 Rear spacers • Install the spacers provided within the accessory bag as shown in the figure. • Install the spacers on the brackets of the condenser (black grill) at the back of the appliance. 7.6 Connecting the water hose. Water supply should be provided with a tap and 3/4" male connector within 1,5 m from the appliance. This work is to be carried out by a skilled plumber. There are different type-approved taps and tap assemblies on the market.
7.8 Starting the ice maker for the first time. Ensure proper connection to the water supply, refer to "Connecting the water hose". 1. Open the tap on the water connection. 2. Start the freezer and the ice maker starts automatically. It will start filling water when the temperature is sufficiently low. Do not use ice produced during the first day to ensure fresh taste. 7.9 Door reversibility The door reversibility is not possible. 8.
ENGLISH HISSS! BLUBB! HISSS! BLUBB! BRRR! CRACK! 9. TECHNICAL DATA Dimension Height 1850 mm Width 595 mm Depth 623 mm Rising Time 10 h Voltage 230 V Frequency 50 Hz The technical information are situated in the rating plate on the internal left side of the appliance and in the energy label.
Water pressure range The water pressure must be at least 1 bar (100kPa) Consult your installer if water pressure is less than 1 bar. Highest allowed water pressure 10 bar (1000kPa) If water pressure exceeds 10 bar a reduction valve must be fitted (available from your specialist shop). • Do not connect the appliance in spaces where ambient temperature can decrease to below freezing. • The appliance may only be connected to drinking water supplies.
ENGLISH 21
ENGLISH 23
298377041-C-112013 www.husqvarna-electrolux.