QT4201RW User manual Fridge Freezer
Contents Thank you for choosing one of our high-quality products. To ensure optimal and regular performance of your appliance please read this instruction manual carefully. It will enable you to navigate all processes perfectly and most efficiently. To refer to this manual any time you need to, we recommend you to keep it in a safe place. And please pass it to any future owner of the appliance. We wish you much joy with your new appliance.
Safety information 3 appliance are thoroughly familiar with its operation and safety features. Save these in‐ structions and make sure that they remain with the appliance if it is moved or sold, so that everyone using it through its life will be properly informed on appliance use and safety. For the safety of life and property keep the precautions of these user's instructions as the manufacturer is not responsible for damages caused by omission.
Safety information • • • • 3. Make sure that you can come to the mains plug of the appliance. 4. Do not pull the mains cable. 5. If the power plug socket is loose, do not insert the power plug. There is a risk of electric shock or fire. 6. You must not operate the appliance without the lamp cover1) of interior lighting. This appliance is heavy. Care should be taken when moving it.
Control panel 5 • Adequate air circulation should be around the appliance, lacking this leads to overheat‐ ing. To achieve sufficient ventilation follow the instructions relevant to installation. • Wherever possible the back of the product should be against a wall to avoid touching or catching warm parts (compressor, condenser) to prevent possible burn. • The appliance must not be located close to radiators or cookers. • Make sure that the mains plug is accessible after the installation of the appliance.
Control panel Turn the Fridge temperature regulator clockwise to a medium setting. The Fridge pilot light will light up. If the temperature inside the freezer is too high the Alarm light will light up and an alarm will sound. Switching off To turn off the appliance, turn the Freezer temperature regulator to the OFF position. The Freezer and Fridge pilot lights will switch off. Switching off the fridge compartment To turn off the Fridge, turn the Fridge temperature regulator to the OFF position.
First use 7 High temperature alarm Temperature increase in the freezer compartment (for example due to an earlier power failure or door is open) is indicated by: • Alarm light flashing. • sounding of buzzer. The buzzer can be switched off by pressing the Alarm reset button. When normal conditions are restored the Alarm light will stop flashing and the buzzer turns off automatically.
Daily use The freezing process lasts 24 hours: during this period do not add other food to be frozen. Thawing Deep-frozen or frozen food, prior to being used, can be thawed in the refrigerator com‐ partment or at room temperature, depending on the time available for this operation. Small pieces may even be cooked still frozen, directly from the freezer: in this case, cooking will take longer.
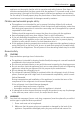
Helpful hints and tips 9 Removal of freezing baskets from the freezer The freezing baskets have a limit stop to prevent their accidental removal or falling out. At the time of its removal from the freezer, pull the basket towards yourself and, upon reaching the end point, remove the basket by tilting its front up‐ wards. At the time of putting it back, slightly lift the front of the basket to insert it into the freezer. Once you are over the end points, push the baskets back in their position.
Helpful hints and tips Fruit and vegetables: these should be thoroughly cleaned and placed in the special drawer(s) provided. Butter and cheese: these should be placed in special airtight containers or wrapped in aluminium foil or polythene bags to exclude as much air as possible. Milk bottles: these should have a cap and should be stored in the bottle rack on the door. Bananas, potatoes, onions and garlic, if not packed, must not be kept in the refrigerator.
Care and cleaning 11 • lean foods store better and longer than fatty ones; salt reduces the storage life of food; • water ices, if consumed immediately after removal from the freezer compartment, can possibly cause the skin to be freeze burnt; • it is advisable to show the freezing in date on each individual pack to enable you to keep tab of the storage time.
Care and cleaning Do not use detergents or abrasive paste as these will damage the paint, or stainless steel anti finger print coating. After cleaning, reconnect the equipment to the mains supply. Cleaning the ventilation grille The ventilation grille can be removed for washing. Make sure the door is open and then: 1. Loosen the upper edge of the grille by pulling outward/downward. 2. Pull the grille straight out to completely remove it. 3. Vacuum clean under the cabinet.
What to do if… 13 • Loosen the drainage channel from its resting position, push it in according to the illustra‐ tion and place it in the bottom freezer draw‐ er where water can collect • carefully scrape off the ice when it starts to thaw. Use a wood or a plastic scraper • when all the ice has melted, clean and wipe the cabinet dry, then put the drainage chan‐ nel back in place. • switch on the cabinet, insert the plug into the wall socket and replace the frozen foodstuff.
What to do if… Problem Possible cause Solution The buzzer sounds. The Alarm light flashing. The temperature in the freezer is Refer to "Temperature Alarm" too high. Pilot light flashing. An error has occurred in meas‐ uring the temperature. The compressor runs con‐ The Temperature regulator may be set incorrectly. tinuously. Call your service representative (the cooling system will continue to keep food products cold, but temperature adjustment will not be possible). Set a warmer temperature.
What to do if… Problem Possible cause The food temperature is too high. 15 Solution Let the food temperature de‐ crease to room temperature be‐ fore storage. There is no cold air circulation in Make sure that there is cold air The temperature in the circulation in the appliance. refrigeration is too warm. the appliance. The temperature in the freezer is too warm. The appliance does not operate. Large quantities of food to be cooled were put in at the same time.
Technical data TECHNICAL DATA Dimension Height 1800 mm Width 595 mm Depth 623 mm Rising Time 18 h The technical information are situated in the rating plate on the internal left side of the appliance and in the energy label. INSTALLATION WARNING! Read the "Safety Information" carefully for your safety and correct operation of the ap‐ pliance before installing the appliance.
Installation 17 The ventilation space can be: • directly above the appliance • behind and above the top cupboard. In this case, the space behind the top cupboard must be at least 50 mm deep. Electrical connection Before plugging in, ensure that the voltage and frequency shown on the rating plate cor‐ respond to your domestic power supply. The appliance must be earthed. The power supply cable plug is provided with a contact for this purpose.
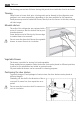
Installation Removing the shelf holders Your appliance is equipped with shelf retainers that make it possible to secure the shelves during transportation. To remove them proceed as follows: 1. Move the shelf holders in the direction of the arrow (A). 2. Raise the shelf from the rear and push it for‐ ward until it is freed (B). 3. Remove the retainers (C). Fitting the door handles (Example for left hinge performance) The handles are supplied as a kit at delivery. 1.
Installation 19 Door reversibility To change the opening direction of the door, do these steps: 1. Remove the plug from the power socket. 2. Remove the ventilation grille. Remove the filling and install it on the opposite side of the grille. 3. Lay down the appliance back side down on a wooden support. 4. For each door: Remove the handle. Un‐ screw the top handle bracket from the handle rod (h1). Unscrew the bottom handle bracket from the door (h2). Unscrew the top handle bracket from the door (h3). 5.
Environmental concerns 10. Tighten the pin with the adjustment spanner supplied. Make sure that the doors are aligned and blocked by the lock-nut. 11. For each door: Install the handle in the opposite side. Re-screw the handle bracket on the door (h4). Turn the handle bracket with the handle and screw them to the door (h5) and the fitted handle bracket (h6) 12. Raise the appliance and install the ven‐ tilation grille. 13. Put the cabinet in position.
298376891-00-16042010 www.aeg-electrolux.