QW 148480 QW 168480 User manual Washing Machine
Contents Thank you for choosing one of our high-quality products. To ensure optimal and regular performance of your appliance please read this instruction manual carefully. It will enable you to navigate all processes perfectly and most efficiently. To refer to this manual any time you need to, we recommend you to keep it in a safe place. And please pass it to any future owner of the appliance. We wish you much joy with your new appliance.
Safety information 3 SAFETY INFORMATION Before the installation and use, read this manual carefully: • For your safety and the safety of your property • To help the environment • For the correct operation of the appliance. Always keep these instructions with the appliance also if you move or give it to a different person. The manufacturer is not responsible if an incorrect installation and use causes damage.
Safety information Care and cleaning • Deactivate the appliance and disconnect the mains plug from the mains socket. • Do not use the appliance without the filters. Make sure that the installation of the filters is correct. An incorrect installation causes water leakages. Installation • The appliance is heavy, be careful when you move it. • Do not transport your appliance without the transit bolts, you can damage internal components and cause leakages or malfunctions.
Environment concerns 5 ENVIRONMENT CONCERNS The symbol on the product or on its packaging indicates that this product may not be treated as household waste. Instead it should be taken to the appropriate collection point for the recycling of electrical and electronic equipment. By ensuring this product is disposed of correctly, you will help prevent potential negative consequences for the environment and human health, which could otherwise be caused by inappropriate waste handling of this product.
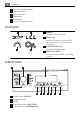
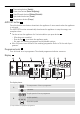
Accessories 7 8 9 10 11 12 Feet for the appliance level Water drain hose Water inlet valve Mains cable Transit bolts Feet for the appliance level ACCESSORIES 1 2 4 3 1 Spanner To remove the transit bolts. 2 Plastic caps To close the holes on the rear side of the cabinet after the removal of the transit bolts. 3 Anti-flood inlet hose To prevent possible leakage 4 Plastic hose guide To connect the drain hose on the edge of a sink.
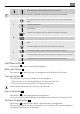
6 7 8 9 10 Time saving button (Snabb) Extra rinse button (Extra Sköljning) Stain/Prewash button (Fläckar/Förtvätt) Spin reduction button (Centr.) Temperature button (Temp.) AUTO Off button 1 Press this button to activate or deactivate the appliance. A tune sounds when the appliance is activated. The AUTO OFF function automatically deactivates the appliance to stop the energy consumption when: • You do not use the appliance for 5 minutes before you press button 4 . – All settings are cancelled.
Prewash phase Washing phase Rinses phase C Spin phase The phase symbols • When a programme is set, all the symbols of the phases related to the programme come on. • When the programme starts, only the symbol of the phase in operation flashes. • When the programme is completed, the symbol of the last phase is on. D The steam symbol comes on when you set a Steam programme. E The detergent overdosing comes on at the end of the cycle when the appliance detects too much detergent.
The indicator bar fills accordingly to the set functions. If you make a wrong selection the message Err indicates that the selection is not possible. The time save symbol comes on when you set one of the programme duration: • Shortened duration J • Extra Quick The extra rinse symbol comes on when this function is activated. The value shows the total number of the rinses. K The indicator bar is fully filled when you set to the maximum number of rinses.
STAIN • Use this function for laundry with hard stains to remove. When you set this function, put the stain remover into compartment increases the programme duration. . This function This function is not available with a temperature lower than 40° C. PREWASH • Use this function to add a prewash phase before the washing phase. We recommend that you use this function when you have laundry with a high level of soil. The set of this function increases the programme duration.
Programmes 11 • After you press the Start/Pause button 4 , all the buttons and the programme knob are deactivated. Permanent extra rinse function With this function you can keep the extra rinse function permanently on when you set a new programme. • To activate the function press button 5 and button 6 at the same time until the display shows the symbol . • To deactivate the function press button 5 and button 6 at the same time until the symbol goes off.
Programmes Programme Temperature Type of load Max. weight of load Cycle description Functions Ylle/Siden 40 - 0° Machine washable wool. Hand washable wool and delicate fabrics with «hand washing» care symbol. max. load 2 kg Wash Rinses Short spin SPIN REDUCTION RINSE HOLD Täcken 60 - 30° One synthetic blanket, duvet, bedspread and so on. max. load 3 kg Wash Rinses Short spin SPIN REDUCTION Antiallergi 60° White cotton items.
Programmes 13 3) If you set the ‘Extra Quick’ duration, we recommend that you decrease the quantity of the load. It is possible to load fully the appliance, however the washing results are reduced. 4) The wash and spin phase of this programme is soft to prevent the creases of the laundry. The appliance adds some rinses. 5) Set the spin speed. Make sure that it agrees with the laundry. To select the DRAIN programme only, set the function NO SPIN. 6) Press EXTRA RINSE button to add rinses.
Before first use Standard programmes for the Energy Label consumption values The cotton 60 °C economy and cotton 40 °C economy are the standard cotton programmes for normally soiled cotton laundry. They are suitable to clean normally soiled cotton laundry and they are the most efficient programmes in terms of combined energy and water consumption for washing that type of cotton laundry. They agree with EN60456. The actual water temperature may differ from the declared cycle temperature.
Filling detergent and additives 15 FILLING DETERGENT AND ADDITIVES The detergent compartment for the prewash phase and the soak programme. Add the detergent for prewash and soak before the start of the programme. The detergent compartment for the washing phase. If you use a liquid detergent, put it immediately before you start the programme. Liquid additives compartment (fabric conditioner, starch). Put the product in the compartment before you start the programme.
Setting and starting a programme 3. To use powder detergent, turn the flap up. 4. To use liquid detergent, turn the flap down. With the flap in the position DOWN: – Do not use gelatinous or thick liquid detergents. – Do not put more liquid detergent than the limit showed in the flap. – Do not set the prewash phase. – Do not set the delay start function. 5. 6. Measure out the detergent and the fabric conditioner. Carefully close the detergent dispenser.
At the end of programme 17 Cancel a programme 1. 2. Press button 1 to cancel the programme and to deactivate the appliance. Press button 1 again to activate the appliance. Now, you can set a new washing programme. The appliance does not drain the water. Change a function You can change only some functions before they operate. 1. Press button 4 . The indicator flashes. 2. Change the function set. AT THE END OF PROGRAMME • • • • • • The appliance stops automatically. The acoustic signals operate.
Helpful hints and tips HELPFUL HINTS AND TIPS The laundry load • • • • • • • • • • • • Divide the laundry in: white, coloured, synthetics, delicates and wool. Obey the washing instructions that are on the laundry care labels. Do not wash together white and coloured items. Some coloured items can discolour with the first wash. We recommend that you wash them separately for the first times. Button up pillowcases, close zippers, hooks and poppers. Tie up belts. Empty the pockets and unfold the items.
Care and cleaning 19 • French degrees (°TH). • mmol/l (millimol for each litre - international unit for the hardness of water). • Clarke degrees. Water hardness table Level Type 1 2 Water hardness °dH °T.H. mmol/l Clarke soft 0-7 0-15 0-1.5 0-9 medium 8-14 16-25 1.6-2.5 10-16 3 hard 15-21 26-37 2.6-3.7 17-25 4 very hard > 21 > 37 >3.7 >25 CARE AND CLEANING WARNING! Disconnect the appliance from the mains supply before you clean it.
Care and cleaning Door seal Regularly examine the seal and remove all objects from the inner part. Drum Regularly examine the drum to prevent limescale and rust particles. Only use special products to remove rust particles from the drum. To do this: • Clean the drum with special product for stainless steel. • Start a short programme for cotton at the maximum temperature with a small quantity of detergent. Detergent dispenser To clean the dispenser: 1 1. 2. Press the lever. Pull the dispenser out.
Care and cleaning 5. 6. 21 Clean the dispenser recess with a brush. Put back the dispenser in the recess. Drain pump Regularly examine the drain pump and make sure that it is clean. Clean the pump if: • The appliance does not drain the water. • The drum cannot turn. • The appliance makes an unusual noise because of the blockage of the drain pump. • The display shows an alarm code because of the problem with water drain. WARNING! 1. Disconnect the mains plug from the mains socket. 2.
Care and cleaning 5. 1 6. When the container is full of water, put the drainage duct back again and empty the container. Do steps 4 and 5 again and again until no more water flows out from the drain pump. Pull back the drainage duct and turn the filter to remove it. 2 2 1 7. Remove fluff and objects from the pump. 8. Make sure that the impeller of the pump can turn. If this does not occur, contact the service centre. 9.
Care and cleaning 23 To clean the water inlet filters: 1. 2. 3. 4. 5. 6. 7. 35° Close the water tap. Remove the water inlet hose from the water tap. Clean the filter in the inlet hose with a stiff brush. Remove the inlet hose behind the appliance. Clean the filter in the valve with a stiff brush or a towel. Install again the inlet hose. Make sure that the couplings are tight to prevent leakages. Open the water tap. 45° Emergency drain Because of a malfunction, the appliance cannot drain the water.
Troubleshooting WARNING! Make sure that the temperature is more than 0 °C before you use the appliance again. The manufacturer is not responsible for damages caused by low temperatures. TROUBLESHOOTING The start of the appliance does not occur or it stops during operation. First try to find a solution to the problem (refer to the table). If not, contact the service centre. With some problems, the acoustic signals operate and the display shows an alarm code: • - The appliance does not fill with water.
Troubleshooting Problem Possible cause The anti-flood device is on. The spin phase does not operate. The programme does not start. There is water on the floor. You cannot open the appliance door. The appliance makes an unusual noise. The appliance fills with water and drain immediately. 25 Possible solution • Disconnect the appliance. • Close the water tap. • Contact the service centre. The spin phase is off. Set the spin programme. The filter of the drain pump is blocked.
Technical data Problem Possible cause Possible solution Incorrect temperature was set. Make sure that you set the correct temperature. Too much laundry load. Decrease the laundry load. After the check, activate the appliance. The programme continues from the point of interruption. If the problem occurs again, contact the service centre. If the display shows other alarm codes, contact the service centre.
Installation 27 2. 3. Remove the cardboard top. Remove the polystyrene packaging materials. 4. Remove the internal film. 5. Open the door. Remove the polystyrene piece from the door seal and all the items from the drum. 6. Put one of the polystyrene packaging elements on the floor behind the appliance. Carefully put down the appliance with the rear side on it. Make sure not to damage the hoses.
Installation 7. 8. Remove the polystyrene protection from the bottom. Pull up the appliance in vertical position. 1 2 9. Remove the power supply cable and the drain hose from the hose holders. 10. Remove the three bolts. Use the key supplied with the appliance. 11. Pull out the plastic spacers.
Installation 29 12. Put the plastic caps in the holes. You can find these caps in the user manual bag. WARNING! Remove all the packaging and the transit bolts before you install the appliance. We recommend that you keep the packaging and the transit bolts for when you move the appliance. Positioning and levelling • Install the appliance on a flat hard floor. • Make sure that carpets do not stop the air circulation below the appliance.
Installation CAUTION! Do not put cardboard, wood or equivalent materials below the appliance feet to adjust the level. The inlet hose • Connect the hose to the appliance. Turn the inlet hose only left or right. Loose the ring nut to set it in the correct position. 35 O 45 O • Connect the water inlet hose to the cold water tap with 3/4 thread. CAUTION! Make sure that there are no leaks from the couplings. Do not use an extension hose if the inlet hose is too short.
Installation 31 Water drainage There are different procedures to connect the drain hose: With the plastic hose guide. • On the edge of a sink. • Make sure that the plastic guide cannot move when the appliance drains. Attach the guide to the water tap or the wall. • To a stand pipe with vent-hole. Refer to the illustration. Directly into a drain pipe at a height of not less than 60 cm and not more than 100 cm. The end of the drain hose must always be ventilated , i.e.
• Directly to a built-in drain pipe in the room wall and tighten it with a clip. You can extend the drain hose to maximum 400 cm. Contact the service centre for the other drain hose and the extension.
132933540-B-282011 www.aeg.