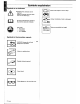
ENGLISH Symbols explanation Symbols on the chainsaw: WARNING! The chainsaw can be dangerous} Careless or improper use can cause serious or even fatal injury Read and Understand the Operator's Manual before using the chainsaw, Always wear: * safely helmet * ear protection * visor of goggles Symbols in the instruction manual: WARNING! Always pull out the plug before fitting pans or adjusting the saw. Always wear safety gloves, Regular cleaning is required.
CONTENTS Before using a new saw «Read the instructions carefully. «Check cutting equipment is correctly lifted and adjusted: Seepage 23. + Start the saw and check the carburetor setting. See pages 24. = 0g not use the saw until scientific chain oil hag reached the chain, $66 page 13; IMPORTANT! # the chain is badly adjusted it will cause increased wear or damage to the bar, drive ‘sprocket and chain. Contents Key 10 symbols... 2 Safety instructions Personal safety equipment...
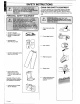
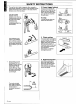
ENGLISH SAFETY INSTRUCTIONS CHAIN SAW SAFETY EQUIPMENT This section explains the various safety features of the saw, how they work, and basic inspection and:maintenance you should carry out ensure safe operation: (See the "What is what?” section to fired out where these components are on Your saw). 1 Chain brake and safety rigger SAFETY HELMET HEARING PROTECTION SAFETY GLASSES OR VISOR a GLOVES WITH SAW PROTECTION ¥ SAFETY TROUSERS WITH SAW PROTECTION BOOTS WITH SAW PROTECTION, STEEL.
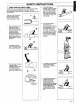
SAFETY INSTRUCTIONS 1" Chain brake and safety trigger YOUR chain saw is equipped with a chain brake that is designed 10 stop the chain immediately if you get a kickback. The chain brake reduces the risk of accidents, but only You can prevent them: b Take care when using your saw and make sure the kickback zone of the bar. never touches any object. 1...
ENGLISH SAFETY INSTRUCTIONS 6-1 The way the chain brake is triggered; either manually or 2 Power trigger lockout automatically, depends on the force of the kickback and the Grasp the front handle with position of the chain saw In relation lo the object that the your left-hand. Grasp the rear. kickback zone of the bar strikes. if you get & violent kickback while the kickback zone of the bar ig farthest away from you the chain brake wilt be. Activated by the. movement of the counterweight INERTIA ACTIVATED).
Sliding clutch 1400/1600W. ‘The saw is equipped with sliding clutch. This protects it! fom overloading. If the chain ‘stops while the motor is: ranting then the saw is: overloaded. Ease up on the cutting pressure until the chain begins to tum again. if the blade hag jammed stop the saw immediately and free the blade. If the chain stops frequently while cutting it may be because the chain is blunt, i so, sharper: the chain. Electronic overload cut-out 1600W The 1600W saw is equipped with.
ENGLISH SAFETY INSTRUCTIONS 3 Checking the brake trigger “The chain brake must be checked several times daily. Place the saw on fife ground. Keep & fit grip on the saw with your right hang on the rear. handle; your left hand ion the front handle; and with your thimbles and fingers encircling the handle and apply throttle. Activate the chain brake by turning your left wrist against the hand guard, without releasing your. grip. around the front handle: The chain should stop immediately (lustrous.
SAFETY INSTRUCTIONS CUTTING EQUIPMENT This section descries how to choose and maintain your cutting equipment in order to: +: Adduce the risk of Kickback. +. Reduce the risk of the chain breaking or jumping. + Obtain maximum cutting performance. «Extend the fife of cutting equipment. The § basic rules 1 Only tse cutting equipment recommended by us! See the Technical dais” section, 2. Keep the chain cutting teeth properly. sharpened! Fallow our instructions and use the recommended file gauge. A damaged or.
ENGLISH SAFETY INSTRUCTIONS C.. Some terms that describe the bar and chain When the cutting equipment supplied with your saw. becomes worn ar damaged you will dean to replace it. Use only the type of Bar and chain recommended by Us. See the “Technical data” section to find out which equipment recommended for your saw. Bar LENGTH (inches/om) NUMBER OF TEETH ON BAR TIP SPROCKET {T).
It is vary difficult to sharpen a chain correctly without the right equipment. We recommend you use a file gauge. This will hei you obtain the maximum Kickback OLIGARCHIC dRd Cutting performance from your chain, SAFETY INSTRUCTIONS B Sharpening cutting teeth To sharpen cutting teeth you will need a ROUND FILE and a FILE. GAUGE. See the. "Technical data’ section for. information on the size of file. and gauge that are recommended for your saw chain. 1 Richie that the teal is correctly pensioned.
SAFETY INSTRUCTIONS D | Setting the taker clearance © = Before setting the taker clearance the cutting teeth should be. ripely sharpened. We recommend that you adjust the nonappearance Avery third time you sharpen the chain, NOTE! This recommendation assumes that the length of the culling teeth is riot reduced excessively, ENGLISH — memo) Teo adjust the taker clearance you will need a FLAT ALE and a BAKER GAUGE. Place the gauge over the. taker fip.
SAFETY INSTRUCTIONS 4 Lubricating cutting equipment A. Chain oll Chain oil should form a smooth fiction the surface of the chain and maintain its flow properties regardless of the temperature. * A a chain saw manufacturer have developed a high quality chain ail, which, because it is vegetable-based, is also fully biodegradable. We recommend you use this oil to get the maximum life from your chain and protect the environment. » if you cannot obtain our chain oil then we recommend a standard chain oil.
ENGLISH SAFETY INSTRUCTIONS £ Chain drive sprocket -5o| [> The lute drum ig fitted with one of the following drive sprockets: A SPUR (integral drive sprocket) B RING (replaceable) Regularly check the degree of wear or the drive sprocket; Replace if wear is excessive. Replace the drive: sprocket! whenever you replace the chain! 14 gene F-Bar 55) @| | Check regular’ * Whether there are burrs on the edges of the bar. Remove these with file if necessary: . Whether the groove in the bar has become warn.
SAFETY INSTRUCTIONS HOW TO AVOID KICKBACK General rules 1... you understand what kickback is and how it happens then you can reduce or eliminate the element of surprise. By: being prepared you reduce the risk. Kickback is usually quite mild, but it can sometimes be very sudden and EAR] What is kickback? The word Kickback is used to describe the sudden reaction that happens when the upper. quadrant of the fillip the bar {known as the. “Kickback zone} touches an object and the. saw is kicked backwards.
ENGLISH SAFETY INSTRUCTIONS 6... Take great care when you cut with the top edge of the bar, Le. when rotting fan thi Underside of the object: This is known as cutting on the push shrike. The chain fries to push the saw back southeastward user. Unless the user resists this pushing theretofore is 4 risk that the saw will move sq far backwards that only the kickback zone of the bar is in contact with the tree. This. will cause kickback. Cutting with the bottom edge of the bar, ie. from the {op of the object.
SAFETY INSTRUCTIONS GENERAL WORKING INSTRUCTIONS important 1. Before using a chain. saw. you must understand the effects of kickback and what causes it. (See the section on HOW TO AVOID KICKBACK). , 2 Before using a saw you must understand the difference between sawing with the top and bottom degas of the bar. {See the section on HOW TO AVOID KICKBACK). 1 Basic safety rules 17 Look around you: ¥ 10. make sure there. are no. people; animals or other.
SAFETY INSTRUCTIONS 2 Basic cutting technique General ENGLISH « Cutting from above = Cutting on the pull stroke. +. Curling from below = Cutting on the push stroke! Bee the section on "How t avoid kickback™ to find out why cutting on the brushstroke increases the risk of kickback. Terms: Cutting = General term for cutting through wood. Limning = Cutting limbs off a felled leer, Splitting = When the object you are cutting breaks off before the cut ig com piste.
SAFETY INSTRUCTIONS 2 The log is supported at one end. There is-a high risk that it will split: 3 Tree felling technique TIDBIT NI A... Safe distance “The safe distance between a tree that is 10. be felled and. anyone siege working nearby is at least 21/2 ree lengths. Make sure that no-one else is in this ‘risk zone” before or during felling. A. Stan by. cutting from. below (about 1/3 of the: way through).
C Clearing the trunk and preparing your retreat ENGLISH Overflew any branches that grain the way, To do this iris bait to work from the top down and keep the trunk. between you and the chain saw. Never limb above: shoulder height. Remove any undergrowth trim the base of the tree and check the area for obstacles {stones, Branches, totes, ofc) sociopath you have a clear path of retreat when the tree stats. to fall.
SAFETY INSTRUCTIONS We recommend that you use a har that is longer than the diameter of the tees, so that you can make the FELLING CUT and DIRECTIONAL CUT | with:single cutting stokes. {8ee "Technical data’ to find out which lengths of bar are recommended for your saw). There are methods for felling frees wit d diameter larger than the iar length. However Hess methods involve a much greater risk that the kickback A zone of the bar will come inch contact with the ree.
ENGLISH WHAT 1S WHAT? 12 15 What is what on the saw? 1. Rear handle . Power trigger Aif vents . Front handle Chain oil tank Qf level window Nose sprocket @ ewe a se Saw chain 10: Bar 22 -edginess Power trigger foldout 11 Chain brake which is obscured by the clutch cover 12. Front hand guard 18. Clutch cover +4. Chair catcher = designed to catch the chair if the chain Jumps or breaks 15. Chain guard » designed fo protect the right hand in the event of the chain jumping or breaking. 16: Combination spanner.
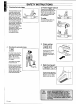
Mounting guide bar and chain ASSEMBLY " Sol” Check that the chain brake is in disengaged position by: moving the front hand guard towards the front handle, Take off the bar standout remove the clutch cover. ran B00 Fit the bar over the bar boils. Place the bar in is rearmost position. Place the chain over the drive sprocket and in the groove on the bar. Begin on the top side of the bar. Make sure that the edges on the: cutting links are facing forward on the top aids of the bar.
ENGLISH START AND STOP Start and stop NG Starting up Grasp the front handle with your left hand. Grasp the rear handle with your right hand. Push in the lock button using your right thumb and press the. start button. = To stop The saw will stop when you release the start bunion. Sliding clutch 1400/1600W The saw is equipped with & sliding clutch. This protects it tfromioveriading If the chain stops while the motor is. running then the saw is overloaded.
MAINTENANCE Saw maintenance The following are some genera maintenance instructions: f you have any further queries contact your service workshop. Dally maintenance Check the mains lead and plug for damage or splitting. A worn or defective lead or plug should always be replaced with new items. Clean the chain brake and check that it works safely, Check that the chain catcher ié int good condition; replace if necessary. Check the air intakes: Check that bar and chain are well oiled.
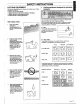
[ECR Technical specification Engine Voltage Rated power Sliding chat oh Electronic soft start speed regulation overload cut-out. Weight Without bar and chain With 13" bar and chain Chain lubrication Qi tank capacity it pump Chain/bar Standard bar length Recommended bar lengths Usable cutting length Chain speed unloaded Chain speed at power rating Chain gits Thickness of drive links: Number of drive links 13/16" Noise levels (see note.