
Operators Manual


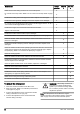
Table Of Contents
- Contents
- Introduction
- Safety
- Operation
- Maintenance
- Troubleshooting
- Transportation, storage and disposal
- Technical data
- EC Declaration of Conformity
- Въведение
- Безопасност
- Операция
- Поддръжка
- Въведение
- График за техническо обслужване
- Регулиране на оборотите на празния ход
- За почистване на системата за охлаждане
- За проверка на запалителната свещ
- Почистване на въздушния филтър
- За нанасяне на масло върху въздушния филтър
- За смазване на корпуса на скоростната кутия
- За почистване и смазване на ножовете
- За проверка на ножовете
- Отстраняване на проблеми
- Транспортиране, съхранение и изхвърляне
- Технически данни
- Декларация за съответствие на ЕО
- Uvod
- Sigurnost
- Rukovanje
- Održavanje
- Rješavanje problema
- Transport, skladištenje i odbacivanje
- Tehnički podaci
- Izjava EK o usklađenosti
- Úvod
- Bezpečnost
- Provoz
- Údržba
- Odstraňování problémů
- Přeprava, skladování a likvidace
- Technické údaje
- ES Prohlášení o shodě
- Indledning
- Sikkerhed
- Drift
- Vedligeholdelse
- Fejlfinding
- Transport, opbevaring og bortskaffelse
- Tekniske data
- EU-overensstemmelseserklæring
- Einleitung
- Sicherheit
- Betrieb
- Wartung
- Fehlerbehebung
- Transport, Lagerung und Entsorgung
- Technische Angaben
- EG-Konformitätserklärung
- Εισαγωγή
- Ασφάλεια
- Λειτουργία
- Συντήρηση
- Αντιμετώπιση προβλημάτων
- Μεταφορά, αποθήκευση και απόρριψη
- Τεχνικά στοιχεία
- Δήλωση Συμμόρφωσης ΕΚ
- Introducción
- Seguridad
- Funcionamiento
- Mantenimiento
- Resolución de problemas
- Transporte, almacenamiento y eliminación
- Datos técnicos
- Declaración de conformidad CE
- Sissejuhatus
- Ohutus
- Töö
- Hooldamine
- Veaotsing
- Transportimine, hoiulepanek ja utiliseerimine
- Tehnilised andmed
- EÜ vastavusdeklaratsioon
- Johdanto
- Turvallisuus
- Käyttö
- Huolto
- Vianmääritys
- Kuljettaminen, säilyttäminen ja hävittäminen
- Tekniset tiedot
- EY-vaatimustenmukaisuusvakuutus
- Introduction
- Sécurité
- Utilisation
- Entretien
- Dépannage
- Transport, entreposage et mise au rebut
- Caractéristiques techniques
- Déclaration de conformité CE
- Uvod
- Sigurnost
- Rad
- Održavanje
- Rješavanje problema
- Prijevoz, spremanje i zbrinjavanje
- Tehnički podaci
- Izjava o sukladnosti EC
- Bevezető
- Biztonság
- Üzemeltetés
- Karbantartás
- Hibaelhárítás
- Szállítás, tárolás és ártalmatlanítás
- Műszaki adatok
- EK megfelelőségi nyilatkozat
- Introduzione
- Sicurezza
- Utilizzo
- Manutenzione
- Ricerca dei guasti
- Trasporto, stoccaggio e smaltimento
- Dati tecnici
- Dichiarazione di conformità CE
- はじめに
- 安全性
- 操作
- メンテナンス
- トラブルシューティング
- 搬送、保管、廃棄
- 主要諸元
- EC 適合性宣言
- Įvadas
- Sauga
- Naudojimas
- Techninė priežiūra
- Gedimai ir jų šalinimas
- Transportavimas, saugojimas ir utilizavimas
- Techniniai duomenys
- EB atitikties deklaracija
- Ievads
- Drošība
- Lietošana
- Apkope
- Problēmu novēršana
- Pārvadāšana, glabāšana un utilizēšana
- Tehniskie dati
- EK atbilstības deklarācija
- Inleiding
- Veiligheid
- Werking
- Onderhoud
- Probleemoplossing
- Vervoer, opslag en verwerking
- Technische gegevens
- EG verklaring van overeenstemming
- Innledning
- Sikkerhet
- Drift
- Vedlikehold
- Feilsøking
- Transport, oppbevaring og avhending
- Tekniske data
- EF-samsvarserklæring
- Wstęp
- Bezpieczeństwo
- Przeznaczenie
- Przegląd
- Rozwiązywanie problemów
- Transport, przechowywanie i utylizacja
- Dane techniczne
- Deklaracja zgodności WE
- Introdução
- Segurança
- Funcionamento
- Manutenção
- Resolução de problemas
- Transporte, armazenamento e eliminação
- Especificações técnicas
- Declaração CE de conformidade
- Introducere
- Siguranţă
- Funcţionarea
- Întreținerea
- Depanarea
- Transportul, depozitarea şi eliminarea
- Date tehnice
- Declarație de conformitate CE
- Введение
- Безопасность
- Эксплуатация
- Техническое обслуживание
- Поиск и устранение неисправностей
- Транспортировка, хранение и утилизация
- Технические данные
- Декларация соответствия ЕС
- Úvod
- Bezpečnosť
- Prevádzka
- Údržba
- Riešenie problémov
- Preprava, skladovanie a likvidácia
- Technické údaje
- ES vyhlásenie o zhode
- Uvod
- Varnost
- Delovanje
- Vzdrževanje
- Odpravljanje težav
- Transport skladiščenje in odstranitev
- Tehnični podatki
- Izjava ES o skladnosti
- Uvod
- Bezbednost
- Rukovanje
- Održavanje
- Rešavanje problema
- Transport, skladištenje i odlaganje
- Tehnički podaci
- EZ deklaracija o usaglašenosti
- Introduktion
- Säkerhet
- Drift
- underhåll
- Felsökning
- Transport, förvaring och kassering
- Tekniska data
- EG‐försäkran om överensstämmelse
- Giriş
- Güvenlik
- Kullanım
- Bakım
- Sorun giderme
- Taşıma, depolama ve atma
- Teknik veriler
- AT Uyumluluk Bildirimi

Maintenance Before
operation
After 40
h
After 100
h
Make sure that the cutting unit does not move at idle speed. X
Do a check of the stop switch. Refer to
To do a check of the stop switch on page
6
.
X
Examine the cutting unit for damages and cracks. Replace if it is damaged. X
Examine the hand guard for damages and cracks. Replace if it is damaged. X
Do a check of the throttle trigger lockout and the throttle trigger. Refer to
To do a
check of the throttle trigger lockout on page 6
.
X
Examine the engine, the fuel tank and the fuel hose for leaks. X
Tighten nuts and screws. X
Examine the starter and the starter rope for damages. X
Do a check that the screws that hold the blades together are correctly tightened. X
Clean the air filter. Clean more frequently if used in areas which has dust. Re-
place if it is damaged.
X
Examine the vibration damping units for damages and cracks. Replace if it is
damaged.
X
Clean the external surface of the spark plug and the area around it. Remove the
spark plug and measure the electrode gap. Adjust the electrode gap or replace
the spark plug. Refer to
To examine the spark plug on page 11
.
X
Clean the cooling system. X
Clean the external surface of the carburetor and the area around it. X
Examine the fuel filter for contamination and the fuel hose for cracks and other
defects. Replace if it is damaged.
X
Clean the spark arrester screen on the muffler, replace if it is damaged. X
Clean the inner surface of the fuel tank. X
Replace the spark plug. X
Examine the clutch, clutch spring and the clutch drum for wear. Replace if it is
damaged by an approved servicing dealer.
X
Make sure that the gear housing is filled with grease. X
Do a check of all cables and connections. X
To adjust the idle speed
1. Clean the air filter and attach the air filter cover.
2. Start the product. Refer to
To start the product with a
cold engine on page 9
.
3. Turn the idle adjustment screw T clockwise until the
cutting unit starts to move. (Fig. 25)
4. Turn the idle adjustment screw counterclockwise
until the cutting unit stops.
WARNING: If the cutting unit does not
stop when you adjust the idle speed,
speak to your nearest servicing dealer.
Do not use the product until it is correctly
adjusted or repaired.
Note: The idle speed is correct when the engine
operates smoothly in all positions. Refer to
Technical
data on page 13
for the recommended idle speed.
10 994 - 002 - 02.07.2019