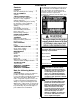
Operator’s Manual Please read these instructions and make sure you understand them before using the machine.
CONTENTS The Emissions Compliance Period referred to on the Emissions Compliance label indicates the number of operating hours for which the engine has been shown to meet Federal emissions requirements. Category C = 50 hours, B= 125 hours, and A = 300 hours. Contents CONTENTS Contents . . . . . . . . . . . . . . . . . . . . . . . . 2 Note the following before starting . . . . 2 KEY TO SYMBOLS Symbols . . . . . . . . . . . . . . . . . . . . . . . . . 3 SAFETY INSTRUCTIONS Personal protective equipment . . .
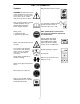
KEY TO SYMBOLS Symbols Only intended for trimmer heads. WARNING: Clearing saws, brushcutters and trimmers can be dangerous! Careless or incorrect use can result in serious or fatal injury to the operator or others. Please read the operator’s manual carefully and make sure you understand the instructions before using the machine. Use unleaded or quality leaded gasoline and two--stroke oil mixed at a ratio of 2% (1:50).
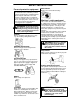
SAFETY INSTRUCTIONS Personal protective equipment FIRST AID KIT Always have a first aid kit nearby. IMPORTANT! Whenever you use a clearing saw, brushcutter or trimmer you must wear personal protective equipment that is approved by the authorities. Personal protective equipment does not eliminate the risk of accidents, but it can reduce the effects of an injury in the event of an accident. Ask your dealer for help when choosing protective equipment.
SAFETY INSTRUCTIONS Cutting equipment Use of incorrectly wound trimmer line or an incorrect cutting attachment increases the level of vibration. A trimmer head is intended for trimming grass. WARNING: Overexposure to vibration can lead to circulatory damage or nerve damage in people who have impaired circulation. Contact your doctor if you experience symptoms of overexposure to vibration.
SAFETY INSTRUCTIONS Muffler WARNING: Never use a machine with faulty safety equipment. The machine’s safety equipment must be checked and maintained as described in this section. If your machine fails any of these checks contact your service agent to get it repaired. S Never use a machine that has a faulty muffler. IMPORTANT! This section describes how to choose and maintain your cutting equipment in order to: Obtain maximum cutting performance. Extend the life of cutting equipment.
SAFETY INSTRUCTIONS General safety precautions WARNING: A faulty cutting attachment may increase the risk of accidents. IMPORTANT! S The machine is only designed for trimming grass. S The only accessories you can operate with this engine unit are the cutting attachments we recommend in the “Technical data” section. S Never use wire, rope, string, etc.
SAFETY INSTRUCTIONS S Check that the trimmer head and guard are correctly secured. S When adjusting the carburetor, make sure the lower end is supported and that no one is in the immediate vicinity. S Make sure the cutting head does not rotate when idling. S Make sure the handle and safety features are in order. Never use a machine that has parts missing or has been changed in relation to the specification. S Only use the machine for the purpose for which it was intended.
SAFETY INSTRUCTIONS S CAUTION! Do not use the machine unless you are able to call for help in the event of an accident. 2. Do not use the machine in bad weather, such as dense fog, heavy rain, strong wind, intense cold, etc. Working in bad weather is tiring and often brings added risks, such as icy ground, unpredictable felling direction, etc. 3. Make sure you can move and stand safely. Check the area around you for possible obstacles (roots, rocks, branches, ditches, etc.
SAFETY INSTRUCTIONS Sweeping WARNING: Neither the operator of the machine nor anyone else may attempt to remove the cut material while the engine is running or the trimmer line is rotating, as this can result in serious injury. Stop the engine and trimmer head before you remove material that has wound around the drive shaft as otherwise there is a risk of injury. The bevel gear can get hot during use and may remain so for a while afterwards. You could get burned if you touch it.
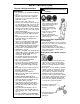
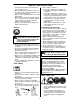
KNOW YOUR TRIMMER 2 1 3 6 8 9 10 5 4 15 7 1 14 12 13 11 16 Know your trimmer 1. 2. 3. 4. 5. 6. 7. 8. 9. Trimmer head Grease filler cap Bevel gear Cutting attachment guard Shaft Loop handle Throttle control Stop switch Cylinder cover 10. 11. 12. 13. 14. 15. 16. 17.
ASSEMBLY NOTE: Make sure unit is assembled correctly as shown in this manual. Fitting the trimmer guard and trimmer head Fitting the loop handle S Position the handle on the shaft. Note that the handle must be mounted between the two arrows on the shaft. S Fit the correct trimmer guard (A) for use with the trimmer head. Hook the trimmer guard/combination guard onto the fitting on the shaft and secure with the wing nut (B). B S Fit the screw, securing plate and wing nut as shown in the diagram.
FUEL HANDLING Fuel mixture S Always start by flling half the amount of the gasoline to be used. Then add the entire amount of oil. Mix (shake) the fuel mixture. Add the remaining amount of gasoline. S Mix (shake) the fuel mixture thoroughly before filling the machine’s fuel tank. CAUTION! The machine is equipped with a two--stroke engine and must always be run using a mixture of gasoline and two-stroke engine oil.
STARTING AND STOPPING Cold engine Check before starting Primer bulb: Press the primer bulb 10 times until fuel begins to fill the bulb. The primer bulb need not be completely filled. S Inspect the unit before each use. Replace damaged parts. Check for fuel leaks. Make sure all fasteners are in place and secure. Make sure the cutting attachment is properly installed and securely fastened. Use only flexible, nonmetallic line recommended by the manufacturer.
STARTING AND STOPPING Warm engine Stopping With a warm engine, squeeze and hold the throttle trigger. Pull starter rope sharply while squeezing throttle trigger until engine runs. Stop the engine by pushing and holding the stop switch in the STOP position until the engine stops. WARNING: When the engine is started with the choke in the closed position the cutting attachment will start to rotate immediately.
MAINTENANCE WARNING: If the idle speed cannot be adjusted so that the cutting attachment stops, contact your servicing dealer. Do not use the machine until it has been correctly adjusted or repaired. WARNING: Mufflers fitted with catalytic converters get very hot during use and remain so for some time after stopping. This also applies at idle speed. Contact can result in burns to the skin.
MAINTENANCE Air filter Maintenance schedule Below you will find some general maintenance instructions. Daily maintenance S Check throttle trigger function. S Check that the stop switch works correctly. S Check that there are no fuel leaks from the engine, tank or fuel lines. S Check that the cutter does not rotate when the engine is idling. S Clean the outside of the machine. S Check that the harness is not damaged. S Check that the blade guard is not damaged or cracked.
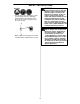
Trimmer Head Line Loading Instructions 1 2 3 6m 20i 3m 10i 4 5 6 7 8 9 18
TECHNICAL DATA Technical data 124L Engine Cylinder volume, cu.in./cm3 Cylinder bore, inch/mm Stroke, inch/mm Idle speed, rpm Recommended max. speed, rpm Speed of output shaft, rpm Max. engine output, acc.
WARRANTY STATEMENT SECTION 1: LIMITED WARRANTY THESE PRODUCTS EXCEPT TO THE EXTENT PROHIBITED BY APPLICABLE LAW. ANY IMPLIED WARRANTY OR MERCHANTABILITY OR FITNESS FOR A PARTICULAR PURPOSE ON THESE PRODUCTS IS LIMITED IN DURATION TO THE WARRANTY PERIOD AS DEFINED IN THE LIMITED WARRANTY STATEMENT. HUSQVARNA RESERVES THE RIGHT TO CHANGE OR IMPROVE THE DESIGN OF THE PRODUCT WITHOUT NOTICE, AND DOES NOT ASSUME OBLIGATION TO UPDATE PREVIOUSLY MANUFACTURED PRODUCTS.
U.S. EPA / CALIFORNIA / ENVIRONMENT CANADA EMISSION CONTROL WARRANTY STATEMENT YOUR WARRANTY RIGHTS AND OBLIGATIONS: WARRANTY COMMENCEMENT DATE: The U.S. Environmental Protection Agency, California Air Resources Board, Environment Canada and HUSQVARNA are pleased to explain the emissions control system warranty on your year 2005 and later small off--road engine. In California, all small off--road engines must be designed, built, and equipped to meet the State’s stringent anti--smog standards.
U.S. EPA / CALIFORNIA / ENVIRONMENT CANADA EMISSION CONTROL WARRANTY STATEMENT MAINTENANCE, REPLACEMENT AND REPAIR OF EMISSION RELATED PARTS: EMISSION CONTROL WARRANTY PARTS LIST: Any HUSQVARNA approved replacement part used in the performance of any warranty maintenance or repair on emission related parts will be provided without charge to the owner if the part is under warranty.