SYMBOLERKLÄRUNG Symbole WARNUNG! Falsch oder nachlässig angewendete Freischneider, Motorsensen oder Trimmer sind gefährliche Geräte, die schwere Verletzungen oder tödliche Unfälle von Anwendern oder anderen Personen verursachen können. Es ist sehr wichtig, dass Sie den Inhalt dieser Bedienungsanweisung lesen und verstehen. Lesen Sie die Bedienungsanweisung sorgfältig durch und machen Sie sich mit dem Inhalt vertraut, bevor Sie das Gerät benutzen.
INHALT Inhalt SYMBOLERKLÄRUNG Symbole ............................................................... INHALT Inhalt ..................................................................... Vor dem Start ist Folgendes zu beachten: ............ EINLEITUNG Sehr geehr ter Kunde! ........................................... WAS IST WAS? Was ist was am Freischneider? ............................ ALLGEMEINE SICHERHEITSVORSCHRIFTEN Wichtig ..................................................................
EINLEITUNG Sehr geehrter Kunde! Herzlichen Glückwunsch zu Ihrem Kauf eines Husqvarna-Produkts!Husqvarnas Geschichte reicht bis ins Jahr 1689 zurück, als König Karl XI eine Fabrik an den Ufern des Flusses Huskvarna errichten ließ, in der Musketen gefertigt werden sollten.Die Lage am Huskvarna bot sich an, da der Fluss zur Erzeugung von Wasserkraft verwendet wurde und so als Wasserkraftwerk diente.
WAS IST WAS? 1 4 7 3 9 8 6 22 10 17 5 30 15 11 16 18 12 19 29 28 20 25 14 2 13 1 24 23 21 26 27 32 4 31 Was ist was am Freischneider? 1 Klinge (Nicht alle Märkte) 17 Kupplungsdeckel 2 Doppelzahniges Blatt (Nicht alle Märkte) 18 Gegenmutter 3 Einfüllöffnung für Schmiermittel, winkelgetriebe 19 Stützflansch 4 Winkelgetriebe 20 Stützkappe 5 Schutz für die Schneidausrüstung 21 Mitnehmer 6 Führungsrohr 22 Lenkerklemme 7 Starthebel/Stoppschalter 23 Bedienungsanweisung 8
ALLGEMEINE SICHERHEITSVORSCHRIFTEN Wichtig Persönliche Schutzausrüstung WICHTIG! WICHTIG! Das Gerät ist nur für das Trimmen von Gras konstruiert. Falsch oder nachlässig angewendete Freischneider, Motorsensen oder Trimmer sind gefährliche Geräte, die schwere Verletzungen oder tödliche Unfälle von Anwendern oder anderen Personen verursachen können. Es ist sehr wichtig, dass Sie den Inhalt dieser Bedienungsanweisung lesen und verstehen.
ALLGEMEINE SICHERHEITSVORSCHRIFTEN HANDSCHUHE Handschuhe sind dann zu tragen, wenn dies notwendig ist, z. B. bei der Montage der Schneidausrüstung. ! WARNUNG! Benutzen Sie nie ein Gerät mit defekter Sicherheitsausrüstung. Die Sicherheitsausrüstung des Gerätes muss so kontrolliert und gewartet werden, wie dies in diesem Abschnitt beschrieben wird. Wenn Ihr Gerät den Kontrollanforderungen nicht entspricht, muss eine Servicewerkstatt aufgesucht werden.
ALLGEMEINE SICHERHEITSVORSCHRIFTEN Kontrollieren, ob Gashebel und Gashebelsperre mit dem dazugehörigen Rückzugfedersystem leicht funktionieren. Schutz für die Schneidausrüstung Dieser Schutz soll verhindern, dass lose Gegenstände zum Anwender hochgeschleudert werden. Der Schutz verhindert auch, dass der Anwender mit der Schneidausrüstung in Berührung kommt. Siehe die Anweisungen unter der Überschrift Start. Gerät starten und Vollgas geben.
ALLGEMEINE SICHERHEITSVORSCHRIFTEN Die Antivibrationselemente regelmäßig auf Risse und Verformungen überprüfen. Schalldämpfer Der Schalldämpfer soll den Geräuschpegel so weit wie möglich senken und die Abgase des Motors vom Anwender fernhalten. Kontrollieren, ob die Vibrationsdämpfer unbeschädigt und fest verankert sind. ! WARNUNG! Personen mit Blutkreislaufstörungen, die zu oft Vibrationen ausgesetzt werden, laufen Gefahr, Schäden an den Blutgefäßen oder am Nervensystem davonzutragen.
ALLGEMEINE SICHERHEITSVORSCHRIFTEN Gegenmutter ! Bestimmte Schneidausrüstungen sind mit einer Gegenmutter gesichert. ! WARNUNG! Den Motor immer abstellen, bevor irgendwelche Arbeiten an der Schneidausrüstung ausgeführt werden. Diese rotiert noch weiter, nachdem der Gashebel losgelassen wurde. Kontrollieren, ob die Schneidausrüstung völlig stillsteht, und das Kabel von der Zündkerze abziehen, bevor mit der Arbeit an der Schneidausrüstung begonnen wird.
ALLGEMEINE SICHERHEITSVORSCHRIFTEN Die Schneidausrüstung auf Beschädigung und Risse kontrollieren. Beschädigte Schneidausrüstungen sind grundsätzlich auszutauschen. Trimmerkopf WICHTIG! Stets darauf achten, dass der Trimmerfaden fest und gleichmäßig auf die Rolle gewickelt wird, andernfalls entstehen im Gerät gesundheitsschädliche Vibrationen. • Nur die empfohlenen Trimmerköpfe und Fäden verwenden. Sie sind vom Hersteller für eine bestimmte Motorgröße getestet worden.
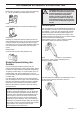
MONTAGE Hauptgehäuse anbringen kann dies zu einem gefährlichen Ungleichgewicht der Maschine führen. Motor (A) mit vier Schrauben (C) am Rohr (B) anschließen. A (A) Pfeilmarkierungen Beschleunigungskabel und Ein-/ Ausschalterdraht anschließen Montage von Lenkung und Gasgriff • • 1 Luftfilterdeckel entfernen. 2 Verbinden Sie das Starterkabel (A) mit dem Ende des Justierers (B).
MONTAGE berührt und die Kabelposition 1–2 mm Spiel zwischen der Kabelöse und der Schlitzschraube bei voll angezogenem Gashebel einhält. 10 Bringen Sie den Staubschutz (J) an. 1-2mm 7 Wenn das Starterkabel korrekt angebracht wurde, ziehen Sie die Verschlussmutter (F) und die M3Schraube (G) fest. 11 Luftfilterdeckel montieren. Montage von Klinge und Trimmerkopf ! 8 Stoppschalterdrähte (H) an die passenden Steckverbinder vom Motor anschließen. Die Kabelpolarität ist nicht wichtig.
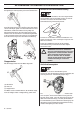
MONTAGE Montage der Schutzabdeckung • • ACHTUNG! Bei Verwendung von Trimmerkopf/ Kunststoffmessern und Kombischutz muss die Schutzabdeckung stets montiert sein. Bei Verwendung von Grasklinge und Kombischutz muss die Schutzabdeckung demontiert sein. Den Klingenschutz/Kombischutz (A) an seiner Halterung am Führungsrohr einhaken und mit einer Schraube fixieren. Die Schutzkappenführung in die Nut am Kombischutz einsetzen.
MONTAGE • • Den Sperrstift (C) in das Loch stecken, so dass die Achse fixiert ist. Den Trimmerkopf/die Kunststoffmesser (H) entgegen der Rotationsrichtung aufschrauben. H Schnellverschluss H • Standardgurt Vorn befindet sich ein leicht erreichbarer Schnellverschluss. Benutzen Sie diesen, wenn der Motor anfängt zu brennen, oder in einer anderen Notsituation, wenn Sie sich schnell von Tragegurt und Gerät befreien müssen. Die Demontage erfolgt in umgekehrter Reihenfolge.
UMGANG MIT KRAFTSTOFF Sicherer Umgang mit Kraftstoff Kraftstoff Das Gerät niemals starten, wenn: ACHTUNG! Das Gerät ist mit einem Zweitaktmotor ausgestattet und daher ausschließlich mit einer Mischung aus Benzin und Zweitaktmotoröl zu betreiben. Damit das Mischungsverhältnis richtig ist, muss die beizumischende Ölmenge unbedingt genau abgemessen werden. Wenn kleine Kraftstoffmengen gemischt werden, wirken sich auch kleine Abweichungen bei der Ölmenge stark auf das Mischungsverhältnis aus.
UMGANG MIT KRAFTSTOFF • Eine unzureichende Ölqualität oder ein zu fettes Öl/ Kraftstoff-Gemisch kann die Funktion des Katalysators beeinträchtigen und seine Lebensdauer reduzieren. • Mischungsverhältnis Tanken 1:50 (2 %) mit HUSQVARNA-Zweitaktöl. ! 1:33 (3 %) mit anderen Ölen für luftgekühlte Zweitaktmotoren der Klasse JASO FB/ISO EGB. Benzin, Liter WARNUNG! Folgende Vorsichtsmaßnahmen verringern die Feuergefahr: Beim Tanken nicht rauchen und jegliche Wärmequellen vom Kraftstoff fernhalten.
STARTEN UND STOPPEN Kontrolle vor dem Start • Das Gerät niemals ohne Schutz oder mit defektem Schutz benutzen. • Vor dem Start des Geräts müssen sämtliche Gehäuse korrekt montiert und in einwandfreiem Zustand sein. • Die Klinge auf Risse am Zahnansatz und um das Mittelloch herum kontrollieren. Die häufigste Ursache für Rissbildungen am Zahnansatz stellen beim Feilen entstandene scharfe Ecken oder die Anwendung der Klinge in stumpfem Zustand dar. Die Klinge austauschen, wenn sie Risse aufweist.
STARTEN UND STOPPEN Kraftstoffpumpe: Mehrmals auf die Gummiblase der Kraftstoffpumpe drücken, bis diese sich mit Kraftstoff zu füllen beginnt. Die Blase braucht nicht ganz gefüllt zu werden. elektrischen Schlägen führen, wenn die Zündkappe defekt ist. Stets Handschuhe tragen. Niemals eine Maschine mit defekter Zündkappe verwenden. Choke: Den Chokehebel in Choke-Lage führen. Stoppen Zum Abstellen des Motors die Zündung ausschalten.
ARBEITSTECHNIK Allgemeine Arbeitsvorschriften unvermittelt Ihren Standort wechseln. Beim Arbeiten auf abschüssigem Boden immer sehr vorsichtig sein. WICHTIG! Dieser Abschnitt behandelt grundlegende Sicherheitsregeln für die Arbeit mit Freischneider und Trimmer. Wenn Sie in eine Situation kommen, die Sie in Bezug auf die weitere Anwendung des Geräts verunsichert, lassen Sie sich von einem Experten beraten. Wenden Sie sich an Ihren Fachhändler oder Ihre Servicewerkstatt.
ARBEITSTECHNIK ! WARNUNG! Vorsicht bei weggeschleuderten Gegenständen.Stets einen zugelassenen Augenschutz tragen.Niemals über den Schutz der Schneidausrüstung beugen.Hochgeschleuderte Steine, Unrat usw. können die Augen treffen und Blindheit oder schwere Verletzungen verursachen. Grasfreischneiden mit Grasklinge • Grasklingen und Grasmesser dürfen nicht für verholzte Stämme verwendet werden. • Für alle Arten von hohem oder dichtem Gras wird die Klinge benutzt.
ARBEITSTECHNIK Grastrimmen mit Trimmerkopf Mähen • Ein Trimmer ist das optimale Gerät zum Mähen an Stellen, die mit einem gewöhnlichen Rasenmäher schwer zugänglich sind. Beim Mähen den Faden parallel zur Erde halten. Den Trimmerkopf nicht auf die Erde drücken, weil dadurch Rasen und Gerät beschädigt werden können. • Beim normalen Mähen sollte der Trimmerkopf nicht ständig den Boden berühren. Ständiger Kontakt kann zu erhöhtem Verschleiß oder zu Schäden am Trimmerkopf führen.
WARTUNG Vergaser Einstellung des Leerlaufs (T) Kontrollieren, ob der Luftfilter sauber ist. Wenn der Leerlauf korrekt eingestellt ist, darf die Schneidausrüstung nicht rotieren. Falls eine Einstellung notwendig ist, die T-Schraube (im Uhrzeigersinn) bei laufendem Motor schließen, bis die Schneidausrüstung zu rotieren beginnt. Dann die Schraube (gegen den Uhrzeigersinn) öffnen, bis die Schneidausrüstung stehen bleibt.
WARTUNG Luftfilter Winkelgetriebe Luftfilter regelmäßig von Staub und Schmutz reinigen, zur Vermeidung von: Das Winkelgetriebe ist ab Werk mit der richtigen Menge Fett gefüllt. Bevor das Gerät in Betrieb genommen wird, sollte jedoch kontrolliert werden, ob das Getriebe zu 3/4 mit Fett gefüllt ist. HUSQVARNA Spezialfett verwenden. • Vergaserstörungen • Startschwierigkeiten • Leistungsminderung • Unnötigem Verschleiß der Motorteile. • Unnormal hohem Kraftstoffverbrauch.
WARTUNG Wartungsschema Nachstehend sind die an der Maschine vorzunehmenden Wartungsmaßnahmen aufgelistet.Die meisten der Punkte werden im Abschnitt ”Wartung” beschrieben. Der Bediener darf nur die Wartungs- und Servicearbeiten ausführen, die in dieser Bedienungsanleitung beschrieben sind.Größere Eingriffe sind von einer autorisierten Servicewerkstatt auszuführen. Wartung Tägliche Wartung Das Gerät äußerlich reinigen. X Den Tragegurt auf Beschädigungen überprüfen.
TECHNISCHE DATEN Technische Daten Technische Daten 143R-II Motor Hubraum, cm3 41,5 Bohrung, mm 40 Hublänge, mm 33 Leerlaufdrehzahl, U/min 2500 Empfohlene max.
TECHNISCHE DATEN Zugelassenes Zubehör Typ Schutz für die Schneidausrüstung, Teile-Nr.
EXPLICATION DES SYMBOLES Symboles AVERTISSEMENT! Utilisés de manière négligente ou erronée, les débroussailleuses et les coupeherbes peuvent devenir des outils dangereux pouvant occasionner des blessures graves, voire mortelles pour l’utilisateur ou d’autres. Il est très important de lire attentivement et de bien comprendre les instructions contenues dans ce mode d’emploi. Toujours porter des gants de protection homologués.
SOMMAIRE Sommaire EXPLICATION DES SYMBOLES Symboles .............................................................. SOMMAIRE Sommaire ............................................................. Contrôler les points suivants avant la mise en marche: ................................................................. INTRODUCTION Cher client, ........................................................... QUELS SONT LES COMPOSANTS? Quels sont les composants de la débroussailleuse? .................................
INTRODUCTION Cher client, Félicitations pour ce choix d’un produit Husqvarna. Husqvarna a vu le jour en 1689 lorsque le roi Karl XI décida de construire un arsenal pour la fabrication des mousquets au bord de la rivière Huskvarna. Le choix de l’emplacement était logique puisque la rivière Huskvarna servait à produire de l’énergie hydraulique et constituait donc une sorte de centrale hydraulique.
QUELS SONT LES COMPOSANTS? 1 4 7 3 9 8 6 22 10 17 5 30 15 11 16 18 12 19 29 28 20 25 14 2 13 1 24 23 21 26 27 32 4 31 Quels sont les composants de la débroussailleuse? 1 Lame (Pas tous les marchés) 17 Carter d’embrayage 2 Lame à 2 dents (Pas tous les marchés) 18 Contre-écrou 3 Ravitaillement en lubrifiant, renvoi d’angle 19 Bride de support 4 Renvoi d’angle 20 Bol de garde au sol 5 Protection pour l’équipement de coupe 21 Toc d’entraînement 6 Tube de transmission 22 Br
INSTRUCTIONS GÉNÉRALES DE SÉCURITÉ Important! IMPORTANT! La machine est conçue uniquement pour le désherbage. Les seuls accessoires pouvant utiliser le moteur comme source motrice sont les équipements de coupe que nous recommandons au chapitre Caractéristiques techniques. Éviter d’utiliser la machine en cas de fatigue, d’absorption d’alcool ou de prise de médicaments susceptibles d’affecter l’acuité visuelle, le jugement ou la maîtrise du corps. Utiliser les équipements de protection personnelle.
INSTRUCTIONS GÉNÉRALES DE SÉCURITÉ GANTS Au besoin, utiliser des gants, notamment lors du montage de l’équipement de coupe. BOTTES Utiliser des bottes avec coquille en acier et semelle antidérapante HABITS Porter des vêtements fabriqués dans un matériau résistant à la déchirure, éviter les vêtements excessivement amples qui risqueraient de se prendre dans les broussailles et les branches. Toujours utiliser des pantalons longs et robustes.
INSTRUCTIONS GÉNÉRALES DE SÉCURITÉ Vérifier que le blocage de l’accélération, la commande d’accélération et leurs ressorts de rappel fonctionnent correctement. Protection pour l’équipement de coupe Cette protection a pour but d’empêcher que des objets ne soient projetés en direction de l’utilisateur. La protection prévient aussi le contact entre l’utilisateur et l’équipement de coupe. Voir le chapitre Démarrage. Démarrer la machine et donner les pleins gaz.
INSTRUCTIONS GÉNÉRALES DE SÉCURITÉ Vérifier régulièrement l’état des éléments afin de détecter fissures et déformations. Silencieux Le silencieux est conçu pour réduire au maximum le niveau sonore et détourner les gaz d’échappement loin de l’utilisateur. Vérifier que les éléments anti-vibrations sont entiers et solidement fixés. ! AVERTISSEMENT! Une exposition excessive aux vibrations peut entraîner des troubles circulatoires ou nerveux chez les personnes sujettes à des troubles cardio-vasculaires.
INSTRUCTIONS GÉNÉRALES DE SÉCURITÉ Contre-écrou ! Un contre-écrou est utilisé pour la fixation de certains types d’équipements de coupe. ! AVERTISSEMENT! Toujours arrêter le moteur avant d’entamer des travaux sur l’équipement de coupe. Celui-ci continue de tourner après qu’on a relâché l’accélérateur. S’assurer que l’équipement de coupe est complètement immobilisé et débrancher le câble de la bougie d’allumage avant de commencer l’intervention sur l’équipement de coupe.
INSTRUCTIONS GÉNÉRALES DE SÉCURITÉ Inspecter l’équipement de coupe afin de détecter d’éventuels dommages ou fissures. Toujours remplacer un équipement de coupe endommagé. Tête de désherbage IMPORTANT! Veiller à ce que le fil du coupe-herbe soit toujours enroulé de manière serrée et régulière autour du tambour, autrement la machine produit des vibrations dangereuses pour la santé. • N’utiliser que les têtes de désherbage et les fils recommandés.
MONTAGE Mise en place du corps principal zone, cela peut engendrer un déséquilibre de la machine pouvant s'avérer dangereux. Connecter le moteur (A) au tube (B) à l’aide de quatre vis (C). A (A) Flèches Connexion du câble de l’accélérateur et des fils du bouton d’arrêt Montage du guidon et de la poignée d'accélération • • 1 Retirer le couvercle du filtre à air. 2 Insérer le câble de commande des gaz (A) à l'extrémité du dispositif de réglage (B).
MONTAGE 6 Régler le manchon du dispositif de réglage du câble afin que la butée sur la came de la commande des gaz du carburateur soit juste en contact avec la butée de la commande des gaz et afin que la position du câble conserve un jeu de 1-2 mm entre la cosse de câble et la fixation fendue quand la gâchette d’accélération est complètement enfoncée. 10 Monter le capot de protection (J). 1-2mm 7 Une fois le câble de commande des gaz correctement placé, serrer le contre-écrou (F) et la vis M3 (G).
MONTAGE Montage du bouclier de protection REMARQUE! Le bouclier de protection doit toujours être en place lors d’utilisation de la tête de désherbage/des couteaux en plastique et de la protection combinée. Lorsque une lame à herbe et la protection combinée sont utilisées, le bouclier de protection doit toujours être déposé. Emboîter le protège-lame/la protection combinée (A) dans la fixation du tube de transmission et fixer à l’aide d’une vis.
MONTAGE • • Insérer la goupille d’arrêt (C) dans le trou afin de bloquer l’axe. Visser la tête de désherbage/les couteaux en plastique (H) dans le sens contraire de la rotation. H Libération rapide H • Harnais standard Sur le devant du harnais se trouve une plaque pectorale à libération rapide constituant une bonne sécurité au cas où le moteur prendrait feu ou dans l’éventualité d’une situation nécessitant de rapidement se libérer de la machine et du harnais.
MANIPULATION DU CARBURANT Sécurité carburant erreurs au niveau de la quantité d’huile affectent sérieusement le rapport de mélange. Ne jamais démarrer la machine: 1 Si du carburant a été renversé. Essuyer soigneusement toute trace et laisser les restes d’essence s’évaporer. 2 Si vous avez renversé du carburant sur vous ou sur vos vêtements, changez de vêtements. Lavez les parties du corps qui ont été en contact avec le carburant. Utilisez de l’eau et du savon. 3 S’il y a fuite de carburant.
MANIPULATION DU CARBURANT • Remplissage de carburant Rapport de mélange 1:50 (2%) avec huile deux temps HUSQVARNA. 1:33 (3%) avec d’autres huiles conçues pour des moteurs deux temps à refroidissement par air classés pour JASO FB/ISO EGB. Essence, litres Huile deux temps, litres 2% (1:50) 3% (1:33) 5 0,10 0,15 10 0,20 0,30 15 0,30 0,45 20 0,40 0,60 ! Ne jamais fumer ni placer d’objet chaud à proximité du carburant. Ne jamais faire le plein, moteur en marche.
DÉMARRAGE ET ARRÊT Contrôles avant la mise en marche • Ne jamais utiliser la machine sans protection ou avec une protection défectueuse. • Tous les carters doivent être correctement montés et sans défaut avant le démarrage de la machine. • Contrôler la lame afin de détecter d’éventuelles fissures au niveau des dents et du trou central. Les raisons les plus fréquentes de la présence de fissures sont la formation de coins pointus lors de l’affûtage et l’utilisation d’une lame aux dents émoussées.
DÉMARRAGE ET ARRÊT Pompe à carburant: Appuyer sur la poche en caoutchouc de la pompe à carburant plusieurs fois jusqu’à ce que le carburant commence à remplir la poche. Il n’est pas nécessaire de remplir la poche complètement. REMARQUE! Ne pas placer aucune partie du corps sur la surface marqué. Contact peut causer en brûlures à la peau ou les chocs électriques si le chapeau de bougie est defecteux. Toujours utiliser des gants. Ne jamais utiliser une machine dont le chapeau de bougie est defecteux.
TECHNIQUES DE TRAVAIL Méthodes de travail fondrières, etc. Observer la plus grande prudence lors de travail sur des terrains en pente. IMPORTANT! Ce chapitre traite des consignes de sécurité de base lors du travail avec une débroussailleuse ou un coupeherbe. Dans l’éventualité d’une situation rendant la suite du travail incertaine, consulter un expert. S’adresser au revendeur ou à l’atelier de réparation. Évitez les tâches pour lesquelles vous ne vous sentez pas suffisamment qualifié.
TECHNIQUES DE TRAVAIL ! AVERTISSEMENT! Attention aux objets projetés. Toujours utiliser des protections homologuées pour les yeux. Ne jamais se pencher au-dessus de la protection de l'équipement de coupe. Des cailloux, débris, etc. peuvent être projetés dans les yeux et causer des blessures très graves, voire la cécité. Débroussaillage avec une lame à herbe • Ne pas utiliser les lames et les couteaux à herbe pour les tiges ligneuses.
TECHNIQUES DE TRAVAIL Désherbage avec tête de désherbage Coupe • Le coupe-herbe est idéal pour atteindre l’herbe aux endroits difficilement accessibles avec une tondeuse ordinaire. Maintenir le fil parallèlement au sol lors du désherbage. Éviter de presser la tête de désherbage contre le sol, puisque cela risque d’endommager la pelouse et le matériel. • Éviter de maintenir la tête de désherbage constamment au contact avec le sol en utilisation normale.
ENTRETIEN Carburateur Réglage du ralenti (T) Vérifier que le filtre à air est propre. Quand le ralenti est correctement réglé, l’équipement de coupe ne tourne pas. Si un réglage est nécessaire, fermer (sens des aiguilles d’une montre) le pointeau T avec le moteur en marche jusqu’à ce que l’équipement de coupe commence à tourner. Ouvrir (sens contraire des aiguilles d’une montre) le pointeau jusqu’à l’arrêt de l’équipement de coupe.
ENTRETIEN Filtre à air Renvoi d’angle Le filtre à air doit être maintenu propre pour éviter: Le renvoi d’angle est enduit en usine de la quantité de graisse nécessaire. Toutefois, avant d’utiliser la machine, il convient de s’assurer que le renvoi d’angle est au 3/4 rempli de graisse. Utiliser une graisse HUSQVARNA spéciale. • Un mauvais fonctionnement du carburateur • Des problèmes de démarrage • Une perte de puissance • Une usure prématurée des éléments du moteur.
ENTRETIEN Schéma d’entretien La liste ci-dessous indique l’entretien à effectuer sur la machine. La plupart des points sont décrits à la section Entretien. L’utilisateur ne peut effectuer que les travaux d’entretien et de révision décrits dans ce manuel d’utilisation. Les mesures plus importantes doivent être effectuées dans un atelier d’entretien agréé. Entretien Entretien quotidien Nettoyer l’extérieur de la machine. X Vérifier que le harnais est intact.
CARACTÉRISTIQUES TECHNIQUES Caractéristiques techniques Caractéristiques techniques 143R-II Moteur Cylindrée, cm3 41,5 Alésage, mm 40 Course, mm 33 Régime de ralenti, tr/min 2500 Régime d'emballement maximal recommandé, tr/min 12000 Régime de l’axe sortant, tr/min 9270 Puissance moteur maxi selon ISO 8893, kW/ tr/min 1,47/7500 Système d’allumage Fabricant/type de système d’allumage Ikeda Denso Bougie NGK BPMR 7A Écartement des électrodes, mm 0,6-0,7 Système de graissage/de carburant Fa
CARACTÉRISTIQUES TECHNIQUES Accessoires homologués Type Protection pour équipement de coupe, réf.
VERKLARING VAN DE SYMBOLEN Symbolen WAARSCHUWING! Een motorzeis, bosmaaier of trimmer kan bij onjuist of slordig gebruik een gevaarlijk gereedschap zijn, dat ernstig letsel of het overlijden van de gebruiker of anderen kan veroorzaken. Het is van het grootste belang dat u de inhoud van deze gebruiksaanwijzing doorleest en begrijpt. Gebruik altijd goedgekeurde veiligheidshandschoenen. Gebruik stevige antisliplaarzen.
INHOUD Inhoud VERKLARING VAN DE SYMBOLEN Symbolen ............................................................. INHOUD Inhoud .................................................................. Voor het starten moet u rekening houden met de volgende punten: .................................................. INLEIDING Beste klant! ........................................................... WAT IS WAT? Wat is wat op de motorzeis? ................................ ALGEMENE VEILIGHEIDSINSTRUCTIES Belangrijk .....
INLEIDING Beste klant! Gefeliciteerd met de aankoop van een Husqvarna-product! Husqvarna heeft een geschiedenis die terugvoert tot 1689 toen koning Karl XI aan het strand van het riviertje Huskvarna een fabriek liet bouwen voor de productie van musketten. De locatie aan de Huskvarna was logisch omdat het riviertje werd gebruikt om waterkracht op te wekken en op die manier een waterkrachtcentrale vormde.
WAT IS WAT? 1 4 7 3 9 8 6 22 10 17 5 30 15 11 16 18 12 19 29 28 20 25 14 2 13 1 24 23 21 26 27 32 4 31 Wat is wat op de motorzeis? 1 Blad (Niet alle markten) 17 Koppelingdeksel 2 Blad met 2 tanden (Niet alle markten) 18 Borgmoer 3 Bijvulopening smeermiddel, hoekoverbrenging 19 Steunflens 4 Hoekoverbrenging 20 Steunkop 5 Beschermkap voor snijuitrusting 21 Meenemer 6 Steel 22 Stuurklem 7 Startgas-/stopschakelaar 23 Gebruiksaanwijzing 8 Gashendel 24 Transportbescher
ALGEMENE VEILIGHEIDSINSTRUCTIES Belangrijk Persoonlijke veiligheidsuitrusting BELANGRIJK! BELANGRIJK! De machine is uitsluitend bedoeld voor het maaien van gras. Een motorzeis, bosmaaier of trimmer kan bij onjuist of slordig gebruik een gevaarlijk gereedschap zijn, dat ernstig letsel of het overlijden van de gebruiker of anderen kan veroorzaken. Het is van het grootste belang dat u de inhoud van deze gebruiksaanwijzing doorleest en begrijpt.
ALGEMENE VEILIGHEIDSINSTRUCTIES LAARZEN Gebruik laarzen met stalen neus en anti-slip zool. ! WAARSCHUWING! Gebruik de machine nooit wanneer de veiligheidsuitrusting defect is. De veiligheidsuitrusting van de machine moet gecontrolleerd en onderhouden worden zoals beschreven in dit hofdstuk. Als uw machine niet door alle controles komt, moet u ermee naar uw servicewerkplaats voor reparatie.
ALGEMENE VEILIGHEIDSINSTRUCTIES Controleer of de gashendel en de gashendelvergrendeling vlot lopen en of hun terugspringveersystemen werken. Beschermkap voor snijuitrusting Deze beschermkap voorkomt dat losse voorwerpen in de richting van de gebruiker worden geslingerd. De beschermkap voorkomt tevens dat de gebruiker in aanraking komt met de snijuitrusting. Zie instructies in het hoofdstuk Start. Start de machine en geef vol gas.
ALGEMENE VEILIGHEIDSINSTRUCTIES Controleer het trillingdempingselement regelmatig op materiaalbarsten en vervormingen. Geluiddemper De geluiddemper werd ontworpen om het geluidsniveau zo laag mogelijk te houden, en om de uitlaatgassen weg te richten van de gebruiker. Controleer of de trillingdempingselementen heel zijn en goed vast zitten.
ALGEMENE VEILIGHEIDSINSTRUCTIES Borgmoer ! Voor een bepaald type snijuitrusting worden borgmoeren gebruikt bij het vastzetten. ! WAARSCHUWING! Schakel altijd de motor uit voor u aan de snijuitrusting begint te werken. De snijuitrusting blijft roteren nadat u de gashendel heeft losgelaten. Controleer of de snijuitrusting volledig stilstaat en demonteer de kabel van de bougie voor u aan de snijuitrusting begint te werken.
ALGEMENE VEILIGHEIDSINSTRUCTIES Controleer de snijuitrusting op beschadigingen en barsten. Een beschadigde snijuitrusting moet altijd vervangen worden. Trimmerkop BELANGRIJK! Denk er altijd om dat de trimmerdraad stevig en gelijkmatig rond de trommel wordt gewikkeld, anders ontstaan er schadelijke trillingen in de machine. • Gebruik uitsluitend de door ons aanbevolen trimmerkoppen en trimmerdraden. Ze zijn door de producent getest om bij een bepaalde motorgrootte te passen.
MONTEREN De machine in elkaar zetten pijlstickers. Als ze zich buiten dit gebied bevinden, kan de machine uit evenwicht raken, een gevaarlijke situatie. Sluit de motor (A) op de buis (B) aan met vier schroeven (C). A (A) Pijlstickers De gaskabel en de kabels voor de stopschakelaar aansluiten Monteren van stuur en gashandgreep • • 1 Verwijder het luchtfilterdeksel. 2 Steek de gaskabel (A) in het uiteinde van de versteller (B).
MONTEREN net raakt. Zorg ervoor dat er een speling van 1-2 mm is tussen de kabelschoen en de sleufaansluiting wanneer de smoorklepschakelaar volledig is ingedrukt. 10 Breng de stofkap (J) aan. 1-2mm 7 Wanneer de gaskabel juist is afgesteld draait u de borgmoer (F) en de M3-schroef (G) aan. 11 Monteer het luchtfilterdeksel. Montage van blad en trimmerkop ! 8 Steek de stopknopdraden (H) in de daarvoor bestemde aansluitingen van de motor. De polariteit van de draden heeft geen belang.
MONTEREN Bescherming monteren • • N.B.! Bij gebruik van trimmerkop/kunststof messen en combibeschermkap, moet de bescherming altijd gemonteerd zijn. Als grasmaaiblad en combibeschermkap worden gebruikt, moet de bescherming zijn gedemonteerd. • • • De bladbeschermkap/combibeschermkap (A) wordt vastgehaakt in de bevestiging op de steel en met een schroef vastgezet. Plaats de beschermingsgeleider in de gleuf op de combibeschermkap.
MONTEREN • Duw de borgpin (C) in de opening zodat de as vergrendeld wordt. • Schroef de trimmerkop/kunststof messen (H) tegen de rotatierichting in op zijn plaats. H Snelontgrendeling H • Standaard draagstel Vooraan zit een makkelijk bereikbare snelontgrendeling. Gebruik die als de motor vlam vat of in een andere noodsituatie, wanneer u zich snel van draagstel en machine moet kunnen ontdoen. Ga voor het demonteren in omgekeerde volgorde tewerk.
BRANDSTOFHANTERING Brandstofveiligheid oliehoeveelheid een grote invloed op de mengverhouding. Start de machine nooit: 1 Als u er brandstof op gemorst heeft. Neem alle gemorste brandstof af en laat de benzineresten verdampen. 2 Als u brandstof op uzelf of op uw kleding gemorst heeft, trek schone kleding aan. Was de lichaamsdelen die in contact zijn geweest met brandstof. Gebruik water en zeep. 3 Als de machine brandstof lekt. Controleer de tankdop en de brandstofleidingen regelmatig op lekkage.
BRANDSTOFHANTERING • Tanken Mengverhouding 1:50 (2%) met HUSQVARNA tweetaktolie. 1:33 (3%) met andere olie, gemaakt voor luchtgekoelede tweetaktmotoren, geklassificeerd voor JASO FB/ISO EGB. Benzine, liter Tweetaktolie, liter ! 2% (1:50) 3% (1:33) 5 0,10 0,15 10 0,20 0,30 Rook niet of plaats geen warme voorwerpen in de buurt van de brandstof. 15 0,30 0,45 Tank nooit terwijl de motor draait. 20 0,40 0,60 Stop de motor en laat hem voor het tanken enkele minuten afkoelen.
STARTEN EN STOPPEN Controle voor het starten • Gebruik de machine nooit zonder beschermkap of een defecte beschermkap. • Alle kappen moeten juist gemonteerd zijn en zonder gebreken voor de machine wordt gestart. • Controleer het blad op barsten bij het centergat en bij de tandbodems. De barsten ontstaan meestal doordat er tijdens het vijlen scherpe hoeken ontstaan zijn in de tandbodems of doordat men het blad gebruikt heeft met botte tanden.
STARTEN EN STOPPEN Brandstofpomp: Druk een aantal malen op de rubberen balg van de brandstofpomp totdat er brandstof in de balg komt. De balg hoeft niet helemaal gevuld te worden. aan de huid of een elektrische schok wanneer het ontstekingsmechanisme kapot is. Gebruik altijd handschoenen. Gebruik nooit een machine met een kapot ontstekingsmechanisme. Choke: Zet de choke-hendel in de choke-positie. Stoppen (1) Chokehendel Stop de motor door de ontsteking af te zetten.
ARBEIDSTECHNIEK Algemene werkinstructies stenen, takken, kuilen, greppels enz.). Wees extra voorzichtig wanneer u op hellend terrein werkt. BELANGRIJK! In dit hoofdstuk nemen we de basisveiligheidsregels voor het werken met een motorzeis en trimmer door. Wanneer u in een situatie belandt waarin u niet goed weet hoe u verder te werk moet gaan, moet u een expert raadplegen. Wend u tot uw dealer of uw servicewerkplaats. Gebruik de machine nooit voor taken waarvoor u niet voldoende gekwalificeerd bent.
ARBEIDSTECHNIEK ! WAARSCHUWING! Waarschuwing voor weggeslingerde voorwerpen. Gebruik altijd goedgekeurde oogbescherming. Buig nooit over de beschermkap van de snijuitrusting heen. Stenen, vuil e.d. kunnen omhoog geworpen worden in uw ogen en blindheid of ernstig letsel veroorzaken. Houd onbevoegden op afstand. Kinderen, dieren, toeschouwers en medewerkers moeten zich buiten de veiligheidszone van 15 m bevinden. Schakel de machine onmiddellijk uit indien iemand dichterbij komt.
ARBEIDSTECHNIEK Schoonschrapen • Met de schraaptechniek kan men alle ongewenste begroeiing verwijderen. Hou de trimmerkop vlak boven de grond en een ietsje scheef. Laat het uiteinde van de draad tegen de grond slaan naast bomen, palen, standbeelden e.d. N.B.! Deze techniek veroorzaakt grotere slijtage van de draad. • De draad verslijt vlugger en moet vaker aangevoerd worden wanneer men tegen stenen, bakstenen, beton, metalen omheiningen enz.
ONDERHOUD Carburateur Afstellen van stationairtoerental (T) Controleer of het luchtfilter schoon is. Als het stationair lopen correct is ingesteld, mag de snijuitrusting niet draaien. Als er afstelling nodig is, moet de T-schroef met draaiende motor worden dichtgedraaid (met de klok mee) totdat de snijuitrusting begint te draaien. Draai de schroef open (tegen de klok in) totdat de snijuitrusting stopt.
ONDERHOUD Luchtfilter Hoekoverbrenging Het luchtfilter dient regelmatig te worden schoongemaakt (stof en vuil verwijderen) om de volgende problemen te vermijden: De hoekoverbrenging is af fabriek gevuld met een geschikte hoeveelheid vet. Voor u de machine in gebruik neemt, moet u controleren of de overbrenging voor 3/4 gevuld is met vet. Gebruik HUSQVARNA speciaalvet. • Storingen van de carburateur • Moeilijkheden bij het starten • Vermogensverlies • Onnodige slijtage van de motoronderdelen.
ONDERHOUD Onderhoudsschema Hieronder volgt een lijst van het onderhoud dat aan de machine moet worden uitgevoerd. De meeste punten staan beschreven in het hoofdstuk Onderhoud. De gebruiker mag alleen die onderhouds- en servicewerkzaamheden uitvoeren die in deze gebruiksaanwijzing worden beschreven. Meer ingrijpende maatregelen moeten door een erkende servicewerkplaats worden uitgevoerd. Onderhoud Dagelijks onderhoud Maak de machine uitwendig schoon. X Controleer of het draagstel niet beschadigd is.
TECHNISCHE GEGEVENS Technische gegevens Technische gegevens 143R-II Motor Cilinderinhoud, cm3 41,5 Cilinderdiameter, mm 40 Slaglengte, mm 33 Stationair toerental, t/min 2500 Aanbevolen max. overtoeren, t/min 12000 Toerental van uitgaan as, tpm 9270 Max. motorvermogen volgens ISO 8893, kW/ omw./min.
TECHNISCHE GEGEVENS Goedgekeurde accessoires Type Beschermkap voor de snijuitrusting, Artikelnr.
S35 2 3 2,4-2,7 mm .095-.
S35 3 2 2,4-2,7 mm .095-.
T35, T35x 2 3 2,4-2,7 mm .095-.
T45, T45x 2 3 2,7-3,3 mm .106-.
T55x 1 2 A 3 B C A 2,7 - 4,0 mm / .105 - .160" B 8 m / 26’ C 15 cm / 5.
Trimmy SII 1 2,4-3,3 mm .095"-.