
Use and Care Guide


SERVICING INSTRUCTIONS CONTINUED
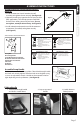
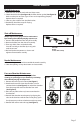
7. Pull upward to slide piston rod out of pump. (See Figure 7)
8. While holding onto the pump, use an adjustable wrench to unthread pump nut from pump.
Remove nut, hose and barb assembly. (See Figure 8)
9. Inspect (2) o-rings on barb assembly. If damaged, replace hose assembly. (See Figure 9)
Figure 9
Figure 8
Figure 7
page 7
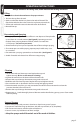
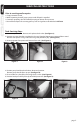
Figure 10
Figure 11
Figure 12
10. Remove pump out of tank. Remove and replace gasket. (See Figure 10)
11. Slide piston rod assembly down and out of grommet and remove from tank. (See Figure 11)
12. Carefully remove and replace o-ring from piston. Lubricate o-ring with petroleum jelly. (See Figure 12)
Figure 13
Figure 14
Figure 15
13. Remove grommet from tank using pliers to grasp the head of the grommet while exing the
grommet out of the hole in the tank. Press or tap new grommet into tank. Lubricate
hole in grommet with petroleum jelly. (See Figure 13)
14. Insert piston rod assembly into tank and through grommet. (See Figure 14)
15. Reassemble pump with gasket into tank. (See Figure 15) for correct orientation. Tighten pump nut
securely with adjustable wrench while holding pump to maintain correct orientation. Push
piston assembly into pump.