
Use and Care Guide


Page 4
OPERATING INSTRUCTIONS
Filling
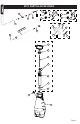
IMPORTANT: Always make sure the pressure is
released from the tank before lling or servicing.
1. Pull up on the knob of the pressure release
valve until all the pressure is released from the
tank. (See Figure E.)
2. Turn the pump handle counterclockwise to remove
the pump (See Figure F).
3. Fill the tank to the desired level. See ll markings
on side of tank. (Always refer to chemical
manufacturer for proper mixture).
4. Install the pump into the tank opening and turn
clockwise until tightly sealed against the tank
(See Figure G).
Figure G
Figure F
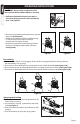
Pressurizing
1. Make sure shut-o lock is not engaged. (If shut-o lock is engaged while pressurizing, the unit
will immediately start spraying).
2. Push down on the handle and turn counterclockwise to unlock the handle (See Figure H-1H).
3. Pressurize the sprayer by pumping the handle in a smooth up and down motion (See Figure H-2H).
4. Push down on the handle and turn clockwise to lock the handle into the pump (See Figure H-3H).
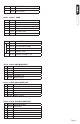
Spraying and Locking
1. Direct nozzle away from you and squeeze shut-o
lever to begin spraying.
2. For continuous spraying, squeeze lever and rotate
lock (See Figure J).
3. Unlock if needed and release shut-o lever to stop
spraying.
4. Turn the nozzle tip to adjust the spray pattern.
Figure J
LEVER
Figure H
Figure E
1H
2H
3H