Operator’s Manual Model: 23 Compact Safety Rules l Assembly 0 Operation l Care and Maintenance l WARNING: Read and follow all Safety Rules and Operating Instructions before first use of this product. Failure to do so can result in serious injury. Husqvarna Forest & Garden Co.
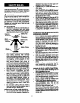
standers may resutt. A chain saw is intended for two-handed use.. ~o~;$~nly in a well-venMated out- A Do not operate from a ladder or in a tree, unless you are specifically trained. Make sure the chain will not make contact with any object while starting the engine. Never try to start the saw when theguide barisinacut Do not put pressure on the saw at the end of the cut Applying pressure can cause you to lose control when the cut is completed. Stop engine before setting saw down.
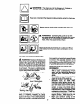
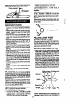
WARNING: m IS c h ain saw can be dangerous! Careless or improper use can cause serious or even fatal injury. Read and understand the Operator’s Manual before using the chain saw. rnBl Always use two hands when operating the chain saw. WARNING: Contacting the guide bar tip with any object should be avoided; tip contact may cause the uide bar to move suddenly upward and backwar 3 , which may cause serious injury.
KJCKBACK SAFETY FEATURES speed, there is greater chance of kickback occurring. l Use extreme caution when reentering a cut. l Do not attempt cuts starting with the tip of the bar (plunge cuts). l Watch for shifting logs or other forces that could close a cut and pinch or fall into chain. l Use the specified Reduced- Kickback Guide Bar and Low-Kickback Chain. Avoid Pinch-Kickback: l Be extremely aware of situations or ob structions that can cause material to pinch the top of or otherwise stop the chain.
kickback your bar and chain combinations will have when tested in accordance with CSA and ANSI standards. When purchasing replacement bar and chain, considerations should be given to the lower CKAvalues. Lower CKA values represent safer angles to the user, higher values indicate more angle and higher kick energies. Computed angles represented in the non-activated column indicate total energy and angle associated without activation of the chain brake during kickback.
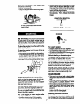
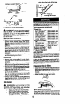
. Turn the adjusting screw to move adjusting pin to the back. Further adjustment may be necessary as you mount the bar. Mount the bar as illustrated. Slide the bar toward the back. Use the illustration of the chain to determine the proper direction. Place the chain onto the sprocket located behind the clutch drum. Start at the top of the bar and fit chain into roove around the guide bar. Bull the bar foward until the chain is snug in the groove of the bar.
from heat and friction, and resists high temperature thinning. l Never use waste oil. l Stop the engine before removing caps. l l l Pull the starter rope quickly with your right hand unbil the en ine attempts to start, then push the cho f e to the Off position. Pullthestarterropequicklywithyourright hand until the engine starts. Allow the engine to run for approximately five seconds. Then, release the throttle trigger.
Weight and branches on one side. Surrounding trees and obstacles. Lookfordecayand rot. !f the trunk is rotted, it can snap and fall toward the chain moves have chain brake repaired by Authorized Service Dealer before use. Disengaged l l % m Operator Make sure there is enough room for the tree to fall.
Hinge holds tree on stump and helps control fall Turn saw OFF and use a plastic or wooden wedge to force cut open. Overcutting begins on the top side of the log with the saw a ainstthe log. When overcutting use light 8 ownward pressure. Closing 0 notch control the direction of fall. Use wood or plastic wedges, but never steel or iron, to avoid kickback and chain damage. l Be alert to signs that the tree is ready to fall: cracking sounds, widening ofthefelling cut, or movement in the upper branches.
Using a support stand, collar from the trunk of the tree. 2nd cut Pruning technique We recommend all service and adjustments not listed in this manual be performed by an Authorized Service Dealer. LIMBING AND PRUNING MAINTENANCE A Check For: Fuel Mixture Level Bar Lubrication . . . Chain Tension . . . . Chain Sharpness . Es;g;$artsI. . WARNING: Never climb into atree to limb or prune.
ia~s~u te your chain and make cutting 9 Replace your bar if bent or the inside rails of the bar are worn. l Clean the oil holes and bar groove after each 5 hours of operation l Remove sawdustfrom bar groove periodically with a wife or putty knife. CARBURETOR ADJUSTMENTS Carburetor adjustment is critical and if done improperly can permanently damage your unit We recommend ou contact anAuthorized Service Dealer Yor ad’ustrnents. IDLE SPEED ADJUSTME &r. .. Turn the Idle Speed Screw clockwise until rt stops.
HUSQVARNA FOREST & GARDEN CO. WARRANTY STATEMENT Effective02iS5 SECTION 1: LIMITED WARRAW Husqvama Forest 8 Garden Company (‘HusqvamaT warrants Husqvama product to the original purchaser to be free from defective material and workmanship from the date of purchase for the “Warranty Periti of the product as set forth below: Lifetime Warranty: All tiller tines, trimmer shafts, ignition coils and modules on hand held product.
IMPLIED WARRANTY ON THESE PRODUCTS EXCEPT TO THE EXTENT PROHIBITED BY APPLICABLE LAW. ANY IMPLIED WARRANTYOF MERCHANTABlLi-fYOR FITNESS FOR A PARTICULAR PURPOSE ON THESE PRODUCTS IS LIMITED IN DURATION TO THE WARRANTY PERIOD AS DEFINED IN THE LIMITED WARRANTY STATEMENT. HUSQVARNA RESERVES THE RIGHTTO CHANGE OR IMPROVE THE DESIGN OFTHE PRODUCT WITHOUT NOTICE, AND DOES NOT ASSUME OBLIGATION TO UPDATE PREVIOUSLY MANUFACTURED PRODUCTS.
FOR CALIFORNIA SEEKING RESIDENTS SERVICE ONLY WHEN IN CALIFORNIA CALIF’ORNIA EMISSION CONTROL WARRANTY STATEMENT YOUR Wm RIGHTS AND OBLIGATIONS The California Air Resources Board and@ Husqvarna Forest & Garden AB are pleased to explain the emissions control system warranty on your 1995 lawn and garden equipment engine. In California, new utility and lawn and garden equipment engines must be designed, built, and equipped to meet the State’s stringent anti-smog standards.
WHAT IS COVERED-REPAIR OR REPLACEMENT OF PARTS- Repair or replacement of any warranted part will be performed at no charge to the owner at an approved Husqvarna servicing center. If you have any questions regarding your warranty rights and .responsibilities, you should contact your nearest authorized service center or call Husqvarna at l-800-487-5962.