Operator′s manual 325HDA65X-series 323HE3 325HE3X-series 325HE4X-series Please read the operator’s manual carefully and make sure you understand the instructions before using the machine.
KEY TO SYMBOLS Symbols WARNING! Incorrect or careless use of a hedge trimmer can turn it into a dangerous tool that can cause serious or even fatal injury. It is extremely important that you read and understand the contents of this operator’s manual. Please read the operator’s manual carefully and make sure you understand the instructions before using the machine. Other symbols/decals on the machine refer to special certification requirements for certain markets.
CONTENTS Contents KEY TO SYMBOLS Symbols ....................................................................... CONTENTS Contents ...................................................................... Note the following before starting: ................................ INTRODUCTION Dear Customer, ............................................................ WHAT IS WHAT? What is what? .............................................................. GENERAL SAFETY PRECAUTIONS Impor tant .......................
INTRODUCTION Dear Customer, Congratulations on your choice to buy a Husqvarna product! Husqvarna is based on a tradition that dates back to 1689, when the Swedish King Karl XI ordered the construction of a factory on the banks of the Husqvarna River, for production of muskets. The location was logical, since water power was harnessed from the Huskvarna River to create the water-powered plant.
WHAT IS WHAT? 21 20 2 What is what? 1 Cutter 16 Air purge 2 Grease nipple and plug for filling lubricant.
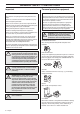
GENERAL SAFETY PRECAUTIONS Important Personal protective equipment IMPORTANT! IMPORTANT! The machine is only designed for cutting branches and twigs. Incorrect or careless use of a hedge trimmer can turn it into a dangerous tool that can cause serious or even fatal injury. It is extremely important that you read and understand the contents of this operator’s manual. Never use a machine that has been modified in any way from its original specification.
GENERAL SAFETY PRECAUTIONS FIRST AID KIT Always have a first aid kit nearby. Machine′s safety equipment Make sure the throttle control is locked at the idle setting when the throttle lockout is released. Press the throttle lockout and make sure it returns to its original position when you release it. This section describes the machine′s safety equipment, its purpose, and how checks and maintenance should be carried out to ensure that it operates correctly.
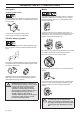
GENERAL SAFETY PRECAUTIONS Hand guard Muffler (325HDA65,323HE3,325HE3) The hand guard prevents hands from coming into contact with the moving blades, for example, if the operator loses grip on the front handle. Check that the hand guard is fitted correctly. Check that the hand guard is undamaged. The muffler is designed to keep noise levels to a minimum and to direct exhaust fumes away from the user. A muffler fitted with a catalytic converter is also designed to reduce harmful exhaust gases.
GENERAL SAFETY PRECAUTIONS WARNING! The inside of the muffler contain chemicals that may be carcinogenic. Avoid contact with these elements in the event of a damaged muffler. ! Gear housing The gear housing gets hot when the machine has been in use. To avoid burning yourself do not touch the gear housing. WARNING! Bear in mind that: ! The exhaust fumes from the engine are hot and may contain sparks which can start a fire.
ASSEMBLY Fitting the hand guard and loop handle Fitting the cutting head (325HDA65, 323HE3) (325HDA65,323HE3,325HE3) 1 Assemble the hand guard and loop handle by screwing them together. Take care to align the holes in both parts. (325HDA65, 323HE3) 2 Slide the loop handle and hand guard onto the shaft. (325HDA65, 323HE3) 3 Slide the spacer into the slot in the loop handle. 4 Fit the nut and screw. Do not overtighten.
ASSEMBLY Fitting the impact guard (325HE4) Fit the guard using the three screws and washers. Fit the two short screws in hole A. Tighten the screws to a torque of 4 Nm. After the machine has been in use for around 20 hours, re-tighten the screws to 4 Nm.
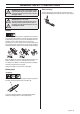
FUEL HANDLING Fuel safety Petrol Never start the machine: 1 If you have spilt fuel on it. Wipe off the spillage and allow remaining fuel to evaporate. 2 If you have spilt fuel on yourself or your clothes, change your clothes. Wash any part of your body that has come in contact with fuel. Use soap and water. 3 If the machine is leaking fuel. Check regularly for leaks from the fuel cap and fuel lines. CAUTION! Always use a quality petrol/oil mixture at least 90 octane (RON).
FUEL HANDLING Fuelling Mixing • Always mix the petrol and oil in a clean container intended for fuel. • Always start by filling half the amount of the petrol to be used. Then add the entire amount of oil. Mix (shake) the fuel mixture. Add the remaining amount of petrol. • ! Mix (shake) the fuel mixture thoroughly before filling the machine’s fuel tank. WARNING! Taking the following precautions, will lessen the risk of fire: Do not smoke or place hot objects near fuel.
STARTING AND STOPPING Check before starting • Inspect the working area. Remove any objects that could be thrown out. • Check the cutting attachment. Never use blades that are dull, cracked or damaged. Choke: Set the choke control in the choke position. Warm engine Primer bulb: Press the air purge repeatedly until fuel begins to fill the bulb. The bulb need not be completely filled. • Check that the machine is in perfect working order. Check that all nuts and screws are tight.
WORKING TECHNIQUES General working instructions IMPORTANT! Keep in mind that the operator is responsible for accidents or hazards occuring to other people or their property. Safety instructions while working This section takes up the basic safety precautions for working with a hedge trimmer. If you encounter a situation where you are uncertain how to proceed you should ask an expert. Contact your dealer or your service workshop. • Always ensure you have a safe and stable working position.
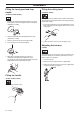
WORKING TECHNIQUES Safety instructions after completing work Changing the hedge trimmer angle • The transport guard should always be fitted to the cutting attachment when the machine is not in use. (323HE3) • Make sure the cutting attachment has stopped before cleaning, carrying out repairs or an inspection. Disconnect the HT lead from the spark plug. • Always wear heavy-duty gloves when repairing the cutting attachment. This is extremely sharp and can easily cause cuts.
WORKING TECHNIQUES • Tighten the knob. Transport position (325HE4) Once the work has been completed fold the cutting unit back against the shaft to simplify transport and storage of the hedge trimmer. (325HE3,325HE4) 1 Turn off the engine. • 2 Fit the transport guard to the cutting attachment. 3 Loosen the knob on the shaft (clockwise). 4 Grip the handle on the cutting unit and angle the cutting unit upwards. At an angle of 90 degrees there is a stop position.
MAINTENANCE Carburettor Basic setting Your Husqvarna product has been designed and manufactured to specifications that reduce harmful emissions. After the engine has used 8-10 tanks of fuel the engine will be run-in. To ensure that it continues to run at peak performance and to minimise harmful exhaust emissions after the running-in period, ask your dealer/service workshop (who will have a rev counter at their disposal) to adjust your carburettor.
MAINTENANCE Fine adjustment of the idle speed T Correctly adjusted carburettor Adjust the idle speed with the idle adjustment screw T, if adjustment is necessary. First turn the idle adjustment screw T clockwise until the blades start to move. Then turn the idle adjustment screw T anticlockwise until the blades stop. The idle speed is correctly adjusted when the engine runs smoothly in every position. There should also be a clear margin to the speed at which the blades start to move.
MAINTENANCE Cooling system Air filter To keep the working temperature as low as possible the machine is equipped with a cooling system. The air filter must be regularly cleaned to remove dust and dirt in order to avoid: 4 3 2 1 • Carburettor malfunctions • Starting problems • Loss of engine power • Unnecessary wear to engine parts. • Excessive fuel consumption. Clean the filter every 25 hours, or more regularly if conditions are exceptionally dusty.
MAINTENANCE Gear housing There is a grease nipple and a plug for filling lubricant on the gear housing. Use a grease gun to fill with grease. New machines are first filled with grease after approximately 20 hours of operation, and subsequently approximately every 60 hours of operation. Use Husqvarna’s special grease, no. 503 98 96-01. CAUTION! The gear housing must not be filled completely with grease. The grease expands as the machine heats up during operation.
MAINTENANCE Maintenance schedule The following is a list of the maintenance that must be performed on the machine. Most of the items are described in the Maintenance section. The user must only carry out the maintenance and service work described in this Operator’s Manual. More extensive work must be carried out by an authorised service workshop. Daily maintenance Maintenance Clean the outside of the machine.
TECHNICAL DATA Technical data Technical data Engine Cylinder displacement, cm3 Cylinder bore, mm Stroke, mm Idle speed, rpm Recommended max. speed, rpm Max. engine output, acc.
1150278-26 ´®z+R;r¶6_¨ ´®z+R;r¶6_¨ 2009-06-03