Owner's Manual Husqvarna ROTARY LAWN MOWER 173cc Kohler Engine Power-Propelled 21" Multi-Cut Model No. 917.374082 Product No. 7021 • Espa_ol, p. 20 CAUTION'. Read and follow all Safety Rules and Instructions before operating this equipment Husqvarna, Charlotte, NC 28269 Visit our website: www.husqvama.com U.S.A.
Warranty ................................................... 2 Safety Rules .......................................... 2-4 Product Specifications .............................. 5 Assembly / Pre-Operation ........................ 6 Operation ............................................. 7-12 Maintenance Schedule ........................... 12 Maintenance ...................................... Service and Adjustments ................... Storage .............................................. Troubleshooting .
DO: • Mow across the face of slopes: never up and down. Exercise extreme caution when changing direction on slopes. • Remove obstacles such as rocks, tree limbs, etc. • Watch for holes, ruts, or bumps. Tall grass can hide obstacles. DO NOT: • • • Do not trim near drop-offs, ditches or embankments. The operator could lose footing or balance. • Do not trim excessively steep slopes. • Do not mow on wet grass. Reduced footing could cause slipping. • • Iii.
SECTION 1: LIMITED WARRANTY Husqvama Forest & Garden Company ("Husqvarna") warrants Husqvama product to the original purchaser to be free from defects in material and workmanship from the date of purchase for the "Warranty Period" of the product as set forth below: (4)Additional damage to parts or components due to continued use occurring after any of the above. REPAIR OR REPLACEMENT AS PROVIDED UNDER THIS WARRANTY IS THE EXCLUSIVE REMEDY OF THE PURCHASER.
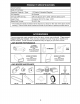
Serial Number: Date of Purchase: Gasoline Capacity / Type: 1.5 Quarts (Unleaded Regular) Oil Capacity: 20 Ounces Oil Type (API SG-SL): SAE 30 (above 32°F); SAE 10W-30 (below 32°F) Spark Plug: Champion Blade Bolt Torque: 35-40 ft. Ibs. RC12YC (Gap: .030") • The model and serial numbers wil! be found on a decal on the rear of the lawn mower housing. Record both serial number and date of purchase in space provided above. These accessories were available when this lawn mower was produced.
Read these instructions and this manual in its entirety before you attempt to assemble or operate your new lawn mower. IMPORTANT: This lawn mower is shipped WITHOUT OIL OR GASOLINE in the engine. Your new lawn mower has been assembled at the factory with the exception of those parts left unassembled for shipping purposes. To ensure safe and proper operation of your lawn mower, all parts and hardware you assemble must be tightened securely. Use the correct tools as necessary to ensure proper tightness.
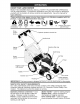
KNOW YOUR LAWN MOWER READ THIS OWNER'S MANUAL AND ALL SAFETY RULES BEFORE OPERATING YOUR LAWN MOWER. Compare the illustrations with your lawn mower to familiarize yourself with the location of various controls and adjustments. Save this manual for future reference. These symbols may appear on your lawn mower product. Learn and understand their meaning.
Operator presence control bar The operationof any SAFETYG'ASSES lawn mower can result in foreign objects thrown into the eyes, which can result in severe eye damage. Alwayswear safety glasses or eye TO ENGAGE DRIVE CONTROL shields while operating your lawn mower or performing any adjustments or repairs. We recommend a standard safety glasses or wide vision safety mask worn over spectacles.
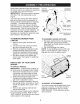
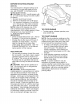
TO CONVERT MOWER Your lawn mower was shipped ready to be used as a mulcher. To convert to bagging or discharging: REAR BAGGING , Lift rear door of the lawn mower and place the grass catcher frame hooks onto the door pivot pins. • To convert to mulching or discharging operation, remove grass catcher and close rear door. Pivot pins Rear I Grass catcher handle SIMPLE STEPS TO REMEMBER WHEN CONVERTING YOUR LAWN MOWER FOR MULCHING 1. Rear door closed. 2. Mulcher door closed. FOR REAR BAGGING 1.
BEFORE STARTING ENGINE Gasoline filler cap ADD OIL Your lawnmower is shipped without oil in the engine. For type and grade of oil to use, see "ENGINE" in the Maintenance section of this manual. • ILCAUTION: DO NOT overfill engine with oil, or it will smoke heavily from the muffler on startup. 1. Be sure lawnmower is level. 2. Remove oil dipstick from oil fill spout. 3. You receive a container of oil with the unit. Slowly pour the entire container down the oil fill spout into the engine.
MOWING TIPS A CAUTION: Do not use de-thatcher blade attachments on your mower. Such attachments are hazardous, wil! damage your mower and could void your warranty. • Under certain conditions, such as very tall grass, it may be necessary to raise the height of cut to reduce pushing effort and to keep from overloading the engine and leaving clumps of grass clippings. It may also be necessary to reduce ground speed and/or run the lawn mower over the area a second time.
MAINTENANCE SCHEDULE BEFORE EAC H use EAC H W ,/ Check for Loose Fasteners ML Clean / Inspect Grass Catcher* _ AFTER EVERY 10 EVERY 25 HOURS OR SEASON use HOURS EVERY 100 HOURS BEFORE STORAGE v' ,/ Check Tires N Check Drive Wheels *** Clean Lawn Mower ....
LAWN MOWER Always observe safety rules when performing any maintenance. Blade adapter Crankshaft Lockwasher TIRES • Keep tires free of gasoline, oil, or insect control chemicals which can harm rubber. • Avoid stumps, stones, deep ruts, sharp objects and other hazards that may cause tire damage. Blade i) Blade Hardene( bolt washer !, Trailing edge DRIVE WHEELS Check front drive wheels each time before you mow to be sure they move freely. The wheels not turning freely means trash, grass cuttings, etc.
GEAR CASE • To keep your drive systemworking properly, the gear case and area around the drive should be kept clean and free of trash build-up. Clean under the drive cover twice a season. • The gear case is filled with lubricant to the proper level at the factory. The only time the lubricant needs attention is if service has been performed on the gear case. • If lubricant is required, use only Texaco Starplex Premium1 Grease, Part No. 750369. Do not substitute. 4.
SPARK PLUG Cartrid( Slot Replace spark plug at the beginning of each mowing season or after every 100 hours of operation, whichever occurs first. Spark plug type and gap setting are shown in the "PRODUCT SPECIFICATIONS" section of this manual. \ CLEANING IMPORTANT: For best performance, keep mower housing free of built-grass and trash. Clean the underside of your mower after each use.
TO REMOVE DRIVE TO ADJUST BELT 1. Remove drive cover and belt keeper. 2. Remove belt from gearcase pulley. 3. Turn lawn mower on its side with air filter and carburetor down. 4. Remove blade and engine pulley. The handle can be mounted in a high or low position. The mounting holes in the bottom of lower handle are off center for raising or lowering the handle. 1. Remove upper handle and wire tie(s) securing cable(s) to lower handle. 2. Remove hairpin cotters from lower handle bracket mounting pin. 3.
ENGINE ENGINE your lawn mower to a Husqvarna or other qualified service center for repair and/or adjustment. IMPORTANT: Never tamper with the engine governor, which is factory set for proper engine speed. Overspeeding the engine above the factory high speed setting can be dangerous. If you think the engine-governed high speed needs adjusting, contact a Husqvarna or other qualified service center, which has proper equipment and experience to make any necessary adjustments.
OTHER NOTE: Fuel stabilizer is an acceptable alternative in minimizing the formation of fuel gum deposits during storage. Add stabilizer to gasoline in fuel tank or storage container. Always follow the mix ratio found on stabilizer container. Run engine at least 10 minutes after adding stabilizer to allow the stabilizer to reach the carburetor. Do not empty the gas tank and carburetor if using fuel stabilizer. ENGINE OIL • Do not store gasoline from one season to another.
TROUBLESHOOTING =See appropriate section in manual to a Husqvarna or other qualified service center. PROBLEM Loss of power CAUSE . 2. 3. 4. 5. 6. Poor cut - Rear of mower housing or blade dragging in grass. Cutting too much grass. Dirty air filter. Buildup of grass, leaves, and trash under mower. Too much oil in engine. Walking speed too fast. 1. Worn, bent or loose blade. 2. Wheel heights uneven. 3. Buildup of grass, leaves and trash under mower. . Worn, bent or loose blade. 2.
Garantia ................................................... Reglas de Seguridad ............................... Especificaciones del Producto ................. Montaje / Pre-Operaci6n ......................... Operaci6n ................................................ Mantenimiento ......................................... .... 20 20-22 .... 22 .... 24 25-30 30-33 Programa de Mantenimiento ......................... 30 Servicio y Adjustes ................................... 33-35 Almacenamiento ..........
HACER: • Puede recortar a traves de la superficie de la cuesta, nunca hacia arriba y hacia abajo. Proceda con extrema precauci6n cuando cambie de direcci6n en las cuestas. • Renueva todos los objetos extrafios, tales como guijarros, ramas, etc. • Debe prestar atenci6n a hoyos, baches o protuberancias. Recuerde que la hierba alta puede esconder obstaculos. NO HACER: • No recorte cerca de pendientes, zanjas o terraplenes. El operador puede perder la tracci6n en los pies o el equilibrio.
SECCl6N 1: GARANTiA LIMITADA Husqvama Forest & Garden Company ("Husqvama') garantiza al comprador original que el producto Husqvama no tiene defectos de material y fabricaci6n a partir de la fecha de compra y por et "Periodo de Garantia" det producto seg_n to establecido a continuaci6n: GARANTiA NO COMERClAL DE 2 AltOS: Cortacesped automatico, cortacesped conducibles, tractores de jardin y terreno, cortacesped con los que se camina at lado, dispositivos de filtrado, hojas de cadena, desbastadores, cortadore
NOmero de Serie: Fecha de Compra: Capacidad y Tipo de Gasolina: Tipo de Aceite Capacidad (API SG-SL): Torsi6n SAE 30 (Sobre de Aceite: Buj[a (Abertura: 1.6 Cuartos (Regular sin PIomo) 32°F); SAE 5W-30 (Debajo 32°F) 20 Onzas .030") Champion del Perno de la Cuchilla: 35-40 J19LM o RJ19LM ft. Ibs. • El nQmero del nodelo y el de serie se encuentran en la calcomania adjunta a la parte trasera de la caja de la segadora.
Lea estas instrucciones y este manual completamente antes de tratar de montar u operar su segadora nueva. IMPORTANTE: Este cortacesped viene SIN ACEITE O GASOLINA en el motor. Barra de que exige la presencia det operador Su segadora nueva ha sido montada en la fabrica con la excepci6n de aquellas partes que se dejaron sin montar por razones de envio. Todas las partes como las tuercas, las arandelas, los pernos, etc., que son necesarias para completar el montaje han sido colocadas en la bolsa de partes.
FAMILIARICESE CON SU SEGADORA LEA ESTE MANUAL DEL DUENO Y LAS REGLAS DE SEGURIDAD ANTES DE OPARAR SU SEGADORA. Compare las ilustraciones con su segadora para familiarizarse con la ubicaci6n de los diversos controles y ajustes. Guarde este manual para referencia en el futuro. Estos simbolos pueden apareser producto. Aprenda y comprenda ATTENCION O ADVERTENCIA MOTOR ENCENDIDO MOTOR APAGADO sobre su segadora sus signiflcados.
La operaci6ndecualquier SEGURIDAD segadorapuedehacerque saltenobjetosextrafiosdentrode susojos,Ioquepuedeproducir dafiosgravesenestos.Siempre useanteojosdeseguridado protecci6npara losojosmientrasoperesu segadorao cuando hagaajusteso reparaciones. Recomendamos gafaso unamascaradeseguddaddevisi6n ampliadeseguridadusadasobrelasgafas. COMO USAR SU SEGADORA VELOCIDAD DEL MOTOR La velocidad del motor se estableci6 en la fa= brica para un rendimiento 6ptimo. La velocidad no se puede ajustar.
PARA CONVERTIR LA SEGADORA Su segadora fue enviada lista para usarse como acolchadora de capa vegetal. Para convertirla a una operaci6n de ensacado o de descarga: SEGADORAS CON DESCARGA TRASERA * Levantar la puerta trasera de cortacesped y colocar los ganchos del armaz6n de la recolectora de hierba en los pasadores del quicio de la puerta. * Para pasar a la operaci6n de acolchamiento, remover la recolectora de hierba y cerrar la puerta trasera.
ANTES DE HACER ARRANCAR MOTOR EL La pr6xima temporada use combustible nuevo. Vea las Instrucciones Para El Almacenamiento para mas informaci6n. Nunca use productos de limpieza para el motor o para el carburador en el estanque del combustible pues se pueden producir dafios permanentes. AGREGUE ACEITE Su segadora fue enviada sin aceite en el motor. Para el tipo y el grado del aceite a utilizar, vea "MOTOR" en la secci6n del Mantenimiento de este manual.
CONSEJOS PARA SEGAR CONSEJOS CHAR _ILPRECAUCl6N: No utilizar dispositivos antipaja de la hoja en la segadora ya que estos accesorios son peligrosos, pueden dafiar su segadora y anular su garantia. • Bajo ciertas condiciones, tal como cesped muy alto, puede ser necesario el elevar la altura del corte para reducir el esfuerzo necesario para empujar la segadora y para evitar sobrecargar el motor, dejando montones de recortes de cesped.
PROGRAMA DE ANTES MANTENIMIENTO S Revisar si hay Sujetadores Sueltos de Cesped * Limpiar/Inspeccionar el Recogedor _1_ E Controlar los NeumAticos I_ Controlar las Ruedas Motrices *** Limpiar la Segadora ....
SEGADORA Siempre observe las reglas de seguridad cuando haga el mantenimiento. AVlSO: Remueva el adaptador de la cuchilla y revise el cubo interior de la ranura del adaptador de la cuchilla. La ranura tiene que estar en buenas condiciones para que funcione en forma adecuada. Cambie el adaptador si esta dafiado. LLANTAS • Mantenga las Ilantas sin gasolina, aceite o substancias quimicas para control de insectos que pueden dafiar la goma.
RECOGEDOR DE CO:SPED • El recogedor de cesped puede ser rociado con el agua de la manguera pero tiene que estar seco cuando se vaya a usar. • Revise su recogedor de cesped a menudo para verificar siesta dafiado o deteriorado. Se va a desgastar con el uso normal. Si se necesita cambiar el recogedor, cambielo solamente por uno que sea aprobado por el fabricante. De el nQmero del modelo de la segadora cuando Io ordene. .
Cartucho Ranuras BUJiA Cambie el bujia al comienzo de cada temporada de siega o despues de cada 100 horas de operaci6n, Io que suceda primero. El tipo de bujia y el ajuste de la abertura aparecen en "ESPECIFICACIONES DEL PRODUCTO" secci6n de este manual. \ LIMPIEZA IMPORTANTE: Para obtener el mejor rendimineto, mantenga la caja de la segadora sin acumulacion de cesped y basura. Limpie la parte de abajo de su segadora despues de cada uso.
PARA REMOVER CORREA DE IMPULSI6N 1. Remueva la cubierta de la impulsi6n y fijador de la correa. 2. Remueva la correa en la polea de la caja de engranajes. 3. Haga descansar la segadora en su lado con el filtro de aire y el carburador mirando hacia arriba. 4. Remueva la cuchilla y la polea del motor. PARA AJUSTAR EL MANGO El mango puede ser montado a una posici6n alta o baja. Los agujeros de montaje en el mango inferior estan fuera del centro para levantar y bajar el mango. 1.
MOTOR VELOCIDAD DEL MOTOR La velocidad del motor ha sido ajustada en la fabrica. No trate de aumentar la velocidad del motor pues se pueden producir lesiones personales. Si cree que el motor esta funcionando demasiado rapido o demasiado lento, Ileve su segadora a mas con su centro de servicio Husqvarna o con un otro centro de servicio cualificado. CARBURADOR Su carburador tiene un chorro principal fijo no ajustable para controlar la mezcla.
AVISO:Elestabilizador decombustibleesuna OTROS alternativaaceptableparareducira un minimo • No guarde la gasolina de una temporada a la laformaci6ndedep6sitosdegomaenel comotra. bustibleduranteel periodode almacenamiento. • Cambie el envase de la gasolina si se empieAgregueestabilizador a lagasolinaenel za a oxidar. La oxidaci6n y/o la mugre en su estanquedecombustible o enel envaseparael gasolina produciran problemas. almacenamiento.
SOLUCION DE PROBLEMAS est_ dirigido Altura de las ruedas dispareja. Velocidad del motor lenta. 4. Acumulaci6n de cesped, hojas o basura debajo de la segadora. Demasiado aceite en motor. Velocidad de recorrido . Dificil de empujar 2. Eleve la altura de corte. 3. 4. Limpie/cambie el filtro de aire. Limpie la parte inferior de la caja de la segadora. Revise el nivel del aceite. Corte a una velocidad de recorrido mas lenta. 5. 6. rapida. Cuchilla desgastada, o suelta.
HUSQVARNA ROTARY LAWN MOWER - - MODEL NUMBER 3 917.:374082 (PRODUCT NUMBER 7021) 2 69 \\ 26 8 6 98 \ \ \ ' 28 34 27 \ Oo OO 1'3 38 14 21 9 17 16 36 32 31 _; 13 .......... 38 \ 46 \ 13 !j 63......
HUSQVARNA KEY NO. Co LO PART NO. ROTARY LAWN MOWER DESCRiPTiON 1 427658 2 3 4 5 6 7 8 9 10 11 12 13 14 15 16 17 18 19 20 432254X498 427415X422 151681 191574 182398 51793 66426 401812X428 128415 406573X479 406574X479 17060410 433866X422 433868X422 405417 405418 132004 194788 413159 21 24 88652 == = PART NO. 917.
HUSQVARNA ROTARY LAWN MOWER - - MODEL NUMBER 917.:374082 (PRODUCT NUMBER 7021) 27 \\ 11 33 \\ \\ \ 8 \ / I 54 32 \ \ _ .............. 57 /_ / \ \ 14 12 17 \ 35 4_ 0 1 / \ 38 18 17
HUSQVARNA KEY NO. IMPORTANT: ROTARY PART NO. LAWN MOWER - - MODEL NUMBER KEY NO. DESCRiPTiON 1 2 3 4 5 6 425580 406260X460 406262 425538 406261X460 181698 Drive ControlAssembly Cover, Top Pulley Lever, Drive Control Cover, Bottom Screw 7 9 11 12 13 14 400235X479 406259 401274X460 12000058 403849 189403 15 16 17 18 917.374082 (Includes Cable) PART NO.
KOHLER 4-CYCLE ENGINE BLOWER HOUSING & BAFFLES MODEL NUMBER I OIL PAN/LUBRICATION XT173-3089-EA I 25 086 167-S 25 086 288-S 25 086 14 153 01-S_ ......
KOHLER 4-CYCLE ENGINE MODEL NUMBER XT173-3089-EA BLOWER HOUSING & BAFFLES PART NO. QTY. DESCRIPTION 1433204-s 1 Insert, Engine Cover (Black) 25 086 167-s 4 Screw, #15, 6-Lobe, Pan Head, Hi-Lo Thread 1402703-s 1 Housing, Blower w/Elec Start 1409627-s 1 Cover, Engine (Black) 25 086 288-s 2 Screw, Shoulder (M5) OIL PAN/LUBRICATION PART NO. QTY. DESCRIPTION IGNITION/ELECTRICAL PART NO. QTY. DESCRIPTION 1410902-s 1 Cup, Drive 1402502-s 1 Flywheel (Aluminum) 1458405-s 1 Module, Ignition (Aluminum Std.
KOHLER 4-CYCLE HEAD/VALVE/BREATHER ENGINE MODEL NUMBER XT173-3089-EA STARTING SYSTEM I I .14 096 05-S 14 017 01-S 14 041 01-S _ M-641060-S J 14 i65 01-S \ i4 84i 04-S 14 i65 03-S FUEL SYSTEM 14 318 01-S Intake & Exhaust Valves available 14 755 02-S separately. "_ 14 186 02-S :_:;; 1404105-S/ _ 14 599 01-S 1.153ol-s_ '_i BREATHER \_ _14 _ 841 04-S , GASKET COVER _/CRANKCASE/FLYWHEEL SEAL i4 153 03-S _ I-S 14 041 01-S 14 032 04-S VALVE STEM SEAL j_ 14 041 14 379 01-S 05-
KOHLER 4-CYCLE ENGINE MODEL NUMBER XT173-3089-EA HEAD/VALVE/BREATHER PART NO. QTY.
KOHLER FUELSYSTEM 4-CYCLE ENGINE MODEL NUMBER XT173-3089-EA ENGINE CONTROLS I i i_¸¸¸'• _(_i :I 14 089 07-S __14 079 01-S 14 090 04-S _I4 090 12-S M-s41oso-s 14 126 ll-S 4 126 22-S 14 853 24-S 14 853 27-S __ 1_1_089 33-S 14 089 14-S 14 089 05-S 14 079 04-S 14 079 02-S 46
KOHLER STARTING PART NO. 4-CYCLE ENGINE MODEL NUMBER XT173-3089-EA SYSTEM QTY. DESCRIPTION 14 165 01-s 1 14 160 01-s 1 14 379 01-s 1 M-641060-s 3 AIR INTAKE/FILTRATION PART NO. QTY. DESCRIPTION 14 083 01-s 1 Element, Air Cleaner 1409609-s 1 Cover, Air Cleaner 14 326 04-s 1 Hose, Primer 14 123 05-s 1 Hose, Breather 1409413-s 1 Kit, Air Cleaner Base (Primer) (Includes 41 037 10-s and Air Cleaner Base Gasket) 14 096 51-s 1 Cover, Air Cleaner Base (Breather Gas) M-641060-s 2 Nut, Flanged M6 x 1.
Your Home For repair - in your home - of all major brand appliances, lawn and garden equipment, or heating and cooling systems, no matter who made it, no matter who sold it! For the replacement parts, accessories and owner's manuals that you need to do-it-yourself. For Sears professional installation of home appliances and items like garage door openers and water heaters. 1-800-4-MY-HOME ® Anytime, day or night (1-800-469-4663) www.sears,com (U.S.A. and Canada) www.sears.