Owner's Manual ® sqva Y LAWN MOWER ROTA 160cc Honda Engine 22" Rear Discharge Self-Propelled Model No. 917.379151 Product No. HU800HW • EspaSol, p. 22 CAUTION: Read and follow all Safety Rules and Instructions before operating this equipment Husqvarna, Charlotte, NC 28269 Visit our website: www.husqvarna.com U.S.A.
Warranty ................................................ 4-6 Safety Rules .......................................... 4-5 Product Specifications .............................. 7 Assembly / Pre-Operation ........................ 8 Operation ............................................. 9-13 Maintenance Schedule ........................... 14 Maintenance ...................................... Service and Adjustments ................... Storage .............................................. Troubleshooting ..
DO: . Mow across the face of slopes: never up and down. Exercise extreme caution when changing direction on slopes. . Remove obstacles such as rocks, tree limbs, etc. o Watch for holes, ruts, or bumps. Tall grass can hide obstacles. DO NOT: o o o Do not trim near drop-offs, ditches or embankments. The operator could lose footing or balance. o Do not trim excessively steep slopes. o Do not mow on wet grass. Reduced footing could cause slipping. o o III.
Husqvama CONSUMIER WHIEIELIED PRODUCTS - LiMiTED WARRANTY Husqvarna warrants to the original retail purchaser that this Husqvarna® product is free from defects in material or workmanship_ under normal use and maintenance from the date of retail purchase for the applicable Warranty Period shown on Exhibit A. Certain components (e.g., engines and transmissions) are excluded from coverage, and other limitations apply, as described in this document.
Husqvarna 3. Owner's (Your) Responsibilities. To preserve your rights under this Limited Warranty, you must demonstrate reasonable care and use of the product, including, following the preventative maintenance, storage, fuel and oil usages as prescribed in the enclosed operator's manual. For example, the following items are the Owner's responsibility and are not covered by this Limited Warranty: a. Set-up and pre-delivery service, and engine tune-ups. b.
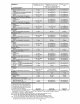
Engine* * Transmission Battery 1 Year ! 10the[ N0n,Expendab!e C0rnp0nents ;Zero rs::(MZ_EZ IOtherOther 1"4,Non-Expendable Components ind: * .... rs Components ! N? WARRANTY NO WARRANTY iii " ......................................................................................... I 2 Years .L n-Expendable Pro-rated 3 Years NO WARRANTY NO WARRANTY NO WARRANTY NO WARRANTY I I I *- J.
Serial Number: Date of Purchase: Gasoline Capacity / Type: 1.0 Quarts (Unleaded Oil Capacity: 18.5 Ounces Oil Type (API SG-SL): SAE 30 (above 32°F) or SAE 10W-30 Spark Plug (Gap: NGK BPR6ES Valve Clearance .030") (+ 0.04 mm): Intake: 0.015 mm; Blade Bolt Torque: Regular) Exhaust: 0.020 mm 35-40 ft. Ibs. o The model and serial numbers will be found on a decal on the rear of the lawn mower housing. Record both serial number and date of purchase in space provided above.
Read these instructions and this manual in its entirety before you attempt to assemble or operate your new lawn mower. IMPORTANT: This lawn mower is shipped WITHOUT OIL OR GASOLINE in the engine. Your new lawn mower has been assembled at the factory with the exception of those parts left unassembled for shipping purposes. To ensure safe and proper operation of your lawn mower, all parts and hardware you assemble must be tightened securely. Use the correct tools as necessary to ensure proper tightness.
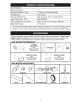
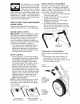
KNOW YOUR LAWN MOWER READ THIS OWNER'S MANUAL AND ALL SAFETY RULES BEFORE OPERATING YOUR LAWN MOWER. Compare the illustrations with your lawn mower to familiarize yourself with the location of various controls and adjustments. Save this manual for future reference. These symbols may appear on your lawn mower product. Learn and understand their meaning.
DRIVE CONTROL The operation of any lawn SAFETVG'ASSES mower can result in foreign objectsthrowninto the eyes, which can result in severe eye damage. Always wear safety glasses or eye shields while operating your lawn mower or performing any adjustments or repairs. We recommend a standardsafetyglassesor widevision safety mask worn over spectacles. HOW TO USE YOUR LAWN Over time, the drive control system may become "loose", resulting in decreased speed.
TO CONVERT MOWER TO EMPTY GRASS CATCHER Your lawn mower was shipped ready to be used as a mulcher. To convert to rear bagging or discharging: REAR BAGGING , Lift rear door of the lawn mower and place the grass catcher frame hooks onto the grass bag brackets. , To convert to mulching or discharging operation, remove grass catcher and close rear door. 1. Lift up on grass catcher using the frame handle. 2. Remove grass catcher with clippings from under lawn mower handle. 3.
ADD GASOLINE , Fill fuel tank to bottom of tank filler neck. Do not overfill. Use fresh, clean, regular unleaded gasoline with a minimum of 87 octane. Do not mix oil with gasoline. Purchasefuel in quantities that can be used within 30 days to assure fuel freshness. ,A CAUTION: Wipe off any spilled oil or fuel. Do not store, spill or use gasoline near an open flame. TO STOP ENGINE , To stop engine, release operator presence control bar.
MULCHING MOWING TiPS A CAUTION: Do not use de-thatcher blade attachments on your mower. Such attachments are hazardous, will damage your mower and could void your warranty. * Under certain conditions, such as very tall grass, it may be necessary to raise the height of cut to reduce pushing effort and to keep from overloading the engine and leaving dumps of grass clippings. It may also be necessary to reduce ground speed and/or run the lawn mower over the area a second time.
MAINTENANCE EVERY BEFORE AFTER EVERY EACH EACH 10 SCHEDULE USE Check for Loose Fasteners _ lean /Inspect Check Tires _ Check Drive Wheels Clean Lawn Mower ....
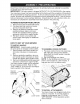
5. Install the blade bolt with the lock washer and hardened washer into blade adapter and crankshaft. 6. Use block of wood between blade and lawn mower housing and tighten the blade bolt, turning clockwise. o The recommended tightening torque is 35-40 ft. Ibs. IMPORTANT: Blade bolt is heat treated. If bolt needs replacing, replace only with approved bolt shown in the Repair Parts section of this manual. LAWN MOWER Always observe safety rules when performing any maintenance.
GRASS CATCHER o The grass catcher may be hosed with water, but must be dry when used. o Check your grass catcher often for damage or deterioration. Through normal use it will wear. If catcher needs replacing, replace only with approved replacement catcher shown in the Repair Parts section of this manual. Give the lawn mower model number when ordering. GEAR CASE o To keep your drive system working properly, the gear case and area around the drive should be kept clean and free of trash build-up.
TO 1. 2. 3. CLEAN AIR FILTER Remove cover. Carefully remove cartridge. Clean by gently tapping on a flat surface. If very dirty, replace cartridge. ACAUTION: Petroleum solvents, such as kerosene, are not to be used to clean cartridge. They may cause deterioration of the cartridge. Do not oil cartridge. Do not use pressurized air to clean or dry cartridge. 4. Install cartridge, then replace cover.
,_, WARNING: To avoid serious injury,before performing any service and adjustments: 1. Releasecontrol bar and stop engine. 2. Make sure the blade and all moving parts have completely stopped. 3. Disconnectspark plug wire from spark plug and place wire where it cannot come in contact with plug. LAWN MOWER TO REPLACE BELT 1. Place new drive belt on gearcase pulley. NOTE: Always use factory approved belt to assure proper fit and long life. 2. Reinstall gearcase belt keeper.
ENGINE to suspected carburetor problems, take your lawn mower to a Husqvarna or other qualified service center for repair and/or adjustment. IMPORTANT: Never tamper with the engine governor, which is factory set for proper engine speed. Overspeeding the engine above the factory high speed setting can be dangerous. If you think the engine-governed high speed needs adjusting, contact a Husqvarna or other qualified service center, which has proper equipment and experience to make any necessary adjustments.
ENGINE ENGINE OiL FUEL SYSTEM Drain oil (with engine warm) and replace with clean engine oil. (See "ENGINE" in the Maintenance section of this manual). CYLINDER IMPORTANT: It is important to prevent gum deposits from forming in essential fuel system parts such as carburetor, fuel filter, fuel hose, or tank during storage. Alcohol blended fuels (called gasohol or using ethanol or methanol) can attract moisture which leads to separation and formation of acids during storage.
TROUBLESHOOTING - See appropriate section in manual to a Husqvarna or other qualified Parts & Repair Center. PROBLEM Loss of power CAUSE . . 3. 4. 5. 6. Poor cut = uneven CORRECTION Rear of lawn mower housing or cutting blade dragging in heavy grass. Cutting too much grass. Dirty air filter. Buildup of grass, leaves, and trash under mower. Too much oil in engine. Walking speed too fast. 1. Worn, bent or loose blade. 2. Wheel heights uneven. 3. Buildup of grass, leaves and trash under mower.
Garanfia .................................................... 24-26 Reglas de Seguridad ................................ 22-23 Especificaciones del Producto ....................... 27 Montaje / Pre-Operaci6n ............................... 28 Operaci6n ................................................. 29-33 Programa de Mantenimiento ......................... 34 Mantenimiento .......................................... Servicio y Adjustes ................................... AImacenamiento ...................
HACER: • Puede recortar a traves de la superficie de la cuesta, nunca hacia arriba y hacia abajo. Proceda con extrema precauci6n cuando cambie de direcci6n en las cuestas. • Renueva todos los objetos extraflos, tales como guijarros, ramas, etc. • Debe prestar atenci6n a hoyos, baches o protuberancias. Recuerde que la hierba alta puede esconder obstaculos. NO HAOER: • No recorte cerca de pendientes, zanjas o terraplenes. El operador puede perder la tracci6n en los pies o el equilibrio.
iHusqvarna PRODUCTOS CON RU_'DAS PARA CONSUM|DOR = GARANTiA LIMITADA Husqvarna le garantiza al comprador minorista original que este producto Husqvama® estb. libre de defeetos de material o mano de obra bajo uso y mantenimiento normales a partir de la fecha de compra minorista pot el per[odo de garanfia aphcable que se indica en el Anexo A. Ciertos componentes (por ejemplo los motores y las transmisiones) quedan excluidos de la cobertura y aplican otras limitaciones, seg0n se describe en este documento.
3. Responsabilidades del propietario (usted). Si desea conservar sus derechos bajo esta Garanfia limitada, debe demostrar el cuidado y uso razonables del producto; esto incluye cumplir con el mantenimiento preventivo, el almacenamiento, el uso de combustible y aceite segun se indican en el manual del operador que se adjunta. Pot ejemplo, los siguientes elementos son responsabilidad del propietario y no estb.n cubiertos por esta Garanfia limitada: a.
Anexo A Consumidor (personal, uso dom#stico bnicamente) Producto/Componente Bastidor, chasis, eje delantero Motor* Transmisi6n (fab. Husqvarna/Peerless) Transmisi6n (si es de terceros) ........ Bateria Otros componentes perecederos Motor* Transmisi6n .... Bateria Otros componentes Ca .... Motor* Transmisi6n ........
NQmero Fecha de Serie: de Compra: Capacidad y Tipo de Gasolina: 1.0 Cuartos Capacidad de Aceite: 18.50nzas Tipo de Aceite Bujia (Abertura: Tolerancia Torsi6n (API SG-SL): SAE 30 (Debajo .030") de V_.lvula (Regular NGK (+ 0.004 mm) 35-40 0°C/32°F) o SAE 10W30 BPR6ES Admisi6n: del Perno de la Cuchilla: sin PIomo) 0.015 mm; Descarga: 0.020 mm ft. Ibs. • El nOmero del nodelo y el de serie se encuentran en la calcomania adjunta a ia parte trasera de la caja de la segadora.
Lea estas instrucciones y este manual completamente antes de tratar de montar u operar su segadora nueva. IMPORTANTE: Este cortacesped viene SIN ACEITE O GASOLINA en el motor. Su segadora nueva ha sido montada en la f_.brica con la excepci6n de aquellas partes que se dejaron sin montar por razones de env[o. Todas las partes como las tuercas, las arandelas, los pernos, etc., que son necesarias para completar el montaje han sido colocadas en la bolsa de partes.
FAMILIARICESE CON SU SEGADORA LEA ESTE MANUAL DEL DUENO Y LAS REGLAS DE SEGURIDADANTES DE OPARAR SU SEGADORA. Compare las ilustraciones con su segadora para familiarizarse con la ubicaci6n de los diversos controles y ajustes. Guarde este manual para referencia en el futuro. Estos simbolos pueden apareser producto. Aprenda y comprenda ATTENCION O ADVERTENClA MOTOR ENCENDIDO MOTOR APAGADO sobre su segadora o en la literatura sus significados.
Laoperaci6ndecualquier SEGURIDAD segadorapuedehacerque saltenobjetosextraflosdentrode susojos,Ioquepuedeproducir daflosgravesenestos.Siempre useanteojosdeseguridado protecci6npara losojosmientrasoperesu segadorao cuando hagaajusteso reparaciones. Recomendamos gafaso unamascaradeseguridaddevisi6n ampliadeseguridadusadasobrelasgafas. COIVIO USAR SU SEGADORA VELOCIDAD DEL MOTOR La velocidad del motor se estableci6 en la f_.brica para un rendimiento 6ptimo. La velocidad no se puede ajustar.
PARA CONVERTIR LA SEGADORA Su segadora fue enviada Nsta para usarse como acolchadora de capa vegetal. Para convertirla a una operaci6n de ensacado o de descarga: DESCARGA TRASERA: • Levantar la puerta trasera de cortacesped y colocar los ganchos del armaz6n de la recolectora de hierba en los soporte del quicio. • Para pasar a la operaci6n de acolchamiento, remover la recolectora de hierba y cerrar la puerta trasera.
AGREGUEGASOLINA • Lleneel estanquede combustible hastala parteinferiordelcuellode rellenodelestanquede gasolina.NoIoIlenedemasiado. Usegasolinaregular,sinplomo,nuevay limpiaconel m[nimode87octanos.Nomezcle el aceiteconla gasolina.Paraasegurar quela gasolinautilizadaseafrescacompre estanquesloscualespuedanserutilizados durantelosp.rimeros 30d[as. _PRECAUClON:Limpieel aceiteo el combustible derramado.Noalmacene,derrame o usegasolinacercade unallamaexpuesta.
CONSEJOS PARA SEGAR _PRECAUClON: No utilizar dispositivos antipaja de la hoja en la segadora ya que estos accesorios son peligrosos, pueden daSar su segadora y anular su garanfia. • Bajo ciertas condiciones, tal como cesped muy alto, puede ser necesario el elevar la altura del corte para reducir el esfuerzo necesario para empujar la segadora y para evitar sobrecargar el motor, dejando montones de recortes de cesped.
PROGRAMA DE ANTES DESPUES CADA DE CADA DE CADA 10 USO USO HORAS MANTEN|M|ENTO Revisar si hay Sujetadores S Limpiar/Inspeccionar E Controlar G Controlar _1_ Limpiar Sueltos el Recogedor CADA CADA ANTES DEL 25 HORAS O 100 ALMACE= TEMPORADA HORAS NAMIENTO v" v' _# v' de Cesped * los Neumaticos las Ruedas la Segadora Motrices [_ Limpiar debajo la Cubierta O Revisar las Correas F{ Revisar / Afilar / Cambiar A Lubricaci6n Limpiar/Recargar *** _#_ v' ....
SEGADORA Siempre observe las reglas de seguridad cuando haga el mantenimiento. LLANTAS • Mantenga las Nantas sin gasoNna, aceite o substancias qufmicas para control de insectos que pueden dahar la goma. • Evite los tocones, las piedras, las grietas profundas, los objetos afilados y otros peligros que pueden dahar alas Nantas. RUEDAS DE IMPULSION Revise las ruedas de impulsi6n traseras cada vez antes de segar, para asegurarse de que se mueven Nbremente.
RECOGEDOR DE ClaSPED • El recogedor de cesped puede ser rociado con el agua de la manguera pero tiene que estar seco cuando se vaya a usar. • Revise su recogedor de cesped a menudo para verificar si estb. daflado o deteriorado. Se va a desgastar con el uso normal. Si se necesita cambiar el recogedor, cb.mbielo solamente por uno que sea aprobado por el fabricante. De el n0mero del modelo de la segadora cuando Io ordene.
DERRUBIO DEL AGUA Su cortacespedes de cesped se equipa de una guarnici6n que permita la limpieza rApida y fAcil del superficie inferior de la cubierta. Para utilizar esta caracteristica, siga de la forma siguiente: 1. Mueva el cortacespedes de cesped a un Area de la hierba cortada o de otra superficie dura. NOTA: El agua, la hierba y la otra ruina escurriran debajo de la cubierta del cortacespedes durante el proceso del derrubio. 2.
_bADVERTENClA: Para evitar lesi6nes serias, antes de dar calquier servico o de hacer ajustes: 1. Suelte la barra de control y pare el motor. 2. AsegOrese que la cuchilla y que todas las partes movibles se hayan detenido completamente. 3. Desconecte el alambre de la buj[a y p6ngalo en donde no pueda entrar en contacto con esta. PARA CAMBIAR CORREA DE IMPULSION 1. Colocar la nueva correa de fijador de la correa. NOTA: Siempre use la correa aprobada pot la f_.brica para asegurarse que calce y dure. 2.
MOTOR a problemas que se sospecha vienen del carburador, Ileve su segadora a contacto con su centro de servicio Husqvarna o con un otro centro de servicio cualificado para repararla y/o ajustarla. IMPORTANTE: Nunca manipule el regulador del motor, el que ha sido ajustado en la fb.brica para la velocidad del motor adecuada. Puede ser peligroso hacer funcionar el motor a una velocidad por sobre el ajuste de alta velocidad de la fAbrica.
ACEITE DEL MOTOR Drene el aceite (con el motor caliente) y cb.mbielo con aceite de motor limpio. (Vea "MOTOR" en la secci6n de Mantenimento de este manual.) CILINDRO 1. Remuevalabujia. 2. Vade una onza (29 ml) de aceite a traves del agujero de la bujia en el cilindro. 3. Tire la manilla de arranque lentamente unas cuantas veces para distribuir el aceite. 4. Vuelva a montar la nueva bujia.
SOLUCION DE PROBLEMAS - Yea ia seccion apropiada este dirigido a un centro de servico Husqvarna. CAUSA PROBLEMA Falta de fuerza IVlal cortedisparejo Vibracion e×cesiva AItura de las ruedas dispareja. Velocidad del motor lenta. 4. Acumulaci6n de cesped, hojas o basura debajo de la segadora. Demasiado aceite en motor. Velocidad de recorrido que 1. Eleve la altura de corte. 2. Eleve la altura de corte. 3. 4. Limpie/cambie el filtro de aire. Limpie la parte inferior de la caja de la segadora.
HUSQVARNA 70 ........... ROTARY LAWN MOWER - MODEL NUMBER 917,379151 (PRODUCT HUSOOHW) 13 64 / /'/58 84 .... 3 96 56 39 22 59 28 26 56 \ 11 17 37 .............. _, 21 / .._ ............ 57 19 4_ PO NUMBER 26 40 22 \ 31 \ 47 \ t 30 57 50 ............
HUSQVARNA KEY NO. PART NO. 186296 2 440386 429930X004 CO 13 17 18 19 2O 21 22 24 26 182398 750634 426432X668 431390 425575 189713X428 437516 431238 132004 194788 430349 419949 141841 419948 419945 iMPORTANT: LAWN MOWER - MODEL NUMBER KEY NO. DESCRiPTiON 1 3 6 7 8 9 11 4_12 ROTARY PART NO.
HUSQVARNA ROTARY LAWN MOWER - MODEL 44 NUMBER 917,379151 4 37 (PRODUCT 59 NUMBER HUSOOHW) 30 J f J ( (, \ \ 56 i \ / '\ / 1 \ \ 9 57 '\ 34 / / 6 / 10 32 4O \, 17 \ \ 38 38 33 "_ \ 11 12 \, 38 24 35 41 31 12 ,_ 40 18 \ 15 '\ \ 36 \ \ 28 '\ 57 34 5 29 \ \, \, 34 .............
HUSQVARNA (J1 ROTARY LAWN MOWER - MODEL NUMBER 917,379151 KEY NO. PART NO. PART NO. DESCRiPTiON 1 430995 9 10 11 12 13 14 15 16 DESCRiPTiON KEY NO.
HONDA 4-CYCLE ENGINE CYLINDER BARREL MODEL NUMBER I GCV160-LAS3A CRANKSHAFT / ® F 3/8-24UNF 2B TAP _86,7 b 1357_ O525 CARBURETOR ! 14 23 I -2o
HONDA 4=CYCLE ENGINE MODEL NUMBER CYLINDER BARREL KEY PART NO. NO. DESCRIPTION 1 12000-ZOL-406 Cylinder Assembly 12000-ZOL-840 Cylinder Assembly 3 12310-ZOJ-000 Cover, Cylinder Head 12311 -ZL8- D00 Cover, Head 12311 -ZLS-000 Cover, Head 4 12355-ZL8-000 Cover, Breather 5 90013-883-000 6 90014-952-000 7 91201-ZL8-003 8 98079-55846 10 12209-ZM0-003 11 14711-ZL8-000 14711 14711 12 14721 13 14751 14 14771 -ZOJ-000 -ZOJ-800 -ZL8-000 -ZLS-000 -ZOJ-000 CARBURETOR KEY PART NO. NO.
HONDA 4=CYCLE ENGINE MODEL NUMBER GCV160=LAS3A / 9 1 _15 21 14 - 27 48 @1o 49 33 12 47 8 t7 38 26- 17 48
HONDA 4=CYCLE ENGINE MODEL NUMBER FAN COVER KEY PART NO. NO.
HONDA 4=CYCLE ENGINE MODEL NUMBER GCV160-LAS3A i t / 13_ ,_ 12 <;> 4 15 5O CAMSHAFT PULLEY
HONDA 4=CYCLE ENGINE MODEL NUMBER CAMSHAFT PULLEY KEY PART NO. NO. DESCRIPTION 1 14320-ZL8-010 Pulley, Camshaft 2 14324-ZL8-000 Shaft, Cam Pulley 3 14400-Z0J-014 Belt, Timing 6 11 12 13 15 16 14461-ZL8-000 90112-333-000 90206-001-000 91301 -ZM0-V31 14431 -Z0J-000 14441 -Z0J-000 OiL PAN KEY PART NO. NO.
Your Home For repair - in your home - of all major brand appliances, lawn and garden equipment, or heating and cooling systems, no matter who made it, no matter who sold it! For the replacement parts, accessories and owner's manuals that you need to do-it-yourself. For Sears professional installation of home appliances and items like garage door openers and water heaters. 1-800=4-MY-HOME ® Anytime, day or night (1-800-469-4663) www.sears.com (U.S.A. and Canada) www.sears.