Gasoline containing up to 10% ethanol (E10) is acceptable for use in this machine. The use of any gasoline exceeding 10% ethanol (E10) will void the product warranty. Vous pouvez utiliser de l’essence contenant jusqu’à 10 % d’éthanol (E10) avec cet appareil. L’utilisation d’essence contenant plus de 10 % d’éthanol annulera la garantie du produit.
SAFETY RULES SAFE OPERATION PRACTICES FOR POWERED WALK-BEHIND ROTARY TILLERS AND HAND-SUPPORTED CULTIVATORS TRAINING • • • OPERATION Read, understand, and follow all instructions on the machine and in the manual(s) before starting. Be thoroughly familiar with the controls and the proper use of the equipment. Know how to stop the machine and disengage the controls quickly. Never allow children to operate the equipment. Never allow adults to operate the equipment without proper instruction.
SAFETY RULES SAFE OPERATION PRACTICES FOR POWERED WALK-BEHIND ROTARY TILLERS AND HAND-SUPPORTED CULTIVATORS • • • Never pick up or carry a machine while the engine (motor) is running. Do not operate the tiller while under the influence of alcohol or drugs. Powered walk-behind tiller work is strenuous. You must be in good physical condition and mentally alert. If you have any condition that might be aggravated by strenuous work, check with your doctor before operating a powered walk-behind tiller.
PRODUCT SPECIFICATIONS GASOLINE CAPACITY: 2.7 Quarts (2.55 L) Unleaded Regular OIL (API SJ–SN): Capacity: 14 oz. (0.41 L) SAE 30 (Above 40°F/4°C) SAE 5W-30 (Below 40°F/4°C) SPARK PLUG : TORCH F6RTC GAP: .010" (0.25 mm) CUSTOMER RESPONSIBILITIES • • Read and observe the safety rules. Follow a regular schedule in maintaining, caring for and using your tiller. • Follow instructions under “Maintenance” and “Storage” sections of this Owner’s Manual.
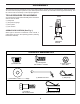
ASSEMBLY Your new tiller has been assembled at the factory with exception of those parts left unassembled for shipping purposes. To ensure safe and proper operation of your tiller all parts and hardware you assemble must be tightened securely. Use the correct tools as necessary to insure proper tightness. TOOLS REQUIRED FOR ASSEMBLY FRONT A socket wrench set will make assembly easier. Standard wrench sizes are listed.
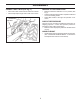
ASSEMBLY UNPACKING CARTON (See Fig. 2) • CAUTION: Be careful of exposed staples when handling or disposing of cartoning material. Grasp handle assembly. Hold in “up” position. Be sure handle lock remains in gearcase notch. Slide handle assembly into position. HANDLE ASSEMBLY "UP" POSITION IMPORTANT: WHEN UNPACKING AND ASSEMBLING TILLER, BE CAREFUL NOT TO STRETCH OR KINK CABLES. • • • • • While holding handle assembly, cut cable ties securing handle assembly to top frame and depth stake.
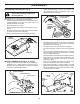
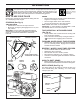
ASSEMBLY REMOVE TILLER FROM CRATE CONNECT SHIFT ROD (See Fig. 7) • • • Insert end of shift rod into hole of shift lever indicator. Insert hairpin clip through hole of shift rod to secure. HAIRPIN CLIP • SHIFT LEVER INDICATOR • SHIFT ROD Make sure shift lever indicator is in “N” position (See Fig. 7) Tilt tiller forward by lifting handle. Separate cardboard cover from leveling shield. Rotate tiller handle to the right and pull tiller out of carton.
OPERATION KNOW YOUR TILLER READ THIS OWNER'S MANUAL AND SAFETY RULES BEFORE OPERATING YOUR TILLER. Compare the illustrations with your tiller to familiarize yourself with the location of various controls and adjustments. Save this manual for future reference. These symbols may appear on your Tiller or in literature supplied with the product. Learn and understand their meaning.
OPERATION The operation of any tiller can result in foreign objects thrown into the eyes, which can result in severe eye damage. Always wear safety glasses or eye shields before starting your tiller and while tilling. We recommend a wide vision safety mask over spectacles or standard safety glasses. HOW TO USE YOUR TILLER ENGINE • Move throttle control to “SLOW” position and allow the engine to run slowly for cool down. • Turn the engine switch to the "OFF" Position.
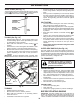
OPERATION DRAG STAKE (See Fig. 11) • The drag stake should be raised when tilling in the counter rotating ( ) till position. The drag stake should be lowered when tilling in the forward rotating ( ) till position. • LOWERED (FORWARD ROTATING TILL) CULTIVATING • • RAISED (COUNTER ROTATING TILL) DRAG STAKE • • Fig. 11 TILLING (See Fig. 12) • • • • • • Release depth stake pin. Pull the depth stake up for increased tilling depth. Place depth stake pin in hole of depth stake to lock in position.
OPERATION CHECK ENGINE OIL LEVEL (See Fig. 12) • • • • • CAUTION: Alcohol blended fuels (called gasohol or using ethanol or methanol) can attract moisture which leads to separation and formation of acids during storage. Acidic gas can damage the fuel system of an engine while in storage. To avoid engine problems, the fuel system should be emptied before storage of 30 days or longer. Drain the gas tank, start the engine and let it run until the fuel lines and carburetor are empty.
OPERATION TILLING HINTS CAUTION: Until you are accustomed to handling your tiller, start actual field use with throttle in slow position. • • Tilling is digging into, turning over, and breaking up packed soil before planting. Loose, unpacked soil helps root growth. Best tilling depth is 4" to 6". A tiller will also clear the soil of unwanted vegetation. The decomposition of this vegetable matter enriches the soil.
MAINTENANCE OU RS Y5 0H EV OU ER YS RS EA SO N S EV ER Y2 5H UR ER EV Y5 ER EV FO BE FILL IN DATES AS YOU COMPLETE REGULAR SERVICE RE EA HO CH US E MAINTENANCE SCHEDULE SERVICE DATES Check Engine Oil Level Change Engine Oil 1,2 Oil Pivot Points Inspect Spark Arrester / Muffler Inspect Air Screen Clean or Replace Air Cleaner Cartridge 2 Clean Engine Cylinder Fins Replace Spark Plug RH Gear Case Grease Fitting (1oz.
MAINTENANCE Disconnect spark plug wire before performing any maintenance to prevent accidental starting of engine. Prevent fires! Keep the engine free of grass, leaves, spilled oil, or fuel. Remove fuel from tank before tipping unit for maintenance. Clean muffler area of all grass, dirt, and debris. Do not touch hot muffler or cylinder fins as contact may cause burns. OIL DRAIN PLUG OIL LEVEL ENGINE OIL FILLER PLUG Fig.
MAINTENANCE MUFFLER COOLING SYSTEM (See Fig. 20) Your engine is air cooled. For proper engine performance and long life keep your engine clean. • Clean air screen frequently using a stiff-bristled brush. • Remove blower housing and clean as necessary. • Keep cylinder fins free of dirt and chaff. Do not operate tiller without muffler. Do not tamper with exhaust system. Damaged mufflers or spark arresters could create a fire hazard. Inspect periodically and replace if necessary.
SERVICE AND ADJUSTMENTS CAUTION: Disconnect spark plug wire from spark plug and place wire where it cannot come into contact with plug. TILLER TO ADJUST HANDLE HEIGHT (See Fig. 23) Select handle height best suited for your tilling conditions. Handle height will be different when tiller digs into soil. • First loosen handle lock lever. • Handle can be positioned at different settings between “HIGH” and “LOW” positions. • Retighten handle lock lever securely after adjusting.
SERVICE AND ADJUSTMENTS GROUND DRIVE BELT ADJUSTMENT (See Fig. 26) TO REPLACE GROUND DRIVE BELT (See Figs. 25 and 26) • • • • • • Remove belt guard as described in “TO REMOVE BELT GUARD”. Remove old belt by slipping off engine pulley first then remove from transmission pulley. Place new belt in groove of transmission pulley and into engine pulley. BELT MUST BE IN GROOVE ON TOP OF IDLER PULLEY. NOTE POSITION OF BELT TO GUIDES. Check belt adjustment as described below. Replace belt guard.
SERVICE AND ADJUSTMENTS TINE REPLACEMENT (See Figs. 27, 28 and 29) ENGINE Maintenance, repair, or replacement of the emission control devices and systems, which are being done at the customers expense, may be performed by any non-road engine repair establishment or individual. Warranty repairs must be performed by an authorized engine manufacturer's service outlet. CAUTION: Tines are sharp. Wear gloves or other protection when handling tines.
STORAGE Immediately prepare your tiller for storage at the end of the season or if the unit will not be used for 30 days or more. ENGINE OIL Drain oil (with engine warm) and replace with clean oil. (See “ENGINE” in the Maintenance section of this manual). CAUTION: Never store the tiller with gasoline in the tank inside a building where fumes may reach an open flame or spark. Allow the engine to cool before storing in any enclosure.
TROUBLESHOOTING POINTS PROBLEM Will not start CAUSE 1. 2. 3. 4. 5. 6. 7. CORRECTION Out of fuel. Fuel valve "OFF". Engine Switch "OFF". Engine not “CHOKED” properly. Engine flooded. Dirty air cleaner. Water in fuel. 1. 2. 3. 4. 5. 6. 7. 8. Bad spark plug or improper gap. Fill fuel tank. Turn fuel valve to the "ON" position. Turn engine switch to the "ON" position. See “TO START ENGINE” in Operation section. Wait several minutes before attempting to start. Clean or replace air cleaner cartridge.
RÈGLES DE SÉCURITÉ MESURES DE SÉCURITÉ D’UTILISATION DES MACHINES ROTATIVES DONT LE CONDUCTEUR EST À PIED À L’ARRIÈRE ROTOCULTEURS ET CULTIVATEURS À MAIN FORMATION • • • • Lire toutes les instructions des manuels et celles sur la machine avant de démarrer la machine. Bien connaître les commandes et l’utilisation appropriée de l’équipement. Savoir arrêter la machine et débrayer rapidement les commandes. Ne jamais laisser un enfant manœuvrer la machine.
RÈGLES DE SÉCURITÉ MESURES DE SÉCURITÉ D’UTILISATION DES MACHINES ROTATIVES DONT LE CONDUCTEUR EST À PIED À L’ARRIÈRE ROTOCULTEURS ET CULTIVATEURS À MAIN • • N’utilisez pas le rotoculteur sous l’influence d’alcool ou de drogues. Le travail à l’aide d’un rotoculteur à conduite à pied à l’arrière est fatigant. Il faut être en bonne condition physique et mentale.
SPÉCIFICATIONS DE PRODUIT Capacité et type d'essence: (L'essence sans plomb normale) RESPONSABILITÉS DU CLIENT • • Lisez et faites attention aux règles de sécurité. Suivez un programme habituel d’entretien, de soin, et d’utilisation de la motobineuse. • Suivez les instructions dans les sections des Entretien et d’Entreposage de ce manuel du propriétaire.
MONTAGE Votre nouvelle motobineuse a été montée à l'usine sauf certaines pièces en vue de l'expédition. Pour s'assurer d'une utilisation correcte et sûre de votre motobineuse, toutes les pièces et ferrures que vous assemblez doivent être serrées à fond. Utilisez les bons outils. LES OUTILS EXIGES POUR LE MONTAGE DEVANT Un jeu des clés à douille facilitera l'assemblage.
MONTAGE • DEBALLER LE CARTON (Voir la Fig. 2) ATTENTION: Faites attention aux agrafes du carton. Empoignez l’ensemble de poignée. Le tenez en position "haute". Assurez que le verrou de poignée reste dans l’encoche de la boîte de vitesse. Glissez l’ensemble de poignée en position. ENSEMBLE DE LA POIGNÉE EN POSITION “HAUTE” IMPORTANT: LORSQUE VOUS DEBALLEZ OU MONTEZ LA MOTOBINEUSE, FAITES ATTENTION DE NE PAS ALLONGER OU ENTORTILLER LE(S) CABLE(S).
MONTAGE ATTACHER LE CABLE D’EMBRAYAGE (Voir la Fig. 6) • RACCORDER LA TIGE DE CHANGEMENT DE VITESSE (Voir la Fig. 6) Accrochez l'extrémité du câble d'embrayage à travers du trou dans le support de la barre de commande au besoin. • • COLLIER EN EPINGLE A CHEVEUX INDICATEUR DE LEVIER DE CHANGEMENT DE VITESSE Insérez l’extrémité de la tige de changement de vitesse dans le trou de l’indicateur de levier de changement de vitesse.
UTILISATION CONNAISSEZ VOTRE MOTOBINEUSE LISEZ CE MANUEL DU PROPRIÉTAIRE ET LES RÈGLES DE SÉCURITÉ AVANT D’UTILISER VOTRE MOTOBINEUSE. Comparez les illustrations à votre motobineuse pour connaître les positions des différentes commandes et les différents réglages. Conservez ce manuel. Ces symboles peuvent se montrer sur votre motovineuse à gazon ou dans les publications fournies avec le produit. Apprenez et comprenez la signification des symboles.
UTILISATION L’utilisation d’une motobineuse présente le risque de la projection des particules dans les yeux, ce qui peut causer des blessures sérieuses. Portez toujours des lunettes de sécurité ou une visière avant de démarrer la motobineuse et lorsque vous labourez. Nous recommandons une visière de sécurité panoramique pour ceux qui portent des lunettes ou des lunettes de sécurité standard. MOTEUR COMMENT UTILISER VOTRE MOTO-BINEUSE 2.
UTILISATION JAUGE DRAGUER (Voir la Fig. 10) • • Le tasseau draguer doit être levé quand vous faites le labourage en contre rotation en marche en avant ( ). Le tasseau draguer doit être baissé quand vous faites le labourage à rotation en marche en avant ( ). • BAISSER (ROTATION EN MARCHE EN AVANT) CULTIVER • LEVÉ (CONTRE ROTATION EN MARCHE EN AVANT) • JAUGE DRAGUER • Fig. 10 LABOURAGE (Voir la Fig. 11) • • Relâchez la pince du jauge de profondeur.
UTILISATION AVANT DE DÉMARRER LE MOTEUR ATTENTION: L’expérience indique que les combustibles mélangés avec l’alcool (appelés gasohol ou utilisant l’éthanol ou le méthanol) peuvent attirer l’humidité qui cause la séparation et la formation d’acide pendant l’entreposage. Le gaz acide peut avarier le système d’essence d’un moteur pendant l’entreposage. Pour éviter les problèmes de moteur, le système d’essence doit être vidangé avant tout l’entreposage de 30 jours ou plus.
UTILISATION • COMMANDE DES GAZ ROBINET DE CARBURANT COMMUTATEUR DU MOTEUR BOUGIE D’ALLUMAGE • COMMANDE DE L'ÉTRANGLEUR BINAGE POIGNÉE DE DÉMARRAGE (RECUL) Le binage est un labourage peu profond entre les sillons pour arracher les mauvaises herbes et pour les empêcher de priver les plantes de l’humidité et des aliments. De plus, l’ameublissement de la couche supérieure de la croûte contribuera à la conservation de l’humidité dans le sol.
UTILISATION RÉGLER LES ROUES POUR BINER (Voir les Figs. 16 et 17) • Mettez des blocs sous le côté droit de la motobineuse et enlevez le collier en épingle à cheveux et l'axe de chape de la roue à droite. • Tirez la roue d'environ 1 pouce (2,5 cm) jusqu’à ce que le trou dans le moyeu intérieur de la roue soit aligné avec le trou intérieur de l’essieu. • Remplacez l'axe de chape et le collier en épingle à cheveux à l’intérieur de la roue et enlevez les blocs. • Répétez les étapes ci-dessus au côté gauche.
DATES D’ENTRETIEN TO CH UT TO AV AN T INSCRIVEZ LES DATES AU FUR ET À MESURE QUE VOUS EFFECTUEZ LES ENTRETIENS RÉGULIERS AQ U CALENDRIER D’ENTRETIEN EU ES SA LE GE S5 UT H ES EU RE LE TO S2 S UT 5H ES E UR LE UN ES S5 AV 0H EZ E PO UR R ES TE MP OR AD A ENTRETIEN Vérifiez le niveau d’huile de moteur Changez l’huile de moteur 1,2 Huilez les points de pivotement Inspectez le silencieux pare-étincelles Inspectez le tamis à air Nettoyez/remplacez la cartouche du filtre à air 2 Nettoyez les ailette
ENTRETIEN Débranchez le fil de bougie d'allumage avant d'effectuer tout entretien pour éviter un démarrage accidentel du moteur. Évitez les incendies! Maintenez le moteur exempt d'herbe, de feuilles et d'huile ou de carburant répandu. Vidangez le carburant du réservoir avant de pencher la motobineuse pour l'entretien. Nettoyez la surface du silencieux de toute accumulation d'herbe, de saleté et de débris.
ENTRETIEN SILENCIEUX SYSTÈME DE REFROIDISSEMENT (Voir la fig. 21) N’utilisez pas la motobineuse sans silencieux. Ne modifiez pas le système d’échappement. Un silencieux ou un pare-étincelles avarié pose des risques d’incendie. Inspectez-les périodiquement et remplacez-les si nécessaire. Si votre moteur est muni d’un grillage de pare-étincelles, enlevez-le toutes les 50 heures pour le nettoyer et l’inspecter. Remplacez-le s’il est avarié. Votre moteur est refroidi à l'air.
RÉVISION ET RÉGLAGES ATTENTION: Débranchez le fil de bougie d'allumage et posez-le à un endroit où il ne peut pas toucher la bougie. MOTOBINEUSE POUR RÉGLER LA HAUTEUR DU GUIDON (Voir la Fig. 22) AXE DE CHAPE Choisissez la hauteur la plus convenable pour vous et les conditions de labourage. La hauteur changera pendant le labourage. • Relâchez premièrement le levier de verrou de guidon. • Le guidon peut être posé à différentes positions entre “HAUTE” (HIGH) et “BASSE” (LOW).
RÉVISION ET RÉGLAGES POUR REMPLACER LA COURROIE D’ENTRAÎNEMENT À TERRE (Voir les Figs. 24 et 25) • • • • • • RÉGLER LA COURROIE D’ENTRAÎNEMENT À TERRE (Voir la Fig. 25) Pour la tension de courroie correcte, le ressort de traction devrait avoir approximativement un allongement de 5/8 po. (16 mm) lorsque la barre de commande d’entraînement est à la position engagée “ENGAGED”.
RÉVISION ET RÉGLAGES MOTEUR REMPLACEMENT DES FRAISES (Voir les Figs. 26, 27, et 28) POUR RÉGLER LE CARBURATEUR Le carburateur a été réglé à l’usine et non modifiable. IMPORTANT: NE TOUCHEZ PAS LE REGULATEUR DE MOTEUR. LE CONSTRUCTEUR DE L’EQUIPEMENT QUI A MONTE LE MOTEUR DETERMINE LA VITESSE MAXIMUM HORS CHARGE A LAQUELLE LE MOTEUR DOIT ETRE UTILISE. NE DEPASSEZ JAMAIS CETTE VITESSE. CETTE ACTION PEUT ETRE DANGEREUSE.
ENTREPOSAGE Préparez immédiatement votre motobineuse pour l’entreposage à la fin de la saison ou si l'unité ne sera pas utilisée pendant 30 jours ou plus. HUILE DE MOTEUR Vidangez l’huile (quand le moteur est chaud) et remplacez avec l’huile de moteur fraîche. (Référez-vous à “MOTEUR” dans la section Entretien de ce manuel.) AVERTISSEMENT: N’entreposez jamais la motobineuse lorsque le réservoir contient d’essence dans un bâtiment où les vapeurs pourraient parvenir à une flamme nue ou une étincelle.
GUIDE DE DÉPANNAGE PROBLÈME Le moteur refuse de démarrer CAUSE 1. 2. 3. 4. CORRECTION Sans essence. Robinet de carburant à la position "OFF" (arrêt). Commutateur du moteur à la position "OFF" (arrêt). Le moteur n’est pas correctement étranglé. 5. Le moteur est noyé. 6. Filtre à air sale. 7. II y a d’eau dans l’essence. 8. Réservoir d'essence bouché. 9. Fil de bougie d'allumage est débranché. 10. Mauvaise bougie d’allumage ou écart incorrect. Démarrage difficile 1.
REMARQUES D’ENTRETIEN 41
REMARQUES D’ENTRETIEN 42
REMARQUES D’ENTRETIEN 43
09.20.17 SR Printed in U.S.A.