A SAFETY RULES A IMPORTANT: THIS CUTTING MACHINE 1S CAPABLE OF AMPUTATING HANDS AND FEET AND THROWING OBJECTS. FAILURE TO OBSERVE THE FOLLOWING SAFETY INSTRUCTIONS COULD RESULT IN SERIOUS INJURY OR DEATH, Look for this symbol to point out ime portent safety precautions, It means CAUTION!!! BECOME ALERT! YOUR SAFETY IS INVOLVED. 1al starting when setting up, transporting, adjusting or making repairs, always disconnect spark plug wire and place wire where it cannot come In contact with plug.
° Never operate machine in wet grass, Always be sure of your footing: keep a firm half on the handle; walk, never run. + Disengage the drive system, if so equipped, before starting the engine (motor). ° if the equipment should start to vibrate abnormally, stop the engine (mortar) and check immediately for the cause, Vibration is generally a waning of ruble, + Always weer eye protection when operating machine.
CONGRATULATIONS on your purchase of a new lawn mower, [hasten designed, engineered and manufactured to give youth best possible dependability and performance. Should you experience any problem you cannot easily remedy, please contact your nearest authorized service carter. We have competent, well-trained technicians and the proper tools to service or repair this fawn mower, Please read and retain this manual. The instructions will enable you to assemble and maintain your lawn mower properly.
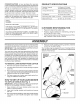
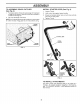
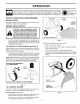
ASSEMBLY TO ASSEMBLE GRASS CATCHER {See Fig. 2) 1. Put grass catcher frame into grass bag with rigid part of bag on the bottom. Make sure the frame handier is outside of the bag top. 2, Slip vinyl bindings over frame, NOTE: vinyl! bindings are too stiff, hold them inward water for a few minutes. If bag gets wet, let it dry before using. BINDINGS OPENING INSTALL STARTER ROPE (See Fig. 3) 1. Loosen Knob, 2. Hold control bar against upper handle.
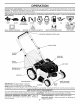
OPERATION KNOW YOUR LAWN MOWER, READ THIS OWNERS MANUAL AND SAFETY RULES BEFORE OPERATING YOUR LAWN MOWER. Compare the illustrations with your lawn mower to familiarize yourself with the location of various controls and adjustments. Save this manual for future reference. Tess symbols may appear on your lawn mower or in literature supplied with the product. Learn and understand their meaning.
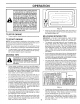
OPERATION pried HOW TO USE YOUR LAWN MOWER ENGINE SPEED The engine speed was set at the factory for optimum performance. Speed is not adjustable. ENGINE ZONE CONTROL EY The operation of any lawn mower can result in foreign objects thrown inch the eyes, Use ear pro which can result in severe eye damage. Always wear safely glasses or eye shields rectors to pet...
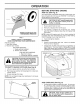
OPERATION MOWER IS NOW READY FOR DISCHARGING OPERATION FIG. 7 SIMPLE STEPS TO REMEMBER WHEN CONVERTING YOUR LAWN MOWER: FOR MULCHING 1. Rear door closed, 2. Moocher door closed. FOR REAR BAGGING 1. Grass catcher installed, 2. Mulches door closed. FOR SIDE DISCHARGING 1. Rear door closed. 2. Discharge deflector installed, CAUTION: Do nol run your lawn mower f \ without rear door closed or approved grass catcher in place.
OPERATION Alcohol blended fuels {called gasohol or using ethanol or methanol) can attract moisture which leads to separation and formation of acids during storage. Acidic gas can damage the fuel sys. tam of an engine while in storage. To avoid engine problems, the fuel system should be emptied before storage of 30 days or longer. Empty the gas tank, start the engine and let it run until the fuel lines and carburetor are empty. Use fresh fuel next season. See Storage Instructions for additional information.
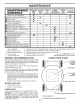
MAINTENANCE BEFORE EACH USE MAINTENANCE SCHEDULE Check for Loose Fasteners EVERY 25 HOURS OR SEASON BEFORE STORAGE Clean / Inspect Grass Catcher ” Check Tires Check Drive Wheels Clean Lawn Mower To Clean under Drive Cover Check Drive Belt / Pulleys ™* Check / Sharpen / Replace Blades L A WwW Lubrication Clean and Recharge Battery ™ Check Engine Oil level Change Engine Oi Clean Air Filter inspect Muffler Replace Spark Plug ME=DEM Replace Air Filter Paper Cartridge Empty fuel system or add Stabilizer * {if so
MAINTENANCE LAWN MOWER Always observe safety rules when performing maintenance, TIRES + Keep tires free of gasoline, oil, or insect control semi cal which can harm rubber. «Avoid stumps, stones, deep ruts, sharp objects and chert hazards that mey cause tire damage. BLADE CARE For best results, mower blade must be kept sharp, Replace bent or damaged blades, aA TO REMOVE BLADE (See Fig. 12} 1. Disconnect spark plug wire from spark plug and place wire where it cannot come in contact with plug. 2.
MAINTENANCE TO CHANGE ENGINE OIL (See Fig. 13) MOTE: Before tipping lawn mower to drain oil, empty fuel tank by running engine until fuel tank is empty. 1. Disconnect spark plug wire from spark plug and place wire where it cannot come in contact with plug. 2. Remove engine ail cap; lay aside on a clean surface. Tip lawn mower on its side as shown and drain ofl into a suitable container. Rock lawn mower back and forth to remove any oil trapped inside of engine. FIG. 13 4.
SERVICE AND ADJUSTMENTS Release control bar and stop engine. CAUTION: TO AVOID SERIOUS INJURY, BEFORE PERFORMING ANY SERVICE OR ADJUSTMENTS: 1 A 2. Make sure the blade and all moving parts have completely sipped. 3. Disconnect spark plug wire from spark plug and place where it cannot come in contact with plug. LAWN MOWER TO ADJUST CUTTING HEIGHT See “TO ADJUST CUTTING HEIGHT" in the Operation section of this manual.
STORAGE MOWING OPERATOR or PRESENCE 7 POSITION CONTROL 75 BAR JS J '/ FOLD o 7, / For Ward STORAGE /; / HANDLE KNOB LOWER HANDLE frm BRACKET FIG. 18 14 ENGINE FUEL SYSTEM PORTENT: IRIS IMPORTANT TO PREVENT GUM DEPOSITS FROM FORMING IN ESSENTIAL FUEL SYSTEM PARTS SUCH AS CARBURETOR, FUEL FILTER, FUEL HOSE, OR TANK DURING STORAGE. ALCOHOL BLENDED FUELS (CALLED GASOHOL OR USING ETHANOL OR METHANOL) CAN ATTRACT MOISTURE WHICH LEADS TO SEPARATION AND FORMATION OF ACIDS DURING STORAGE.
TROUBLESHOOTING POINTS PROBLEM CAUSE CORRECTION Does not start | 1. Dirty air fitter, 1. Clean/replace air fitter, 2. Cutoff 2. Fill fuel tank. 3, Stale fuel, 3. Empty fuel tank and refill tank with fresh, clean gasoline. 4, Water in fuel. 4. Empty fuel tank and refill tank with fresh, clean gasoline. 8, Spark plug wire is disconnected, 5, Connect wire to plug. 6. Bad spark plug. &. Replace spark plug. 7. Loose blade or broken blade adapter, 7. Tighten blade bolt or replace blade adapter) 8.
A REGLAS DE SEGURIDAD A IMPORTANTE: ESTA MAQUINA CORTADORA ES CAPAZ DE AMPUTAR LAS MANOS Y LOS MANOS Y LOS PIES Y DE LANZAR OBJETOS. SI NO SE OBSERVAN LAS INSTRUCCIONES DE SEGURIDAD SIGUIENTES SE PUEDEN PRODUCIR LESIONES GRAVES O LA MUERTE, A A Busque este simbolice gue serial las precauciones de seguridad de importancia.
* Nunca opere la maquina cuando la hierba est mojada. Asegúrese siempre de tener buena fracciona en sus ples: engarite el mango firmemente y camine; nunca cifra, « Desconecte el sistema de tracción, si la maquine cuenta con él, antes de arrancar el motor. «Si el equipo empezara a vibrar de una manera anormal, pare el motor y revise de inmediato para averiguar la causa. Generalmente la vibración suele indicar que existe alguna verla.
FELICITACIONES por la compra de su segadora. Ha sido dis hada, planificado y fabricado para darle la mejor confiabilidad y el mejor rendimiento posible. Ene caso de gue se encuentre con cualquier problema que no pueda solucionar fácilmente, haga favor de podrirse en contacto oun un centro de servicio cualificado. Cuenta cur técnicos bien capacitados y competentes y con las herramientas adecuadas para darle servicio o para reparar este tractor, Haga el favor de leer y de guardar este manual.
MONTAJE / PRE-OPERACIÓN PARA MONTAR EL RECOGEDOR DE CÉSPED {Vea Fig. 2) 1. Ponga el bastidor del recogedor de césped eri la bolsa del césped con la parte rígida de la bolsa en la parte inferior, Asegúrese que el mango del bastidor esté en el exterior de ia parte superior de la bolsa. 2. Deslice los sujetadores de vinilo sobre ef bastidor, VAIS: Silos sujetadores de vinilo estén muy duros, méalos en agua caliente por algunos minutos.
OPERACIÓN FAMILIARÍCESE CON SU SEGADORA. LEA ESTE MANUAL DEL SUENO Y LAS REGLAS DE SEGURIDAD ANTES DE OPERAR SU SEGADORA. Compare las lustraciones con su segadora para familiarizarse con la cubriéndole de los diversos controles y ajustes. Guarda este manual para referencia en al futuro. Estos símbolos pueden ateriese sobre su segadora o en la Plural proporcionada con el producto, Aprenda y comprenda sus significados.
OPERACIÓN kui seguridad seda sobre fas pagas COMO USAR SU SEGADORA VELOCIDAD DEL MOTOR La velocidad del motor se establecida en la fabrica para un rendimiento séptimo. La velocidad no se puede ajustar, CONTROL DE ZONA DEL MOTOR PRECAUCIÓN: Las regulaciones federales exigen gue se Instale un control para el motor en esta segadora para reducir a un mínimo ef riesgo de lesionarse debido al contacto con acuchilla.
OPERACIÓN LA SEGADORA ESTA LISTA PARA LA OPERACIÓN DE LA DESCARGA FIG. 7 PASOS SIMPLES DE RECORDAR CUANDO CONVIERTA SU SEGADORA: PARA ACORCHAMIENTO 1. La plancha acolcha dora trasera instalada. 2. la protección contra la descarga cerrada. PARA ENCASAMIENTO TRASERA 1. la plancha acolcha dora trasera removida. 2. Recogedero del césped instalado 3. La protección contra la descarga cercada. PARA DESCARGA LATERAL: 1. La plancha acolcha dora trasera instalada. 2. La desviador de la descarga instalada.
OPERACIÓN Los combustibles meditados con alcohol (conoideos como galocho, o ef uso de etano 0 metano} pueden atraer la humedad, ia fue conduce a la separación y formación de deudos durante sl almacenamiento, La gasolina acidia puede datar ef sistema del combustible de un motor durante el almacenamiento. Para evitar [us problemas con el motor, se debe vacar el sistema del combustible antes de guardar por un perforo de 30 días 0 mas.
MANTENIMIENTO PROGRAMA DE MANTENIMIENTO Revisar si hay Sujetadores Sueltos DESPUÉS CADA 25 HORAS O HORAS TEMPORADA HORAS DE CADA uso Reaccionariamente ef Recogedor de Césped * Controlar ios Neumáticos Corolario las Ruedas Motrices Limpiar fa Segadora Limpiar debajo fa Cubierta de Ja Transmisión ™* Revisar las Correas vy las Poleas Impulsadas Avisar / Afufar / Cambiar la Cuchilla Lubrican Implar / Recargar la Materia © Revisar el nivel del Aceite Cambiar a Aceite del motor Limpiar &f Filtre de Aire Inspeccio
MANTENIMIENTO SEGADORA Siempre observe las reglas de seguridad cuando haga el mantenimiento. LLANTAS + Mantenga las llantas sin gasolina, aceite o substancias qui fricas pare control de insectos gus pueden defiar la gamo. + Evite los tocones, las piedras, las gritas profundas, los objetos alfados y otros peligros que pueden defiar a las llantas. CUIDADO DE LA CUCHILLA Para obtener los mejores resultados, la cuchilla de la segadora tienen que mantenerse afilada. Cambie la cuchilla doblada o tardada.
MANTENIMIENTO PARA CAMBIAR EL ACEITE DEL MOTOR {Vea Fig. 13) AVISO: Antes de inclinar la segadora para drenar el aceite, drene el tanque de combustible haciendo correr ef motor hasta rus of lengua esté vio. 1. Desconecte ef alambre de la bujía y téngalo de modo que no pueda entrar en compacto con ésta. 2. Remueva la tapa del deposito del aceite; déjela a un lado en una superficie impla. 3. Incline la cortadora de césped por este costado tal como se muestra y purgue ef aceite en un recipientes idóneo.
SERVICIO Y AJUSTES A: Suelte la barra de control y para el motor. Asegúrese gue la cuchilla y que todas las partes movibles se hayan detenido completamente. 4. Desconecte ef alambre de la bujía y téngalo en donde no pueda entrar en contacto con ésta. ADVERTENCIA: Para evitar lesiones serias, antes de dar cualquier servicies o de hacer ajustes: SEGADORA PARA AJUSTAR LA ALTURA DE CORTE Vea "PARA AJUSTAR LA ALTURA DE CORTE" en la sección de Operación de este manual.
ALMACENAMIENTO BARRA DE CON. TROL QUE LA PRESENCIA DEL OPERADOR POSICIÓN PARA io SEGAR FIG. 18 28 MOTOR SISTEMA DE COMBUSTIBLE HA PORTANTE: ES IMPORTANTE EVITAR QUE SE FORMEN DEPÓSITOS DE GAMO EN PARTES FUNDAMENTALES DEL IRRESISTIBLEMENTE TALES COMO EL CARBURADOR, EL. FILTRO DEL COMBUSTIBLE, LAMANGUERADELCOMBUSTIBLE © EN EL ESTANQUE DURANTE EL ALMACENAMIENTO.
SOLUCIÓN DE PROBLEMAS PROBLEMA CAUSA CORRECCIÓN No arranca 1. Filtro de aire sucio. 1. Limpiadientes el filtro de late. 2. Sin combustible, 2. Llene si estanque de combustible, 3. Combustible rancio 3. Drena el estanque de combustible vy vuelva a faenar ef estanque con gasolina nueva. 4. Agua en el combustible. 4. Drene el estanque de combustible y vuelva a llenar ef estanque con gasolina nueva, 5. Alambre de la bujía desconectado. 5, Conecte el alambre a la bujía. 6. Bufa mala. 8. Cambie la bujía. 7.