Gasoline containing up to 10% ethanol (E10) is acceptable for use in this machine. The use of any gasoline exceeding 10% ethanol (E10) will void the product warranty. Esta máquina puede utilizar gasolina con un contenido de hasta el 10% de etanol (E10). El uso de una gasolina que supere el 10% de etanol (E10) anulará la garantía del producto.
SAFETY RULES Safe Operation Practices for Walk-Behind Mowers IMPORTANT: THIS CUTTING MACHINE IS CAPABLE OF AMPUTATING HANDS AND FEET AND THROWING OBJECTS. FAILURE TO OBSERVE THE FOLLOWING SAFETY INSTRUCTIONS COULD RESULT IN SERIOUS INJURY OR DEATH. • Look for this symbol to point out important safety precautions. It means CAUTION!!! BECOME ALERT!!! YOUR SAFETY IS INVOLVED.
• • • When loading or unloading this machine, do not exceed the maximum recommended operation angle of 15°. • Wear proper Personal Protective Equipment (PPE) while operating this machine, including (at a minimum) sturdy footwear, eye protection, and hearing protection. Do not mow in shorts or open toed footwear. Always let someone know you are outside mowing. If fuel is spilled on clothing, change clothing immediately. Never overfill fuel tank. Replace gas cap; tighten securely. V.
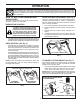
ASSEMBLY Read these instructions and this manual in its entirety before you attempt to assemble or operate your new lawn mower. IMPORTANT: THIS LAWN MOWER IS SHIPPED WITHOUT OIL OR GASOLINE IN THE ENGINE. Your new lawn mower has been assembled at the factory with the exception of those parts left unassembled for shipping purposes. All parts such as nuts, washers, bolts, etc., necessary to complete the assembly have been placed in the parts bag.
ASSEMBLY TO ASSEMBLE GRASS CATCHER (See Fig. 3) INSTALL STARTER ROPE (See Fig. 4) 1. Loosen T-knob. 2. Hold control bar against upper handle. 3. Slowly pull engine starter rope out until rope will slip into loop of rope guide. 4. Tighten T-knob. 1. Put grass catcher frame into grass bag with rigid part of bag on the bottom. Make sure the frame handle is outside of the bag top. 2. Slip vinyl bindings over frame. NOTE: If vinyl bindings are too stiff, hold them in warm water for a few minutes.
OPERATION KNOW YOUR LAWN MOWER READ THIS OWNER'S MANUAL AND SAFETY RULES BEFORE OPERATING YOUR LAWN MOWER. Compare the illustrations with your lawn mower to familiarize yourself with the location of various controls and adjustments. Save this manual for future reference. These symbols may appear on your lawn mower or in literature supplied with the product. Learn and understand their meaning.
OPERATION The operation of any lawn mower can result in foreign objects thrown into the eyes, which can result in severe eye damage. Always wear safety glasses or eye shields while operating your lawn mower or performing any adjustments or repairs. We recommend standard safety glasses or a wide vision safety mask over spectacles. HOW TO USE YOUR LAWN MOWER DRIVE CONTROL ADJUSTMENT (See Fig. 6) ENGINE SPEED Over time, the drive control system may become “loose”, resulting in decreased speed.
OPERATION TO CONVERT MOWER SIDE DISCHARGING (See Fig. 9) • Rear door must be closed. • Open mulcher door and install discharge deflector under door as shown. • Mower is now ready for discharging operation. • To convert to mulching or bagging operation, discharge deflector must be removed and mulcher door must be closed and locked. Your lawn mower was shipped ready to be used as a mulcher. To convert to bagging or discharging: REAR BAGGING (See Fig.
OPERATION TO EMPTY GRASS CATCHER (See Fig. 10) GASOLINE FILLER CAP 1. Lift up on grass catcher using the frame handle. 2. Remove grass catcher with clippings from under lawn mower handle. 3. Empty clippings from bag using both frame handle and bag handle. NOTE: Do not drag the bag when emptying; it will cause unnecessary wear. GRASS CATCHER FRAME HANDLE ENGINE OIL CAP FIG. 11 ADD GASOLINE (See Fig. 11) • BAG HANDLE FIG.
OPERATION MULCHING MOWING TIPS OFF IMPORTANT: FOR BEST PERFORMANCE, KEEP MOWER HOUSING FREE OF BUILT-UP GRASS AND TRASH. SEE “CLEANING” IN THE MAINTENANCE SECTION OF THIS MANUAL. ON • • FUEL VALVE LEVER • FIG. 12 MOWING TIPS CAUTION: Do not use de-thatcher blade attachments on your mower. Such attachments are hazardous, will damage your mower and could void your warranty.
MAINTENANCE BEFORE EACH USE AFTER EACH USE EVERY 10 HOURS EVERY 25 HOURS OR SEASON EVERY 100 HOURS BEFORE STORAGE Check for Loose Fasteners Clean / Inspect Grass Catcher * Check Tires Check Drive Wheels *** Clean Lawn Mower **** Clean under Drive Cover *** Check Drive Belt / Pulleys *** Check / Sharpen / Replace Blade Lubrication Clean and Recharge Battery ** Check Engine Oil level Change Engine Oil Clean Air Filter Inspect Muffler Replace Spark Plug Replace Air Filter Paper Cartridge Empty fuel syste
MAINTENANCE LAWN MOWER IMPORTANT: TO ENSURE PROPER ASSEMBLY, CENTER HOLE IN BLADE MUST ALIGN WITH STAR ON BLADE ADAPTER. Always observe safety rules when performing any maintenance. 3. Be sure the trailing edge of blade (opposite sharp edge) is up toward the engine. 4. Install the blade bolt with the lock washer and hardened washer into blade adapter and crankshaft. 5. Use block of wood between blade and lawn mower housing and tighten the blade bolt, turning clockwise.
MAINTENANCE GRASS CATCHER TO CHANGE ENGINE OIL (See Figs. 16 & 17) • NOTE: Before tipping lawn mower to drain oil, empty fuel tank by running engine until fuel tank is empty. 1. Disconnect spark plug wire from spark plug and place wire where it cannot come in contact with plug. 2. Remove oil fill cap/dipstick; lay aside on a clean surface. 3. Tip lawn mower on its side as shown and drain oil into a suitable container. Rock lawn mower back and forth to remove any oil trapped inside of engine.
MAINTENANCE AIR FILTER (See Fig. 18) • Your engine will not run properly and may be damaged by using a dirty air filter. Replace the air filter every 100 hours of operation or every season, whichever occurs first. Service air cleaner more often under dusty conditions. • • TO CLEAN AIR FILTER 1. Remove cover. 2. Carefully remove cartridge. 3. Clean by gently tapping on a flat surface. If very dirty, replace cartridge. WATER WASHOUT FEATURE (See Fig.
SERVICE AND ADJUSTMENTS CAUTION: TO AVOID SERIOUS INJURY, BEFORE PERFORMING ANY SERVICE OR ADJUSTMENTS: 1. Release control bar and stop engine. 2. Make sure the blade and all moving parts have completely stopped. 3. Disconnect spark plug wire from spark plug and place where it cannot come in contact with plug. LAWN MOWER TO ADJUST CUTTING HEIGHT DRIVE COVER See “TO ADJUST CUTTING HEIGHT” in the Operation section of this manual.
SERVICE AND ADJUSTMENTS TO ADJUST HANDLE (See Fig. 22) ENGINE The handle on your lawn mower has three (3) height positions - adjust to height that suits you. 1. Remove knob and carriage bolt on one side of the lower handle. 2. While holding handle assembly, remove knob and carriage bolt from opposite side, align hole in handle with desired hole in handle bracket and reassemble bolt and knob and tighten securely. 3. Align opposite side of handle with same positioning hole and secure with bolt and knob.
STORAGE ENGINE MOWING POSITION OPERATOR PRESENCE CONTROL BAR FUEL SYSTEM IMPORTANT: IT IS IMPORTANT TO PREVENT GUM DEPOSITS FROM FORMING IN ESSENTIAL FUEL SYSTEM PARTS SUCH AS CARBURETOR, FUEL FILTER, FUEL HOSE, OR TANK DURING STORAGE. ALCOHOL BLENDED FUELS (CALLED GASOHOL OR USING ETHANOL OR METHANOL) CAN ATTRACT MOISTURE WHICH LEADS TO SEPARATION AND FORMATION OF ACIDS DURING STORAGE. ACIDIC GAS CAN DAMAGE THE FUEL SYSTEM OF AN ENGINE WHILE IN STORAGE.
TROUBLESHOOTING POINTS PROBLEM Does not start CAUSE 1. Dirty air filter. 2. Out of fuel. 3. Stale fuel. 4. 5. 6. 7. 8. 9. 10. 11. 12. Loss of power CORRECTION 1. Clean/replace air filter. 2. Fill fuel tank. 3. Empty fuel tank and refill tank with fresh, clean gasoline. Water in fuel. 4. Empty fuel tank and refill tank with fresh, clean gasoline. Spark plug wire is disconnected. 5. Connect wire to plug. Bad spark plug. 6. Replace spark plug. Loose blade or broken blade adapter. 7.
Consumer Wheeled Products - Limited Warranty Husqvarna warrants to the original retail purchaser that this Husqvarna® product is free from defects in material or workmanship under normal use and maintenance from the date of retail purchase for the applicable Warranty Period shown on Exhibit A. This Limited Warranty may not be transferred to any subsequent purchaser of this Husqvarna® product. Certain components (e.g.
(a) Abrasion to mower decks; (b) Tires damaged by external punctures; (c) Natural discoloration of materials due to ultraviolet light; (d) Damage to cutting equipment by way of contact with, rocks, or other non-approved materials and/or structures; In addition, this Limited Warranty does not cover damages, malfunctions or failures resulting from abuse or neglect of the product related to or including any of the following: (e) Failure to provide or perform required maintenance services as prescribed
Consumer Wheeled Limited Warranty Chart 2012 Product/Component Riding Lawn Tractors: Frame, Chassis, Front Axle Engine* Transmission (if made by Husqvarna/Peerless) Transmission (if third party)** XLS Models only - stamped deck shell. Armor Protected Limited Warranty Fabricated Deck shell. Limited Lifetime Warranty Battery Other Non-Expendable Components Residential Zero Turn Mowers ( RZ Only ) Engine* Transmission ** RZ4623 (967009801 & 967009802) RZ5426 (967003601 & 967003602) - stamped deck shell.
Consumer Wheeled Limited Warranty Chart 2012 Consumer (personal, household use only) Product/Component Spreader Robotic Mowers Robotic Mower Battery Parts & Accessories (if purchased) Accessories (e.g., grass catcher, bumper guard accessories, etc. Parts (e.g., belts, blades, etc.
REGLAS DE SEGURIDAD IMPORTANTE: ESTA MAQUINA CORTADORA ES CAPAZ DE AMPUTAR LAS MANOS Y LOS PIES Y DE LANZAR OBJETOS. SI NO SE OBSERVAN LAS INSTRUCCIONES DE SEGURIDAD SIGUIENTES SE PUEDEN PRODUCIR LESIONES GRAVES O LA MUERTE. • Detenga la cuchilla o las cuchillas cuando cruce por calzadas, Busque este símbolo que señala las precaucalles o caminos de grava. ciones de seguridad de importancia.
Ponga en conocimiento de los demás que está cortando el césped. V. SERVICIO IV. MANEJO SEGURO DE GASOLINA • Usar mucha atención cuando se maneja gasolina. La gasolina es extremamente inflamable y los vapores son explosivos. • Apagar todos los cigarrillos, cigarros, pipas y otras fuentes de ignición. • Usar solo un contenedor apropiado. • Nunca quitar el tapón de la gasolina o añadir carburante con el motor en marcha. Esperar que el motor se enfríe antes de repostar la gasolina.
MONTAJE / PRE-OPERACIÓN Lea estas instrucciones y el manual completamente antes de tratar de montar u operar su segadora nueva. IMPORTANTE: Este cortacesped viene SIN ACEITE O GASOLINA en el motor. Su segadora nueva ha sido montada en la fábrica con la excepción de aquellas partes que se dejaron sin montar por razones de envío. Todas las partes como las tuercas, las arandelas, los pernos, etc., que son necesarias para completar el montaje han sido colocadas en la bolsa de partes.
MONTAJE / PRE-OPERACIÓN PARA MONTAR EL RECOGEDOR DE CÉSPED (Vea Fig. 3) INSTALACIÓN DEL CORDÓN ARRANCADOR (Vea Fig. 4) 1. 1. 2. 3. Ponga el bastidor del recogedor de césped en la bolsa del césped con la parte rígida de la bolsa en la parte inferior. Asegúrese que el mango del bastidor esté en el exterior de la parte superior de la bolsa. 2. Deslice los sujetadores de vinilo sobre el bastidor. AVISO: Si los sujetadores de vinilo están muy duros, métalos en agua caliente por algunos minutos.
OPERACIÓN FAMILIARÍCESE CON SU SEGADORA LEA ESTE MANUAL DEL DUEÑO Y LAS REGLAS DE SEGURIDAD ANTES DE OPERAR SU SEGADORA. Compare las ilustraciones con su segadora para familiarizarse con la ubicación de los diversos controles y ajustes. Guarde este manual para referencia en el futuro. Estos símbolos pueden apareser sobre su segadora o en la literatura proporcionada con el producto. Aprenda y comprenda sus significados.
OPERACIÓN La operación de cualquier segadora puede hacer que salten objetos extraños dentro de sus ojos, lo que puede producir daños graves en éstos. Siempre use anteojos de seguridad o protección para los ojos mientras opere su segadora o cuando haga ajustes o reparaciones. Recomendamos gafas o una mascara de seguridad de visión amplia de seguridad usada sobre las gafas. COMO USAR SU SEGADORA AJUSTE DEL MANDO (Vea Fig.
OPERACIÓN PARA CONVERTIR LA SEGADORA DESCARGA LATERAL (Vea Fig. 9): • La puerta trasera tiene que estar cerrada. • Abra la protección contra la descarga y instale el desviador de contra la descarga debajo de la protección como se muestra. • La segadora esta lista para la operación de la descarga. • Para convertir a la operación de ensacado o de descarga, el desviador de la descarga debe ser removido y la protección contra la descarga debe estar cerrada y trabado.
OPERACIÓN PARA VACIAR EL RECOGEDOR DE CÉSPED (Vea Fig. 10) TAPA DEL RELLENADOR DE GASOLINA 1. Levante el recogedor de césped usando el mango del bastidor. 2. Remueva el recogedor de césped, con los recortes, de debajo del mango de la segadora. 3. Vacíe los recortes de la bolsa. AVISO: No arrastre la bolsa cuando la vacíe; se producirá un desgaste innecesario. MANGO DEL BASTIDOR DEL RECOGEDOR DE CÉSPED TAPA DEL DEPOSITO DE ACEITE CON VARILLA DE NIVEL FIG. 11 AGREGUE GASOLINA (Vea Fig. 11) • FIG.
OPERACIÓN PARA HACER ARRANCAR EL MOTOR (Vea Fig. 12) CONSEJOS PARA SEGAR Y ACOLCHAR AVISO: Debido a las capas protectoras del motor, una cantidad pequeña de humo puede estar presente durante el uso inicial del producto y se debe considerar normal. 1. Asegurase que válvula del combustible esté en la posición ON. 2. Sujete la barra de controles que exigen la presencia del operador abajo en el mango y tire el mango del arrancador rápidamente. No permita que el cordón arrancador se devuelva abruptamente.
MANTENIMIENTO ANTES DESPUES CADA CADA CADA ANTES DEL DE CADA DE CADA 10 25 HORAS O 100 ALMACEUSO USO HORAS TEMPORADA HORAS NAMIENTO Revisar si hay Sujetadores Sueltos Limpiar/Inspeccionar el Recogedor de Césped * Controlar los Neumáticos Controlar las Ruedas Motrices *** Limpiar la Segadora **** Limpiar debajo la Cubierta de la Transmisión *** Revisar las Correas y las Poleas Impulsadas *** Revisar / Afilar / Cambiar la Cuchilla Lubricación Limpiar / Recargar la Batería ** Revisar el nivel del Aceite Cambia
MANTENIMIENTO SEGADORA IMPORTANTE: PARA ASEGURAR LA INSTALACION APROPIADA, POSICIONE EL AGUJERO CENTRAL DE LA CUCHILLA CON LA ESTRELLA DEL CONJUNTO DEL ADAPTADOR. 3. Asegúrese de que el borde de salida de la cuchilla (opuesto al borde afilado) esté hacia arriba hacia el motor. 4. Instale el perno de la cuchilla con la arandela de seguridad y la arandela endurecida en el adaptador de la cuchilla y el cigueñal. 5.
MANTENIMIENTO RECOGEDOR DE CÉSPED • • El recogedor de césped puede ser rociado con el agua de la manguera pero tiene que estar seco cuando se vaya a usar. Revise su recogedor de césped a menudo para verificar si está dañado o deteriorado. Se va a desgastar con el uso normal. Si se necesita cambiar el recogedor, cámbielo solamente por uno que sea aprobado por el fabricante. Dé el número del modelo de la segadora cuando lo ordene.
MANTENIMIENTO DERRUBIO DEL AGUA (Vea Fig. 19) PRECAUCIÓN: Los solventes de petróleo, tales como el keroseno, no se deben usar para limpiar el cartucho. Pueden producir el deterioro de éste. No aceite el cartucho. No use aire a presión para limpiarlo o secarlo. 4. Su cortacéspedes de césped se equipa de una guarnición que permita la limpieza rápida y fácil del superficie inferior de la cubierta. Para utilizar esta característica, siga de la forma siguiente: 1.
SERVICIO Y AJUSTES ADVERTENCIA: Para evitar lesiónes serias, antes de dar calquier servico o de hacer ajustes: CUBLERTA DE LA IMPULSIÓN 1. Suelte la barra de control y pare el motor. 2. Asegúrese que la cuchilla y que todas las partes movibles se hayan detenido completamente. 3. Desconecte el alambre de la bujía y póngalo en donde no pueda entrar en contacto con ésta.
SERVICIO Y AJUSTES PARA AJUSTAR EL MANGO (Vea Fig. 22) MOTOR El mango de su segadora cuenta con tres (3) posiciones de altura – ajústelo a la altura que le acomode. 1. Remueva la manilla y el perno portador en un lado del mango inferior. 2. Al mismo tiempo que sujeta el conjunto del mango, remueva la manilla y el perno portador del lado opuesto, alinee el agujero en el mango con el agujero deseado en el puntal del mango y vuelva a montar el perno y la manilla y apriételos en forma segura. 3.
ALMACENAMIENTO MOTOR POSICIÓN PARA SEGAR BARRA DE CONTROL QUE EXIGE LA PRESENCIA DEL OPERADOR SISTEMA DE COMBUSTIBLE IMPORTANTE: ES IMPORTANTE EVITAR QUE SE FORMEN DEPÓSITOS DE GOMA EN PARTES FUNDAMENTALES DEL SISTEMA DE COMBUSTIBLE TALES COMO EL CARBURADOR, EL FILTRO DEL COM BUS TI BLE, LA MANGUERA DEL COMBUSTIBLE O EN EL ESTANQUE DURANTE EL ALMACENAMIENTO.
SOLUCIÓN DE PROBLEMAS PROBLEMA No arranca CAUSA CORRECCIÓN 1. 2. 3. Filtro de aire sucio. Sin combustible. Combustible rancio. 1. 2. 3. 4. Agua en el combustible. 4. 5. 6. 7. Alambre de la bujía desconectado. Bujía mala. Cuchilla suelta o adaptador de la cuchilla quebrado. Barra de control en la posición suelta. Barra de control defectuosa. Válvula del combustible (si equipada) está en la posición OFF. Batería débi (si equipada). Desconecte el conector de la batería (si equipada). Fusible quemado.
Productos con ruedas para consumidor – Garantía limitada Husqvarna garantiza al comprador minorista original que este producto Husqvarna® carece de defectos materiales o de fabricación con un uso y mantenimiento normales desde el día de la compra, dentro del periodo de garantía aplicable indicado en el Anexo A. Esta Garantía limitada on se podrá transferir a ningún comprador posterior de este producto Husqvarna®.
7. Responsabilidades del propietario. Si desea conservar sus derechos bajo esta Garantía limitada, debe realizar un cuidado y uso razonables del producto; lo que incluye cumplir con el mantenimiento preventivo, el almacenamiento, y el uso de combustible y aceite indicados en el manual del operador proporcionado. Por ejemplo, los siguientes elementos son responsabilidad del propietario y no están cubiertos por esta Garantía limitada: a.
11. Documentación requerida. Debe conservar y presentar este Comprobante de compra (que incluya la fecha, el modelo del producto y, si corresponde, el número de serie del motor) a un concesionario de servicio Husqvarna autorizado para obtener el servicio de garantía bajo esta Garantía limitada. El comprobante de compra es de su exclusiva responsabilidad. Husqvarna le recomienda que registre su producto on-line en www.usa.husqvarna.com (EE. UU.
Tabla de garantía limitada de 2012 para productos de consumo con ruedas Consumidor (personal, solo para uso doméstico) Comercial (cualquier uso comercial, profesional, institucional, agrícola o que genere ingresos, que no sea para alquiler) Anexo A Alquiler (cualquier uso para alquiler) Producto/Componente Hidrolavadoras Modelo 5525PW: Motor* * * * Bomba 2 años Sin garantía Sin garantía Otros componentes perec ederos 2 años Sin garantía Sin garantía Todas las otras hidrolavadoras (6027PW, 9032PW, 1340PW)
11/18/2013 BY