
Warranty Guide


8
OPERATION
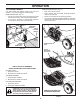
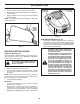
TO ADJUST CUTTING HEIGHT (See Fig. 9)
Raise wheels for low cut and lower wheels for high cut,
adjust cutting height to suit your requirements. Me di um
position is best for most lawns.
• To change cutting height, pull up on adjuster lever,
move wheel up or down to suit your re quire ments
and release adjuster lever. Be sure all wheels are in
the same setting.
NOTE: Adjuster is properly positioned when lever inserts
into hole in plate.
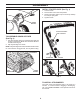
DRIVE CONTROL ADJUSTMENT (See Fig. 8)
Over time, the drive control system may become “loose”,
resulting in decreased speed. There is a turnbuckle on
the drive control housing to increase tension on the drive
cable. Pro ceed as follows:
1. Turn unit off and disconnect spark plug wire from spark
plug.
2. Rotate turnbuckle on drive control to increase drive
speed.
3. Operate mower to test drive speed. Readjust as re-
quired.
4. If condition fails to improve after the above steps
(forward speed remains the same), your drive belt is
worn and should be re placed.
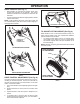
DRIVE CONTROL (See Fig. 7)
• Self-propelling is controlled by pulling either drive
control lever rearward to the handle. The further
toward the handle a lever is pulled, the faster the unit
will travel.
• To stop forward motion without stop ping blade, re lease
a drive control lever.
NOTE: If after releasing the drive control the mower will
not roll backwards, push the mower forward slightly to
disengage drive wheels.
FIG. 8
ADJUSTMENT TURNBUCKLE
TO ENGAGE DRIVE CONTROL
DRIVE
CONTROL
LEVERS
DRIVE CONTROL DISENGAGED
OPERATOR
PRESENCE
CONTROL BAR
FIG. 7
FIG. 9
LEVER
LEVER BACKWARD
TO LOWER MOWER
LEVER FORWARD
TO RAISE MOWER
PLATE