Operator’s manual LC221AH Please read the operator’s manual carefully and make sure you understand the instructions before using the machine.
SAFETY RULES federal lands. A spark arrester for the muffler is available through your nearest authorized service center. IMPORTANT! THIS CUTTING MACHINE IS CAPABLE OF AMPUTATING HANDS AND FEET AND THROWING OBJECTS. FAILURE TO OBSERVE THE FOLLOWING SAFETY INSTRUCTIONS COULD RESULT IN SERIOUS INJURY OR DEATH. ! WARNING! Look for this symbol to point out important safety precautions. It means CAUTION!!! BE COME ALERT!!! YOUR SAFE TY IS IN VOLVED.
SAFETY RULES • Do not operate the mower without proper guards, plates, grass catcher or other safety protective devices in place. • See manufacturer’s instructions for proper operation and installation of accessories. Only use accessories approved by the manufacturer. • Stop blade when crossing gravel surfaces. • Never leave a running machine unattended.
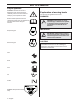
KEY TO SYMBOLS Key to symbols WARNING! The machine can be a dangerous tool if used incorrectly or carelessly, which can cause serious or fatal injury to the operator or others. Explanation of warning levels The warnings are graded in three levels. WARNING! Please read the operator’s manual carefully and make sure you understand the instructions before using the machine.
CONTENTS Contents SAFETY RULES Children ................................................................ General operation ................................................. Slope operation ..................................................... Safe handling of gasoline ...................................... General service ..................................................... KEY TO SYMBOLS Key to symbols ...................................................... Explanation of warning levels ...................
PRESENTATION Dear customer! Customer responsibilities Congratulations on your choice to buy a Husqvarna product! Husqvarna is based on a tradition that dates back to 1689, when the Swedish King Karl XI ordered the construction of a factory on the banks of the Huskvarna River, for production of muskets. The location was logical, since water power was harnessed from the Huskvarna River to create the water-powered plant.
PRESENTATION Steps before using a new lawn mower • Please read the operator’s manual carefully. • Check that the cutting equipment is correctly fitted and adjusted. See instructions under the heading Assembly. • Fill with fuel and oil in the engine. A container with sufficient oil quantity is supplied with the machine. See the instructions under the heading fuel handling. ! WARNING! Under no circumstances may the design of the machine be modified without the permission of the manufacturer.
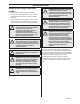
WHAT IS WHAT? 1 2 3 11 11 10 4 5 6 14 16 13 15 12 9 What is what on the lawn mower? 1 Engine brake handle 9 2 Drive control 10 Wash-out port 3 Starter handle 11 Rear deflector 4 Grass catcher 12 Engine oil cap with dipstick 5 Fuel cap 13 Cutting height control 6 Air filter 14 Mulch plug 7 Spark plug 15 Operator’s manual 8 Drive cover 16 Discharge chute 8 – English Muffler 7 8
MACHINE´S SAFETY EQUIPMENT General Rear deflector This section describes the machine's safety equipment, its purpose, and how checks and maintenance should be carried out to ensure that it operates correctly. The rear deflector, attached between the rear wheels of your mower, is provided to minimize the possibility that objects will be thrown out of the rear of the mower into the operator’s mowing position.
ASSEMBLING AND ADJUSTMENTS General Vertical handle storage The handle can be set in a vertical storage position. ! WARNING! Prevent unintentional starting by removing the ignition cable from the spark plug. 1 Loosen the lower handle knobs. 2 Rotate the handle and align the handle bar pins with the vertical slots on the handle bracket. 3 Retighten the knobs. CAUTION! This lawn mower is shipped without oil or gasoline in the engine. Remove the lawn mower from the carton.
ASSEMBLING AND ADJUSTMENTS Grass catcher Convert the lawn mower Assembly of the catcher Your lawn mower was shipped ready to be used in mulching mode. 1 Put the grass catcher frame into the grass bag with the rigid part of the bag on the bottom. Make sure the handle of the frame is outside of the top of the bag. The mulching mode will recut the grass clippings many times, which will reduce the clippings in size so that as they fall onto the lawn they will disperse into the grass and not be noticed.
ASSEMBLING AND ADJUSTMENTS Mulching 1 Lift the back shield and remove the grass bag (if equipped). 2 Insert the mulch plug into the collector channel. 3 Allow the back shield to close and ensure the back shield is firmly shut against the mulch plug. 3 Close the back shield to allow the machine to discharge material to the left of the machine while cutting. Cutting height The cutting height can be adjusted to 9 (1-9) different positions. Raise wheels for low cut and lower wheels for high cut.
FUEL HANDLING General ! WARNING! Running an engine in a confined or badly ventilated area can result in death due to asphyxiation or carbon monoxide poisoning. Fuel and fuel fumes are highly inflammable and can cause serious injury when inhaled or allowed to come in contact with the skin. For this reason observe caution when handling fuel and make sure there is adequate ventilation. The exhaust fumes from the engine are hot and may contain sparks which can start a fire.
OPERATING Personal protective equipment Children You must use approved personal protective equipment whenever you use the machine. Personal protective equipment cannot eliminate the risk of injury but it will reduce the degree of injury if an accident does happen. Ask your dealer for help in choosing the right equipment. Always wear: • Sturdy, non-slip boots or shoes. • Heavy, long pants. Do not wear shorts sandals or go barefoot.
OPERATING Always use common sense Work area safety It is not possible to cover every conceivable situation you can face. Always exercise care and use your common sense. If you get into a situation where you feel unsafe, stop and seek expert advice. Contact your dealer, service agent or an experienced user. Do not attempt any task that you feel unsure of! • Branches, twigs, stones, etc. should be removed from the lawn before you start to mow.
OPERATING • Pay particular attention when pulling the machine towards you during work. • Never lift up the lawn mower or carry it around when the engine is running. If you must lift the lawn mower, first switch off the engine and disconnect the ignition lead from the spark plug. Slope operation Mowing slopes can be dangerous. Do not use the lawn mower on slopes steeper than 15q. All slopes demand extra care. If you feel unsure, do not mow it. Do: • Do not mow the lawn while walking backwards.
OPERATING Starting and stopping Before starting ! When the drive starts feeling slow you need to adjust the drive control cable. Finely adjust the cable using the adjuster screw. WARNING! Please read the operator’s manual carefully and make sure you understand the instructions before using the machine. Wear personal protective equipment. See instructions under the heading ”Personal protective equipment”. • Keep people and animals well away from the working area. • Perform daily maintenance.
OPERATING Stopping • Stop the engine by releasing the engine brake handle. The drive is also disengaged when you release the engine brake handle. • Emptying the grass catcher • Lift up on grass catcher using the frame handle. • Remove grass catcher with clippings from under lawn mower handle. • Empty clippings from bag using both frame handle and bag handle. CAUTION! Do not drag the bag when emptying, it will cause unnecessary wear.
MAINTENANCE General ! WARNING! The user must only carry out the maintenance and service work described in this manual. More extensive work must be carried out by an authorized service workshop. Switch off the engine before carrying out any checks or maintenance. Stop the engine (motor) and wait until the blade comes to a complete stop before cleaning the machine, removing the grass catcher, or unclogging the discharge chute.
MAINTENANCE General recommendations Cleaning The warranty on this lawn mower does not cover items that have been subjected to operator abuse or negligence. To receive full value from the warranty, operator must maintain mower as instructed in this manual. Some adjustments will need to be made periodically to properly maintain your unit. At least once a season, check to see if you should make any of the adjustments described in the Maintenance section of this manual.
MAINTENANCE Gear cases Engine • Lubrication • • To keep your drive system working properly, the gear cases and area around the drive should be kept clean and free of trash build-up. Clean under the drive cover twice a season. Use only high quality detergent oil rated with API service classification SG-SL. Select the oil’s SAE viscosity grade according to your expected operating temperature. The gear cases are filled with lubricant to the proper level at the factory.
MAINTENANCE 7 The lawn mower should stand on flat ground when you check the oil level. Ensure the ignition lead has been removed from the spark plug before you open the oil filler cap. Slowly pour oil down the oil fill spout, stopping evey few ounces to check the oil level with the dipstick. Do not overfill! 8 Always be sure to retighten oil dipstick before starting engine. 2 Remove the oil cap and wipe the dipstick clean. 9 Reconnect to the spark plug wire.
MAINTENANCE Replacing the blades Blade ! WARNING! Always wear heavy-duty gloves when servicing and maintaining the blade. The blade is very sharp and cuts can occur very easily. Always stop the engine before doing any work on the blade. This continues to rotate even after the throttle has been released. Ensure that the blade has stopped completely and disconnect the spark plug cap before you start to work on it. 1 Always disconnect the spark plug before performing maintenance or service.
MAINTENANCE Assembly: 1 2 6 Position the blade adapter on the engine crank shaft. Be sure key in adapter and crankshaft keyway are aligned and that the drive belt is inside the tab of the belt retainer. Verify the spark plug wire is disconnected from the engine. ! The blade must be mounted with the angled ends pointing up towards the engine. 7 WARNING! Always disconnect spark plug wire and place wire where it cannot contact spark plug to prevent accidental starting.
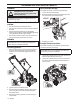
MAINTENANCE Drive belt 2 3 5 4 3 6 8 7 1 14 9 10 11 12 13 1 Mulch plug Remove the drive belt 2 Rear insert • 3 Transmission drive pulley Empty the fuel tank by running the machine until the tank is empty. 4 Idler bracket • Always disconnect the spark plug before performing maintenance or accessing mocable parts. 5 Drive cover • 6 Blade adapter Turn lawn mower on its side. Make sure air filter and carburetor is facing upward. 7 Idler pulleys • Remove drive cover.
MAINTENANCE • • Remove the blade bolt by turning the bolt counterclockwise. Remove blade and attaching hardware: bolt, lock washer and hardened washer. • Remove all 3 idler pulleys from idler assembly. • Remove belt from blade adapter / engine pulley and idler assembly. • Remove rear transmission pulley by clamping locking pilers to the input shaft of the transmission, beneath pulley, and loosen the pulley with a 9/16" box wrench. • Remove the old drive belt. Remove the Mulching plug.
TROUBLESHOOTING Troubleshooting schedule ! WARNING! If service operations or troubleshooting does not require the machine to be on, the engine should be switched off, and the spark plug wire disconnected from the spark plug. Problem The machine does not start Probable cause Incorrect starting procedure. See instructions under the heading Starting and stopping. Air filter clogged Clean the air filter. Replace if necessary.
Original instructions 1158547-27 2016-10-28