Operator’s manual 455e Rancher 455 Rancher 460 Rancher Please read the operator’s manual carefully and make sure you understand the instructions before using the machine. English 1153137-95 Rev.
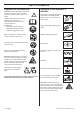
KEY TO SYMBOLS Symbols on the machine: WARNING! Chain saws can be dangerous! Careless or improper use can result in serious or fatal injury to the operator or others. Please read the operator’s manual carefully and make sure you understand the instructions before using the machine.
KEY TO SYMBOLS You will find the following labels on your chain saw: Chain Saw IN ACCORDANCE WITH ANSI B175.1-2000 EPA III The Emissions Compliance Period referred to on the Emission Compliance label indicates the number of operating hours for which the engine has been shown to meet Federal emissions requirements. Maintenance, replacement, or repair of the emission control devices and system may be performed by any nonroad engine repair establishment or individual. 1153137-95 Rev.
CONTENTS Contents KEY TO SYMBOLS Symbols on the machine: ...................................... Symbols in the operator’s manual: ........................ CONTENTS Contents ............................................................... INTRODUCTION Dear customer! ..................................................... WHAT IS WHAT? What is what on the chain saw? ........................... GENERAL SAFETY PRECAUTIONS Before using a new chain saw .............................. Important .......................
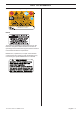
INTRODUCTION Dear customer! Congratulations on your choice to buy a Husqvarna product! Husqvarna is based on a tradition that dates back to 1689, when the Swedish King Karl XI ordered the construction of a factory on the banks of the Huskvarna River, for production of muskets. The location was logical, since water power was harnessed from the Huskvarna River to create the waterpowered plant.
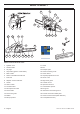
WHAT IS WHAT? 1 29 2 3 4 30 10 23 11 31 32 12 5 9 13 14 8 7 6 27 15 16 26 28 25 24 23 22 21 20 19 18 17 What is what on the chain saw? 1 Cylinder cover 17 Chain 2 Starter handle 18 Bar 3 Air purge 19 Bumper spike 4 Stop switch (Ignition on/off switch.
GENERAL SAFETY PRECAUTIONS Before using a new chain saw Important • Please read this manual carefully. • Check that the cutting equipment is correctly fitted and adjusted. See instructions under the heading Assembly. This chain saw for forest service is designed for forest work such as felling, delimbing and cutting. • Refuel and start the chain saw. See the instructions under the headings Fuel Handling and Starting and Stopping.
GENERAL SAFETY PRECAUTIONS possible. Your dealer, forestry school or your library can provide information about which training materials and courses are available. Generally clothes should be close-fitting without restricting your freedom of movement. IMPORTANT! Sparks can come from the muffler, the bar and chain or other sources. Always have fire extinguishing tools available if you should need them. Help prevent forest fires.
GENERAL SAFETY PRECAUTIONS • • This movement activates a spring-loaded mechanism that tightens the brake band (C) around the engine drive system (D) (clutch drum). • Kickback can be very sudden and violent. Most kickbacks are minor and do not always activate the chain brake. If this happens you should hold the chain saw firmly and not let go.
GENERAL SAFETY PRECAUTIONS Will my hand always activate the chain brake during a kickback? No. It takes a certain force to move the hand guard forward. If your hand only lightly touches the front guard or slips over it, the force may not be enough to trigger the chain brake. You should also maintain a firm grip of the chain saw handles while working.
GENERAL SAFETY PRECAUTIONS ! WARNING! Overexposure to vibration can lead to circulatory damage or nerve damage in people who have impaired circulation. Contact your doctor if you experience symptoms of overexposure to vibration. Such symptoms include numbness, loss of feeling, tingling, pricking, pain, loss of strength, changes in skin colour or condition. These symptoms normally appear in the fingers, hands or wrists. These symptoms may be increased in cold temperatures.
GENERAL SAFETY PRECAUTIONS Cutting equipment designed to reduce kickback ! WARNING! Faulty cutting equipment or the wrong combination of bar and saw chain increases the risk of kickback! Only use the bar/saw chain combinations we recommend, and follow the filing instructions. See instructions under the heading Technical data. • Number of drive links. The number of drive links is determined by the length of the bar, the chain pitch and the number of teeth on the bar tip sprocket.
GENERAL SAFETY PRECAUTIONS • The cutting part of the chain is called the cutter and consists of a cutting tooth (A) and the depth gauge (B). The cutters cutting depth is determined by the difference in height between the two (depth gauge setting). data for information on the size of file and gauge that are recommended for the chain fitted to your chain saw. • Check that the chain is correctly tensioned. A slack chain will move sideways, making it more difficult to sharpen correctly.
GENERAL SAFETY PRECAUTIONS recommendation assumes that the length of the cutting teeth is not reduced excessively. • • • Raise the tip of the bar and stretch the chain by tightening the chain tensioning screw using the combination spanner. Tighten the chain until it does not sag from the underside of the bar. • Use the combination spanner to tighten the bar nuts while lifting the tip of the bar at the same time.
GENERAL SAFETY PRECAUTIONS • before the fuel), and that you adjust the carburetor as recommended (a lean mixture may mean that the fuel lasts longer than the oil) and that you also use the recommended cutting equipment (a bar that is too long will use more chain oil). Tighten the bar clutch by turning the knob clockwise. Checking chain lubrication • • Fold the knob back in to lock the tensioning. Check the chain lubrication each time you refuel.
GENERAL SAFETY PRECAUTIONS Chain drive sprocket Bar The clutch drum is fitted with one of the following drive sprockets: Check regularly: • Whether there are burrs on the edges of the bar. Remove these with a file if necessary. • Whether the groove in the bar has become badly worn. Replace the bar if necessary. • Whether the tip of the bar is uneven or badly worn. If a hollow forms on the underside of the bar tip this is due to running with a slack chain.
ASSEMBLY Fitting the bar and chain ! Tension the chain by turning the chain tensioning screw clockwise using the combination spanner. The chain should be tensioned until it does not sag from the underside of the bar. WARNING! Always wear gloves, when working with the chain. 455 Rancher, 460 Rancher Check that the chain brake is in disengaged position by moving the front hand guard towards the front handle.
ASSEMBLY Fit the bar over the bar bolts. Place the bar in its rearmost position. Place the chain over the drive sprocket locate it in the groove on the bar. Begin on the top edge of the bar. Make sure that the edges of the cutting links are facing forward on the top edge of the bar. Fit the clutch cover and locate the chain adjuster pin in the hole in the bar. Check that the drive links of the chain fit correctly over the drive sprocket and that the chain is correctly located in the groove in the bar.
FUEL HANDLING Fuel Mixing ratio Note! The machine is equipped with a two-stroke engine and must always be run using a mixture of gasoline and two-stroke oil. It is important to accurately measure the amount of oil to be mixed to ensure that the correct mixture is obtained. When mixing small amounts of fuel, even small inaccuracies can drastically affect the ratio of the mixture. ! 1:50 (2%) for all engines.
FUEL HANDLING • • In temperatures below 32°F (0°C) some oils become too viscous. This can overload the oil pump and result in damage to the oil pump components. Contact your service agent when choosing chain oil. Fueling ! Fuel safety • • • Never refuel the machine while the engine is running. Make sure there is plenty of ventilation when refuelling or mixing fuel (gasoline and 2-stroke oil). Move the machine at least 10 ft (3 m) from the refuelling point before starting it.
STARTING AND STOPPING Starting and stopping ! WARNING! Note the following before starting: Decompression valve (C): Press the valve to reduce the pressure in the cylinder and make starting easier. You should always use the decompression valve when starting the machine. Once the machine has started the valve will automatically return to its original setting. The chain brake must be engaged when the chain saw is started to reduce the chance of contact with the moving chain during starting.
STARTING AND STOPPING As the chain brake is still engaged the speed of the engine must be set to idling as soon as possible, this is achieved by disengaging the throttle lock. Disengagement is done by gently touching on the throttle trigger. This prevents unnecessary wear to the clutch, clutch drum and brake band. Allow the machine to idle a few seconds before giving full throttle. • The chain brake should be activated when starting. Se instructions under the heading Start and stop. Do not drop start.
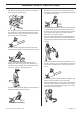
WORKING TECHNIQUES Before use: • To make sure that none of the above might come within reach of your saw or be injured by falling trees. , 1 Check that the chain brake works correctly and is not damaged. 2 Check that the rear right hand guard is not damaged. 3 Check that the throttle lockout works correctly and is not damaged. 4 Check that the stop switch works correctly and is not damaged. 5 Check that all handles are free from oil. 6 Check that the anti vibration system works and is not damaged.
WORKING TECHNIQUES Fit a guard to the bar before transporting the chain saw or carrying it for any distance. 7 Have control over the workpiece. If the pieces you intend to cut are small and light, they can jam in the saw chain and be thrown towards you. Even if this does not need to be a danger, you may be surprised and lose control of the saw. Never saw stacked logs or branches without first separating them. Only saw one log or one piece at a time. Remove the cut pieces to keep your working area safe.
WORKING TECHNIQUES user. If the saw chain is jamming, the saw may be pushed back at you. Terms Cutting = General term for cutting through wood. Limbing = Cutting branches off a felled tree. Splitting = When the object you are cutting breaks off before the cut is complete.
WORKING TECHNIQUES Limbing Turn the log and finish the cut from the opposite side. When limbing thick branches you should use the same approach as for cutting. Cut difficult branches piece by piece. 1 2 3 Start by cutting from below (about 1/3 of the way through). Cutting ! The log is supported at one end. There is a high risk that it will split. Finish by cutting from above so that the two cuts meet.
WORKING TECHNIQUES Felling direction The aim is to fell the tree in a position where you can limb and cross-cut the log as easily as possible. You want it to fall in a location where you can stand and move about safely. Clearing the trunk and preparing your retreat Delimb the stem up to shoulder height. It is safer to work from the top down and to have the tree between you and the saw. Once you have decided which way you want the tree to fall you must judge which way the tree would fall naturally.
WORKING TECHNIQUES The directional cuts should run 1/4 of the diameter through the trunk and the angle between the top cut and bottom cut should be 45°. When the felling cut and directional cut are complete the tree should start to fall by itself or with the aid of a felling wedge or breaking bar. The line where the two cuts meet is called the directional cut line. This line should be perfectly horizontal and at right angles (90°) to the chosen felling direction.
WORKING TECHNIQUES • Portable How to avoid kickback ! Cutting trees and branches that are in tension Preparations: Work out which side is in tension and where the point of maximum tension is (i.e. where it would break if it was bent even more). WARNING! Kickback can happen very suddenly and violently; kicking the chain saw, bar and chain back at the user. If this happens when the chain is moving it can cause very serious, even fatal injuries.
WORKING TECHNIQUES Limbing ! WARNING! A majority of kickback accidents occur during limbing. Do not use the kickback zone of the guide bar. Be extremely cautious and avoid contacting the log, other limbs or objects with the nose of the guide bar. Be extremely cautious of limbs under tension. They can spring back toward you and cause loss of control resulting in injury. Make sure that you can stand and move about safely. Work on the left side of the trunk.
MAINTENANCE General Basic settings and running in The user must only carry out the maintenance and service work described in this manual. More extensive work must be carried out by an authorized service workshop. The basic carburetor settings are adjusted during testing at the factory. Avoid running at a too high speed for extended periods during the first 10 hours. Carburetor adjustment CAUTION! If the chain rotates while idling the T-screw must be turned anti-clockwise until the chain stops. Rec.
MAINTENANCE CAUTION! If the high speed jet is screwed in too far, it may damage the piston/cylinder. When test run at the factory, the high speed jet is set so that the engine satisfies the applicable legal requirements at the same time as achieving maximum performance. The carburetor’s high speed jet is then locked using a limiter cap in the fully screwed out position. The limiter cap limits the potential to adjust the high speed jet to at most half a turn.
MAINTENANCE Checking the brake trigger • Check that the throttle control and throttle lockout move freely and that the return springs work properly. • Start the chain saw and apply full throttle. Release the throttle control and check that the chain stops and remains stationary. If the chain rotates when the throttle control is in the idle position you should check the carburetor idle adjustment. Place the chain saw on firm ground and start it.
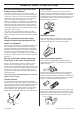
MAINTENANCE Vibration damping system Regularly check the vibration damping units for cracks or deformation. Some mufflers are equipped with a special spark arrestor screen. If your machine has this type of muffler, you should clean the screen at least once a week. This is best done with a wire brush. A blocked screen will cause the engine to overheat and may lead to serious damage. Note! The screen must be replaced if it is damaged.
MAINTENANCE recoil spring by letting the pulley rotate slowly backwards. • Lubricate the recoil spring with light oil. Fit the pulley and tension the recoil spring. 2 1 Fitting the starter • Undo the screw in the centre of the pulley and remove the pulley. Insert and fasten a new starter cord to the pulley. Wind approx. 3 turns of the starter cord onto the pulley. Connect the pulley to the recoil spring so that the end of the spring engages in the pulley. Fit the screw in the center of the pulley.
MAINTENANCE Spark plug When lubricating, remove the clutch cover by loosening the two bar nuts. Lay the saw on its side with the clutch drum upwards. Lubrication involves engine oil dripping into the centre of the clutch drum as it rotates. The spark plug condition is influenced by: • Incorrect carburetor adjustment. • An incorrect fuel mixture (too much or incorrect type of oil). • A dirty air filter.
MAINTENANCE 5 Cylinder cover (directs cold air over the cylinder). Temperature 0°C (32°F) or colder: The cylinder cover is designed so it can be adjusted for running in cold weather, so that preheated air from the cylinder can pass into the carburetor space preventing icing of the air filter, etc. Clean the cooling system with a brush once a week, more often in demanding conditions. A dirty or blocked cooling system results in the machine overheating which causes damage to the piston and cylinder.
MAINTENANCE Maintenance schedule The following is a list of the maintenance that must be performed on the machine. Most of the items are described in the Maintenance section. Daily maintenance Weekly maintenance Monthly maintenance Clean the outside of the machine. On chain saws without a catalytic converter, check the cooling system weekly. Check the brake band on the chain brake for wear. Replace when less than 0.024 inch (0.6 mm) remains at the most worn point.
TECHNICAL DATA Technical data 455e Rancher 455 Rancher 460 Rancher Motor Cylinder displacement, cu.
TECHNICAL DATA Recommended original and replacement bar and chain combinations Following is a list of recommended cutting equipment for the Husqvarna chain saw model 455 Rancher, 455e Rancher and 460 Rancher. The combinations of power head, bar and chain have been tested and found to be in accordance with the kickback requirements of ANSI B175.1–2000. The guide bar nose radius is determined by either the maximum number of teeth in the nose sprocket or the corresponding maximum nose radius of a solid bar.
FEDERAL EMISSION CONTROL WARRANTY STATEMENT YOUR WARRANTY RIGHTS AND OBLIGATIONS The EPA (The US Environmental Protection Agency), Environment Canada and Husqvarna Forest & Garden are pleased to explain the emissions control system warranty on your 2009 and later small nonroad engine. In U.S. and Canada, new small nonroad engines must be designed, built and equipped to meet the federal stringent anti-smog standards.
FEDERAL EMISSION CONTROL WARRANTY STATEMENT MAINTENANCE, REPLACEMENT AND REPAIR OF EMISSION-RELATED PARTS Any Husqvarna Forest & Garden approved replacement part used in the performance of any warranty maintenance or repairs on emission-related parts, will be provided without charge to the owner if the part is under warranty. EMISSION CONTROL WARRANTY PARTS LIST 1 Carburetor and internal parts 2 Intake pipe, airfilter holder and carburetor bolts.
AMERICAN STANDARD SAFETY PRECAUTIONS Safety precautions for chain saw users (ANSI B175.1-2000 Annex C) Kickback safety precautions ! WARNING! Kickback may occur when the nose or tip of the guide bar touches an object, or when the wood closes in and pinches the saw chain in the cut. Tip contact in some cases may cause a lightning fast reverse reaction, kicking the guide bar up and back towards the operator.
Original instructions The engine exhaust from this product contains chemical known to the State of California to cause cancer, birth defects or other reproductive harm.