Operator′s manual 395XP 395XPG Please read the operator’s manual carefully and make sure you understand the instructions before using the machine.
KEY TO SYMBOLS Symbols on the machine: WARNING! Chain saws can be dangerous! Careless or incorrect use can result in serious or fatal injury to the operator or others. Please read the operator’s manual carefully and make sure you understand the instructions before using the machine. Symbols in the operator’s manual: Switch off the engine by moving the stop switch to the STOP position before carrying out any checks or maintenance. Always wear approved protective gloves.
CONTENTS Contents KEY TO SYMBOLS Symbols on the machine: ..................................... Symbols in the operator’s manual: ....................... CONTENTS Contents ............................................................... INTRODUCTION Dear Customer, .................................................... WHAT IS WHAT? What is what on the chain saw? ........................... GENERAL SAFETY PRECAUTIONS Before using a new chain saw .............................. Important ..........................
INTRODUCTION Dear Customer, Congratulations on your choice to buy a Husqvarna product! Husqvarna is based on a tradition that dates back to 1689, when the Swedish King Karl XI ordered the construction of a factory on the banks of the Husqvarna River, for production of muskets. The location was logical, since water power was harnessed from the Huskvarna River to create the waterpowered plant.
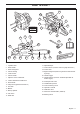
WHAT IS WHAT? 28 22 7 6 8 5 XXXX XXXXXXX 24 27 4 Husqvarna XXXX 9 Husqvarna AB Huskvarna, SWEDEN 11 1 2 10 3 23 25 12 21 26 20 19 18 17 16 15 14 13 What is what on the chain saw? 1 Cylinder cover 16 Spiked bumper 2 Front handle 17 Chain catcher (Catches chain if it jumps or breaks.) 3 Front hand guard 18 Clutch cover 4 Starter housing 5 Chain oil tank 19 Right hand guard (Protects right hand if chain breaks or jumps.
GENERAL SAFETY PRECAUTIONS Before using a new chain saw • Please read this manual carefully. • Check that the cutting equipment is correctly fitted and adjusted. See instructions under the heading Assembly. • Refuel and start the chain saw. See the instructions under the headings Fuel Handling and Starting and Stopping. • • Do not use the chain saw until sufficient chain oil has reached the chain. See instructions under the heading Lubricating cutting equipment.
GENERAL SAFETY PRECAUTIONS Always use common sense It is not possible to cover every conceivable situation you can face when using a chain saw. Always exercise care and use your common sense. Avoid all situations which you consider to be beyond your capability. If you still feel uncertain about operating procedures after reading these instructions, you should consult an expert before continuing. Do not hesitate to contact your dealer or us if you have any questions about the use of the chain saw.
GENERAL SAFETY PRECAUTIONS Take care when using your saw and make sure the kickback zone of the bar never touches any object. • The chain brake (A) can either be activated manually (by your left hand) or automatically by the inertia release mechanism. • The brake is applied when the front hand guard (B) is pushed forwards.
GENERAL SAFETY PRECAUTIONS If the kickback is less violent or the kickback zone of the bar is closer to you the chain brake will be activated manually by the movement of your left hand. Will my chain brake always protect me from injury in the event of a kickback? No. First, the chain brake must be in working order to provide the intended protection. Second, it must be activated during the kickback as described above to stop the saw chain.
GENERAL SAFETY PRECAUTIONS Right hand guard Stop switch Apart from protecting your hand if the chain jumps or snaps, the right hand guard stops branches and twigs from interfering with your grip on the rear handle. Use the stop switch to switch off the engine. Muffler Vibration damping system The muffler is designed to keep noise levels to a minimum and to direct exhaust fumes away from the user.
GENERAL SAFETY PRECAUTIONS General rules Saw chain • A chain is made up of a number of links, which are available in standard and low-kickback versions. Only use cutting equipment recommended by us! See instructions under the heading Technical data. IMPORTANT! No saw chain design eliminates the danger of kickback. • Keep the chain’s cutting teeth properly sharpened! Follow our instructions and use the recommended file gauge. A damaged or badly sharpened chain increases the risk of accidents.
GENERAL SAFETY PRECAUTIONS • Chain oil hole and hole for chain tensioner. The bar must be matched to the chain saw design. Saw chain • • • 2 Cutting angle 3 File position 4 Round file diameter Chain pitch (inches) Drive link width (mm/inches) Number of drive links. Sharpening your chain and adjusting depth gauge setting It is very difficult to sharpen a chain correctly without the right equipment. We recommend that you use our file gauge.
GENERAL SAFETY PRECAUTIONS • Always file cutting teeth from the inside face. Reduce the pressure on the return stroke. File all the teeth on one side first, then turn the chain saw over and file the teeth on the other side. • File all the teeth to the same length. When the length of the cutting teeth is reduced to 4 mm (5/32") the chain is worn out and should be replaced. min 4 mm (5/32") • Place the depth gauge tool over the chain.
GENERAL SAFETY PRECAUTIONS • Use the combination spanner to tighten the bar nuts while lifting the tip of the bar at the same time. Check that you can pull the chain round freely by hand and that it does not sag from the underside of the bar. Checking chain lubrication • Check the chain lubrication each time you refuel. See instructions under the heading Lubricating the bar tip sprocket. Aim the tip of the bar at a light coloured surface about 20 cm (8 inches) away.
GENERAL SAFETY PRECAUTIONS Chain drive sprocket Guide bar The clutch drum is fitted with one of the following drive sprockets: Check regularly: • Whether there are burrs on the edges of the bar. Remove these with a file if necessary. A Spur sprocket (the chain sprocket is welded on the drum) B Rim sprocket (replaceable) Regularly check the degree of wear on the drive sprocket. Replace if wear is excessive. Replace the drive sprocket whenever you replace the chain.
ASSEMBLY Fitting the bar and chain ! correctly located in the groove in the bar. Tighten the bar nuts finger tight. WARNING! Always wear gloves, when working with the chain. Check that the chain brake is in disengaged position by moving the front hand guard towards the front handle. Tension the chain by turning the chain tensioning screw clockwise using the combination spanner. The chain should be tensioned until it does not sag from the underside of the bar.
FUEL HANDLING Fuel Mixing ratio Note! The machine is equipped with a two-stroke engine and must always be run using a mixture of petrol and twostroke oil. It is important to accurately measure the amount of oil to be mixed to ensure that the correct mixture is obtained. When mixing small amounts of fuel, even small inaccuracies can drastically affect the ratio of the mixture. ! 1:50 (2%) with HUSQVARNA two-stroke oil.
FUEL HANDLING Fueling ! • Move the machine at least 3 m from the refuelling point before starting it. Always stop the engine and let it cool for a few minutes before refuelling. • Never start the machine: 1 When refuelling, open the fuel cap slowly so that any excess pressure is released gently. If you have spilt fuel or chain oil on the machine. Wipe off the spillage and allow remaining fuel to evaporate. 2 If you have spilled fuel on yourself or your clothes, change your clothes.
STARTING AND STOPPING Starting and stopping ! WARNING! Note the following before starting: Never start a chain saw unless the bar, chain and all covers are fitted correctly. Otherwise the clutch can come loose and cause personal injuries. Warm engine Use the same procedure as for starting a cold engine but without setting the choke control in the choke position. The correct choke/start throttle setting is obtained by moving the choke control to the choke position and then pushing it in again.
STARTING AND STOPPING ! WARNING! Long term inhalation of the engine’s exhaust fumes, chain oil mist and dust from sawdust can represent a health risk. • Never start a chain saw unless the bar, chain and all covers are fitted correctly. See instructions under the heading Assembly. Without a bar and chain attached to the chain saw the clutch can come loose and cause serious injury. • The chain brake should be activated when starting. Se instructions under the heading Start and stop. Do not drop start.
WORKING TECHNIQUES Before use: Basic safety rules 1 • • Look around you: To ensure that people, animals or other things cannot affect your control of the machine. To make sure that none of the above might come within reach of your saw or be injured by falling trees. , 1 Check that the chain brake works correctly and is not damaged. 2 Check that the rear right hand guard is not damaged. 3 Check that the throttle lockout works correctly and is not damaged.
WORKING TECHNIQUES 6 Before moving your chain saw switch off the engine and lock the chain using the chain brake. Carry the chain saw with the bar and chain pointing backwards. Fit a guard to the bar before transporting the chain saw or carrying it for any distance. 7 When you put the chain saw on the ground, lock the saw chain using the chain brake and ensure you have a constant view of the machine. Switch the engine off before leaving your chain saw for any length of time.
WORKING TECHNIQUES 7 Take great care when you cut with the top edge of the bar, i.e. when cutting from the underside of the object. This is known as cutting on the push stroke. The chain tries to push the chain saw back towards the user. If the saw chain is jamming, the saw may be pushed back at you. • Cutting from below = Cutting on the push stroke. Cutting on the push stroke increases the risk of kickback. See instructions under the heading How to avoid kickback.
WORKING TECHNIQUES The following instructions describe how to handle the commonest situations you are likely to encounter when using a chain saw. If it is possible (can you turn the log?) stop cutting about 2/3 of the way through the log. Turn the log and finish the cut from the opposite side. Limbing When limbing thick branches you should use the same approach as for cutting. Cut difficult branches piece by piece. 1 2 The log is supported at one end. There is a high risk that it will split.
WORKING TECHNIQUES Felling direction Clearing the trunk and preparing your retreat The aim is to fell the tree in a position where you can limb and cross-cut the log as easily as possible. You want it to fall in a location where you can stand and move about safely. Delimb the stem up to shoulder height. It is safer to work from the top down and to have the tree between you and the saw. Once you have decided which way you want the tree to fall you must judge which way the tree would fall naturally.
WORKING TECHNIQUES Directional cuts To make the directional cut you begin with the top cut. Aim using to the saw’s felling direction mark (1) toward a goal further forward in the terrain, where you would like the tree to fall (2). Stand on the right-hand side of the tree, behind the saw, and cut with a pull stroke. Finish the felling cut parallel with the directional cut line so that the distance between them is at least 1/10 of the trunk diameter.
WORKING TECHNIQUES Freeing a tree that has fallen badly Freeing a ”trapped tree” It is very dangerous to remove a trapped tree and there is high accident risk. Never cut straight through a tree or branch that is in tension! If you must cut across tree/limb, make two to three cuts, one inch apart, one to two inches deep. Never try to fell the tree that is trapped. Never work in the risk zone of the hanging trapped tree. Continue to cut deeper until tree/limb bends and tension is released.
WORKING TECHNIQUES How to avoid kickback ! WARNING! Kickback can happen very suddenly and violently; kicking the chain saw, bar and chain back at the user. If this happens when the chain is moving it can cause very serious, even fatal injuries. It is vital you understand what causes kickback and that you can avoid it by taking care and using the right working technique.
MAINTENANCE Carburettor adjustment Function, Basic settings, Fine adjustment The carburettor can be designed in different ways, depending on existing environmental and emissions legislation. Some chain saws are equipped with movement limiters on the carburettor’s adjuster screws. These limit the adjustment possibilities to a maximum of a 1/2 turn.
MAINTENANCE Fine adjustment When the machine has been ”run-in” the carburettor should be finely adjusted. The fine adjustment should be carried out by a qualified person. First adjust the L-jet, then the idling screw T and then the H-jet. Changing the type of fuel Fine tuning may be required if the chain saw, after changing the type of fuel, performs differently with regard to starting, acceleration, maximum speed, etc.
MAINTENANCE Function Conditions • The carburettor governs the engine’s speed via the throttle control. Air and fuel are mixed in the carburettor. The air/fuel mixture is adjustable. Correct adjustment is essential to get the best performance from the machine. • Before any adjustments are made the air filter should be clean and the cylinder cover fitted. Adjusting the carburettor while a dirty air filter is in use will result in a leaner mixture next time the filter is cleaned.
MAINTENANCE High speed jet H • The high speed jet H influences the power and engine speed of the machine. If the high speed jet is set too lean (H-jet screwed in too far) the machine will overrev and this will damage the engine. Run the machine at full throttle for about 10 seconds. Then turn the Hjet 1/4 turn anti-clockwise. Run the machine at full throttle for another 10 seconds or so and listen to the difference in the fast idle speed.
MAINTENANCE Checking the inertia brake release Apply full throttle and activate the chain brake by tilting your left wrist forward onto the front hand guard. Do not let go of the front handle. The chain should stop immediately. Place the chain saw, with the engine switched off, on a stump or other stable surface. Release the front handle and let the saw fall by its own weight, rotating around the rear handle towards the stump.
MAINTENANCE Chain catcher Stop switch Check that the chain catcher is not damaged and is firmly attached to the body of the chain saw. Start the engine and make sure the engine stops when you move the stop switch to the stop setting. Right hand guard Check that the right hand guard is not damaged and that there are no visible defects, such as cracks. Muffler The muffler is designed to reduce the noise level and to direct the exhaust gases away from the operator.
MAINTENANCE Starter housing ! handle. Make a secure knot in the end of the starter cord. WARNING! When the recoil spring is wound up in the starter housing it is under tension and can, if handled carelessly, pop out and cause personal injury. Care must be exercised when replacing the return spring or the starter cord. Wear protective glasses and protective gloves.
MAINTENANCE Fitting the starter • To fit the starter, first pull out the starter cord and place the starter in position against the crankcase. Then slowly release the starter cord so that the pulley engages with the pawls. • Fit and tighten the screws that hold the starter. Air filter The air filter must be regularly cleaned to remove dust and dirt in order to avoid: • Carburettor malfunctions. • Starting problems. • Loss of engine power. • Unnecessary wear to engine parts.
MAINTENANCE Needle bearing lubrication Cooling system The clutch drum has a needle bearing on the output shaft. This needle bearing must be lubricated regularly (once a week). CAUTION! Use a high-quality bearing grease or engine oil. See instructions under the heading Cutting equipment. To keep the working temperature as low as possible the machine is equipped with a cooling system. The cooling system consists of: 1 Air intake on the starter. 2 Air guide plate. 3 Fins on the flywheel.
MAINTENANCE Winter use Temperature -5°°C or colder Running problems can occur when using the machine in the cold and snowy conditions caused by: • Too low engine temperature. • Icing of the air filter and carburettor. Special measures are therefore often required: • Partly mask the air inlet on the starter to increase the working temperature of the engine. • Preheat the intake air to the carburettor by removing the seal between the cylinder and the carburettor space.
MAINTENANCE Maintenance schedule The following is a list of the maintenance steps that must be performed on the machine. Most of the items are described in the Maintenance section. Daily maintenance Weekly maintenance Monthly maintenance Clean the outside of the machine. On chain saws without a catalytic converter, check the cooling system weekly. Check the brake band on the chain brake for wear. Replace when less than 0.6 mm (0.024 inch) remains at the most worn point.
TECHNICAL DATA Technical data 395XP 395XPG Cylinder displacement, cm3 94 94 Cylinder bore, mm 56 56 Stroke, mm 38,0 38,0 Idle speed, rpm 2500 2500 Recommended max.
TECHNICAL DATA Guide bar and saw chain combinations The following cutting attachments are approved for the model Husqvarna 395XP. Guide bar Saw chain Gauge, mm Max. nose radius Pitch, inch 18 3/8 11T 68 20 3/8 11T 72 24 3/8 11T 84 28 3/8 11T 18 3/8 20 3/8 34 mm 72 24 3/8 34 mm 84 28 3/8 34 mm 92 24 0,404 34 mm 76 28 0,404 30 0,404 36 0,404 1,5 1,6 34 mm 34 mm 42 mm 42 mm Type Length, drive links (no.
TECHNICAL DATA EC Declaration of Conformity (Applies to Europe only) Husqvarna AB, SE-561 82 Huskvarna, Sweden, tel +46-36-146500, declares under sole responsibility that the chain saw Husqvarna 395XP/XPG from 2013’s serial numbers and onwards (the year is clearly stated in plain text on the type plate with subsequent serial number), is in conformity with the requirements of the COUNCIL’S DIRECTIVES: - of May 17, 2006 ”relating to machinery” 2006/42/EC.
Original instructions 1153177-26 ´®z+U1h¶6d¨ ´®z+U1h¶6d¨ 2015-02-03