Operator’s manual Manuel d’utilisation Manual de instrucciones 135, 135e, 135e TrioBrake . Please read the operator’s manual carefully and make sure you understand the instructions before using the machine . Lire attentivement et bien assimiler le manuel d’utilisation avant d’utiliser la machine . Lea detenidamente el manual de instrucciones y asegúrese de entender su contenido antes de utilizar la máquina.
1 2 3 4 5 6 7 B E 8 9 10 11 12 13 14 15 17 16 18
21 22 23 24 25 26 27 28 29 30 31 32 33 34 36 37 38 39 40 41 19 20 35
2 43 44 45 46 47 48 49 50 51 52 53 54 55 56 57 58 60 59 61 62 63 64
85
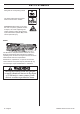
KEY TO SYMBOLS Symbols on the machine: Refuelling. WARNING! Chain saws can be dangerous! Careless or improper use can result in serious or fatal injury to the operator or others. Chain oil fill. Please read the operator’s manual carefully and make sure you understand the instructions before using the machine. Ignition; choke: Set the choke control in the choke position. This should automatically set the stop switch to the start position.
KEY TO SYMBOLS Filling with oil and adjusting oil flow. The chain brake must be engaged when the chain saw is started. WARNING! Kickback may occur when the nose or tip of the guide bar touches an object, and cause a lightning fast reverse reaction, kicking the guide bar up and towards the operator. May cause serious personal injury.
CONTENTS Contents KEY TO SYMBOLS Symbols on the machine: ..................................... Symbols in the operator’s manual: ....................... CONTENTS Contents ............................................................... INTRODUCTION Dear customer! ..................................................... WHAT IS WHAT? What is what on the chain saw? ........................... GENERAL SAFETY PRECAUTIONS Before using a new chain saw .............................. Important .........................
INTRODUCTION Dear customer! Congratulations on your choice to buy a Husqvarna product! Husqvarna is based on a tradition that dates back to 1689, when the Swedish King Karl XI ordered the construction of a factory on the banks of the Huskvarna River, for production of muskets. The location was logical, since water power was harnessed from the Huskvarna River to create the water-powered plant.
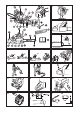
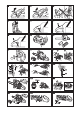
GENERAL SAFETY PRECAUTIONS Before using a new chain saw • Please read this manual carefully. • (1) - (107) refer to figures on p. 2-6. • Check that the cutting equipment is correctly fitted and adjusted. See instructions under the heading Assembly. • Refuel and start the chain saw. See the instructions under the headings Fuel Handling and Starting and Stopping. • Do not use the chain saw until sufficient chain oil has reached the chain. See instructions under the heading Cutting equipment.
GENERAL SAFETY PRECAUTIONS Important IMPORTANT! This chain saw for forest service is designed for forest work such as felling, limbing and cutting. National regulation can restrict the use of the machine. You should only use the saw with the bar and chain combinations we recommend in the chapter Technical data. as well as help you to use your chain saw both efficiently and safely. Attend a training course in chain saw usage if possible.
GENERAL SAFETY PRECAUTIONS carried out professionally. If you need further information please contact your nearest servicing dealer. ! WARNING! Never use a machine with defective safety components. Safety equipment must be inspected and maintained. See instructions under the heading Checking, maintaining and servicing chain saw safety equipment. If your machine does not pass all the checks, take the saw to a servicing dealer for repair.
GENERAL SAFETY PRECAUTIONS Throttle trigger lockout Muffler The throttle lockout is designed to prevent accidental operation of the throttle control. When you press the lock (A) (i.e. when you grasp the handle) it releases the throttle control (B). When you release the handle the throttle control and the throttle lockout both move back to their original positions. This arrangement means that the throttle control is automatically locked at the idle setting.
GENERAL SAFETY PRECAUTIONS • Keep the chain properly tensioned! If the chain is slack it is more likely to jump off and lead to increased wear on the bar, chain and drive sprocket. • Keep cutting equipment well lubricated and properly maintained! A poorly lubricated chain is more likely to break and lead to increased wear on the bar, chain and drive sprocket.
GENERAL SAFETY PRECAUTIONS • Always file cutting teeth from the inside face. Reduce the pressure on the return stroke. File all the teeth on one side first, then turn the chain saw and file the teeth on the other side. • File all the teeth to the same length. When the length of the cutting teeth is reduced to 5/32 inch (4 mm) the chain is worn out and should be replaced. (23) Check the chain tension every time you refuel.
GENERAL SAFETY PRECAUTIONS own chain oil is not available, standard chain oil is recommended. Never use waste oil! Using waste oil can be dangerous to you and damage the machine and environment. IMPORTANT! When using vegetable based saw chain oil, dismantle and clean the groove in the bar and saw chain before long-term storage. Otherwise there is a risk of the saw chain oil oxidizing, which will result in the saw chain becoming stiff and the bar tip sprocket jamming.
GENERAL SAFETY PRECAUTIONS ! WARNING! Most chain saw accidents happen when the chain touches the operator. Wear personal protective equipment. See instructions under the heading ”Personal protective equipment”. Do not tackle any job that you feel you are not adequately trained for. See instructions under the headings Personal protective equipment, How to avoid kickback, Cutting equipment and General working instructions. Avoid situations where there is a risk of kickback.
ASSEMBLY Fitting the bar and chain ! WARNING! Always wear gloves, when working with the chain. 135 Tension the chain by turning the wheel down (+). The chain should be tensioned until it does not sag from the underside of the bar. (31) The chain is correctly tensioned when it does not sag from the underside of the bar, but can still be turned easily by hand. Hold up the bar tip and tighten the bar knob by turning the knob clockwise.
FUEL HANDLING Fuel Gasoline, litre Note! The machine is equipped with a two-stroke engine and must always be run using a mixture of gasoline and two-stroke oil. It is important to accurately measure the amount of oil to be mixed to ensure that the correct mixture is obtained. When mixing small amounts of fuel, even small inaccuracies can drastically affect the ratio of the mixture. ! Two-stroke oil, litre 2% (50:1) WARNING! Always ensure there is adequate ventilation when handling fuel.
FUEL HANDLING Fueling 3 If the machine is leaking fuel. Check regularly for leaks from the fuel cap and fuel lines. ! ! WARNING! Taking the following precautions, will lessen the risk of fire: Do not smoke and do not place any hot objects in the vicinity of fuel. Always stop the engine and let it cool for a few minutes before refueling. When refuelling, open the fuel cap slowly so that any excess pressure is released gently. Tighten the fuel cap carefully after refueling.
STARTING AND STOPPING Starting and stopping ! WARNING! Note the following before starting: The chain brake must be engaged when the chain saw is started to reduce the chance of contact with the moving chain during starting. Never start a chain saw unless the bar, chain and all covers are fitted correctly. Otherwise the clutch can come loose and cause personal injuries. Place the machine on firm ground. Make sure you have a secure footing and that the chain cannot touch anything.
WORKING TECHNIQUES Before use: (50) 1 Check that the chain brake works correctly and is not damaged. 2 Check that the rear right hand guard is not damaged. 3 Check that the throttle lockout works correctly and is not damaged. 4 Check that the stop switch works correctly and is not damaged. 5 Check that all handles are free from oil. 6 Check that the anti vibration system works and is not damaged. 7 Check that the muffler is securely attached and not damaged.
WORKING TECHNIQUES saw chain and be thrown towards you. Even if this does not need to be a danger, you may be surprised and lose control of the saw. Never saw stacked logs or branches without first separating them. Only saw one log or one piece at a time. Remove the cut pieces to keep your working area safe. (52) Terms 4 Never use the chain saw above shoulder height and avoid cutting with the tip of the bar.
WORKING TECHNIQUES The log is lying on the ground. There is little risk of the chain jamming or the object splitting. However there is a risk that the chain will touch the ground when you finish the cut. (63) Another very important factor, which does not affect the felling direction but does affect your safety, is to make sure the tree has no damaged or dead branches that might break off and hit you during felling. Cut all the way through the log from above.
WORKING TECHNIQUES The felling cut is made from the opposite side of the tree and it must be perfectly horizontal. Stand on the left side of the tree and cut on the pull stroke. Make the felling cut about 1.5-2 inches (3-5 cm) above the bottom directional cut. (74) Finish the felling cut parallel with the directional cut line so that the distance between them is at least 1/10 of the trunk diameter. The uncut section of the trunk is called the felling hinge.
MAINTENANCE General The user must only carry out the maintenance and service work described in this manual. More extensive work must be carried out by an authorized service workshop. Carburetor adjustment Your Husqvarna product has been designed and manufactured to specifications that reduce harmful emissions. Checking, maintaining and servicing chain saw safety equipment Note! All servicing and repair work on the machine requires special training. This is especially true of the machine′s safety equipment.
MAINTENANCE See instructions under the heading Starting and stopping. (89) Grasp the chain saw firmly, wrapping your fingers and thumbs around the handles. (51) Apply full throttle and activate the chain brake by tilting your left wrist forward onto the front hand guard. Do not let go of the front handle. The chain should stop immediately. (46) CAUTION! The start/stop switch automatically returns to run position.
MAINTENANCE pulley. Wind approx. 3 turns of the starter cord on the starter pulley. Fit the starter pulley so that the end of the recoil spring (D) hooks into the starter pulley. Now assemble the drive disc spring, drive disc and the bolt in the centre of the pulley. Carry the starter cord through the hole in the starter housing and the starter handle. Tie a good knot on the starter cord.
MAINTENANCE Cooling system Otherwise there is a risk of overheating, resulting in severe damage to the engine. IMPORTANT! Any maintenance other than that described in this manual must be carried out by your servicing dealer (retailer). To keep the working temperature as low as possible the machine is equipped with a cooling system. The cooling system consists of: 1 Air intake on the starter. 2 Air guide plate. 3 Fins on the flywheel. 4 Cooling fins on the cylinder.
MAINTENANCE Troubleshooting schedule Starting failure Check Possible Cause Action Adjust or replace the pawls. Starter pawls Binding pawls Clean around the pawls. Contact an authorized service workshop. Fuel tank Carburetor Incorrect fuel type Drain it and use correct fuel. Adjustment of the idle speed Adjust the idling speed with the Tscrew. Spark plug contaminated or wet Make sure that the spark plug is dry and clean. Sparking (no spark) Spark plug gap incorrect. Clean the spark plug.
MAINTENANCE Maintenance schedule The following is a list of the maintenance that must be performed on the machine. Most of the items are described in the Maintenance section. Daily Maintenance Weekly maintenance Monthly maintenance Clean the outside of the machine. Check the cooling system weekly. Check the brake band on the chain brake for wear. Replace when less than 0.024 inch (0,6 mm) remains at the most worn point. Check that the components of the throttle trigger work safely.
TECHNICAL DATA Technical data 135 135e 135e TrioBrake Cylinder displacement, cu.in/cm3 2.49/40,9 2.49/40,9 2.49/40,9 Cylinder bore, inch/mm 1.61/41 1.61/41 1.61/41 Stroke, inch/mm 1.22/31 1.22/31 1.22/31 2900 Engine Idle speed, rpm 2900 2900 Power, kW/hp @ rpm 1,5/2,0 @ 9000 1,5/2,0 @ 9000 1,5/2,0 @ 9000 Emissions Durability Period according to California Air Resources Board, h.
TECHNICAL DATA Furthermore the saw chain Husqvarna H37 is evaluated and listed as a Type C Low Kickback Saw Chain according to the provisions in Z62.3-11 (R2016). A hard nose guide bar having the same length and nose radius as a sprocket-nose guide bar may be considered to have equivalent or less kickback energy than the sprocket-nose bar.
AMERICAN STANDARD SAFETY PRECAUTIONS Safety precautions for chain saw users (ANSI B175.1-2012 Annex C) Kickback safety precautions ! WARNING! Kickback may occur when the nose or tip of the guide bar touches an object, or when the wood closes in and pinches the saw chain in the cut. Tip contact in some cases may cause a lightning fast reverse reaction, kicking the guide bar up and back towards the operator.
FEDERAL AND CALIFORNIA EMISSIONS CONTROL WARRANTY STATEMENT Note: This Annex is intended primarily for the consumer or occasional user. IMPORTANT: This product is compliant with U.S. EPA Phase 3 regulations for exhaust and evaporative emissions. To ensure EPA Phase 3 compliance, we recommend using only genuine Husqvarna brand replacement parts. Use of non-compliant replacement parts is a violation of federal law. YOUR WARRANTY RIGHTS AND OBLIGATIONS The EPA (U.S.
FEDERAL AND CALIFORNIA EMISSIONS CONTROL WARRANTY STATEMENT DIAGNOSIS The owner must not be charged for diagnostic labor that leads to the determination that a warranted part is in fact defective, provided that such diagnostic work is performed at a warranty station. consumer. For example, in 2012 model year, 2012-2013 will be specified. CONSEQUENTIAL DAMAGES Husqvarna Forest & Garden is liable for damages to other engine components proximately caused by a failure under warranty of any warranted part.
EXPLICATION DES SYMBOLES Symboles sur la machine: Frein de chaîne, activé (droit) Frein de chaîne, non activé (gauche) AVERTISSEMENT! Cette tronçonneuse peut être dangereuse! Une utilisation erronée ou négligente peut occasionner des blessures graves, voire mortelles pour l’utilisateur ou une tierce personne. Remplissage d’essence. Lire attentivement et bien assimiler le manuel d’utilisation avant d’utiliser la machine. Remplissage d’huile de chaîne.
EXPLICATION DES SYMBOLES Porter des lunettes protectrices ou une visière. EPA III Remplissage d’essence. Remplissage d’huile et réglage du débit d’huile. La période de conformité des émissions à laquelle il est fait référence sur l’étiquette de conformité des émissions indique le nombre d’heures de fonctionnement pour lesquelles il a été établi que le moteur répond aux exigences fédérales en matière d’émissions. Le frein de chaîne doit être activé quand la tronçonneuse est démarrée.
SOMMAIRE Sommaire EXPLICATION DES SYMBOLES Symboles sur la machine: ..................................... Symboles dans le manuel: .................................... SOMMAIRE Sommaire ............................................................. INTRODUCTION Cher client, ............................................................ QUELS SONT LES COMPOSANTS? Quels sont les composants de la tronçonneuse? . INSTRUCTIONS GÉNÉRALES DE SÉCURITÉ Mesures à prendre avant de mettre en usage une tronçonneuse neuve .
INTRODUCTION Cher client, Félicitations pour ce choix d’un produit Husqvarna. Husqvarna a vu le jour en 1689 lorsque le roi Karl XI décida de construire un arsenal pour la fabrication des mousquets au bord de la rivière Huskvarna. Le choix de l’emplacement était logique puisque la rivière Huskvarna servait à produire de l’énergie hydraulique et constituait donc une sorte de centrale hydraulique.
INSTRUCTIONS GÉNÉRALES DE SÉCURITÉ Mesures à prendre avant de mettre en usage une tronçonneuse neuve • Lisez attentivement ce manuel d’utilisation. • (1) - (107) fait référence aux figures des p. 2-6. • Vérifier le montage et le réglage de l’outil de coupe. Voir les instructions au chapitre Montage. • Remplissez de carburant et démarrez la tronçonneuse. Voir les instructions aux chapitres Manipulation du carburant et Démarrage et arrêt.
INSTRUCTIONS GÉNÉRALES DE SÉCURITÉ Important! IMPORTANT! Cette tronçonneuse pour l’administration des forêts est conçue pour des travaux forestiers tels que l’abattage, l’ébranchage et la coupe. La législation nationale peut restreindre l’utilisation de la machine. Utilisez seulement les combinaisons guide-chaîne/ chaîne recommandées au chapitre Caractéristiques techniques.
INSTRUCTIONS GÉNÉRALES DE SÉCURITÉ Équipement de sécurité de la machine Cette section traite des équipements de sécurité de la machine et de leur fonction. Pour le contrôle et l’entretien, voir les instructions au chapitre Contrôle, maintenance et entretien des équipements de sécurité de la tronçonneuse. Voir le chapitre Quels sont les composants? pour savoir où se trouvent équipements sur la machine.
INSTRUCTIONS GÉNÉRALES DE SÉCURITÉ tronçonneuse. Nous vous recommandons de le faire avant chaque journée de travail. Le rebond doit aussi être suffisamment violent pour activer le frein de chaîne. Si le frein de chaîne était trop sensible, il serait continuellement activé, ce qui serait gênant. défectueuse (type inadéquat ou affûtage défectueux), le taux de vibrations augmente. ! Le frein de chaîne me protège-t-il toujours des blessures en cas de rebond? Non.
INSTRUCTIONS GÉNÉRALES DE SÉCURITÉ ! AVERTISSEMENT! N'utilisez jamais une tronçonneuse dont le silencieux est absent ou défectueux. Si le silencieux est défectueux, le niveau sonore et le risque d'incendie augmentent considérablement. Veillez à disposer des outils nécessaires à l'extinction d'un feu. N'utilisez jamais une tronçonneuse dont la grille antiflamme est absent ou défectueux si une grille antiflamme est obligatoire dans la zone où vous travaillez.
INSTRUCTIONS GÉNÉRALES DE SÉCURITÉ • Trou de graissage de chaîne et trou du tendeur de chaîne. Le guide-chaîne doit correspondre au modèle de tronçonneuse. (16) Chaîne • Pas de chaîne (=pitch) (pouces) (15) • Jauge du maillon entraîneur (mm/pouces) (18) • Nombre de maillons entraîneurs (pce) (17) • S’assurer que la chaîne est tendue. Une tension insuffisante rend la chaîne instable latéralement, gênant ainsi l’affûtage de la chaîne. • Toujours limer de l’intérieur de la dent vers l’extérieur.
INSTRUCTIONS GÉNÉRALES DE SÉCURITÉ Tension de la chaîne • Rabattre le bouton pour verrouiller la tension de chaîne. (33) Lubrification de l’équipement de coupe ! ! AVERTISSEMENT! Une tension insuffisante de la chaîne augmente le risque que la chaîne saute et donc de blessures graves, voire mortelles. Plus on utilise une chaîne, plus elle s’allonge. L’équipement de coupe doit être réglé après une telle altération. La tension de la chaîne doit être contrôlée après chaque plein d’essence.
INSTRUCTIONS GÉNÉRALES DE SÉCURITÉ En cas de mauvais fonctionnement de la lubrification de la chaîne: • Vérifier que le canal de graissage du guide-chaîne est bien ouvert. Le nettoyer au besoin. (34) • S’assurer que la gorge du guide est propre. La nettoyer au besoin. (35) • Vérifier que le pignon du nez tourne librement et que l’orifice de graissage est propre. Nettoyer et graisser au besoin.
MONTAGE Montage du guide-chaîne et de la chaîne ! AVERTISSEMENT! Utiliser des gants pour toute manipulation de la chaîne. 135 S’assurer que le frein de chaîne ne s’est pas déclenché en amenant l’arceau protecteur contre l’étrier de la poignée avant. (38) Dévisser l’écrou du guide-chaîne et retirer le carter d’embrayage (frein de chaîne). Déposer la protection de transport (A). (39) Monter le carter d’embrayage et veillez à placer le goujon de tension de la chaîne dans l’ouverture du guide.
MANIPULATION DU CARBURANT Carburant Remarque! La machine est équipée d’un moteur deux temps et doit toujours être alimentée avec un mélange d’essence et d’huile deux temps. Afin d’assurer un rapport de mélange correct, il est important de mesurer avec précision la quantité d’huile à mélanger. Pour le mélange de petites quantités de carburant, même de petites erreurs au niveau de la quantité d’huile affectent sérieusement le rapport du mélange. ! pour moteurs refroidis par air.
MANIPULATION DU CARBURANT Remplissage de carburant ! 2 Si vous avez renversé du carburant sur vous ou sur vos vêtements, changez de vêtements. Lavez les parties du corps qui ont été en contact avec le carburant. Utilisez de l’eau et du savon. 3 S’il y a fuite de carburant. Vérifier régulièrement que le bouchon du réservoir et la conduite de carburant ne fuient pas.
DÉMARRAGE ET ARRÊT Démarrage et arrêt ! Moteur chaud AVERTISSEMENT! Contrôler les points suivants avant la mise en marche: Position de démarrage, 1: Un ralenti accéléré combiné au starter adéquat pour un démarrage à chaud est obtenu en bougeant tout d’abord la commande de starter en tirant la commande rouge vers le haut et vers le bas. (44) Le frein de chaîne doit être activé lors du démarrage de la tronçonneuse afin de réduire le risque de contact avec la chaîne en rotation.
DÉMARRAGE ET ARRÊT tronçonneuse en l’air. Cette méthode est très dangereuse car il est facile de perdre le contrôle de la tronçonneuse. (48) • Ne jamais mettre la machine en marche à l’intérieur. Les gaz d’échappement du moteur sont nocifs. • S’assurer que la zone de travail est bien dégagée et qu’aucune personne et aucun animal ne risquent d’entrer en contact avec l’équipement de coupe. • Tenez toujours la tronçonneuse à deux mains.
TECHNIQUES DE TRAVAIL Avant chaque utilisation: (50) 1 Contrôler que le frein de chaîne fonctionne correctement et n’est pas endommagé. 2 Contrôler que la protection arrière de la main droite n’est pas endommagée. 3 Contrôler que le blocage de l’accélération fonctionne correctement et n’est pas endommagé. 4 Contrôlez que l’interrupteur d’arrêt fonctionne correctement et est en bon état. 5 Contrôler que toutes les poignées ne comportent pas d’huile.
TECHNIQUES DE TRAVAIL 2 3 4 5 6 7 8 Toujours tenir la tronçonneuse fermement des deux mains, la main droite sur la poignée arrière, la gauche sur la poignée avant. Tenir les poignées solidement avec les doigts et le pouce. Toujours tenir la tronçonneuse dans cette position, que l’on soit droitier ou gaucher. Une prise solide aide à maîtriser les rebonds et à mieux contrôler la tronçonneuse.
TECHNIQUES DE TRAVAIL La liste suivante indique comment se tirer des situations les plus couramment rencontrées par les utilisateurs de tronçonneuses. Techniques d’abattage IMPORTANT! L’abattage d’un arbre demande beaucoup d’expérience. Un utilisateur non expérimenté ne doit pas effectuer d’abattages. L’utilisateur se doit d’éviter toute utilisation qu’il ne maîtrise par suffisamment! Élagage Lors de l’élagage de branches épaisses, procéder comme pour le sciage ordinaire.
TECHNIQUES DE TRAVAIL Émondage des branches basses et voie de retraite Ébranchez le tronc jusqu’à hauteur d’épaule. Pour des raisons de sécurité, il est préférable de travailler de haut en bas avec le tronc entre la tronçonneuse et vous. (70) Dégager les taillis autour du tronc et éviter les obstacles tels que pierres, branches cassées, fondrières, etc. pour s’assurer d’une voie de retraite facile au moment de la chute. La voie de retraite doit être à 135° derrière le sens de chute prévu de l’arbre.
TECHNIQUES DE TRAVAIL Mesures anti-rebond ! AVERTISSEMENT! Un rebond peut-être soudain, rapide et violent et renvoyer la tronçonneuse, le guide-chaîne et la chaîne en direction de l’utilisateur. Si la chaîne est alors en rotation, les blessures encourues sont graves et quelquefois mortelles. Il convient donc de comprendre les raisons d’un rebond afin de pouvoir éviter ce phénomène grâce à une bonne méthode de travail et un comportement prudent.
ENTRETIEN Généralités L’utilisateur ne peut effectuer que les travaux d’entretien et de révision décrits dans ce manuel d’utilisation. Les mesures plus importantes doivent être effectuées dans un atelier d’entretien agréé. Réglage du carburateur Votre produit Husqvarna a été conçu et fabriqué selon des spécifications qui visent à réduire les émissions nocives. Fonctionnement • • Le carburateur détermine le régime du moteur via la commande de l’accélération.
ENTRETIEN Ne jamais porter ou suspendre la tronçonneuse par l’étrier! Ceci risque d’endommager le mécanisme et de mettre le frein de chaîne hors fonction. (88) Système anti-vibrations Contrôle de l’effet de freinage Placer la tronçonneuse sur une surface solide et la mettre en marche. Vérifier que la chaîne ne touche pas le sol ou tout autre obstacle. Voir les instructions au chapitre Démarrage et arrêt. (89) Vérifier régulièrement l’état des éléments afin de détecter fissures et déformations.
ENTRETIEN Lanceur ! AVERTISSEMENT! Le ressort de rappel est tendu et risque, en cas de manipulation imprudente, de sortir du boîtier et de causer des blessures. Observez la plus grande prudence lors du remplacement du ressort de démarrage ou de la corde de lanceur. Utilisez des lunettes et des gants de protection. Remplacement de la corde du lanceur • Déposer les vis maintenant le lanceur contre le carter moteur et sortir le lanceur.
ENTRETIEN • Mauvais mélange de l’huile dans le carburant (trop d’huile ou huile inappropriée). • La propreté du filtre à air. Ces facteurs peuvent concourir à l’apparition de calamine sur les électrodes, ce qui à son tour entraîne un mauvais fonctionnement du moteur et des démarrages difficiles. Si la puissance de la machine est trop faible, si la machine est difficile à mettre en marche ou si le ralenti est irrégulier, toujours commencer par contrôler l’état de la bougie avant de prendre d’autres mesures.
ENTRETIEN Plan de recherche de pannes Échec de démarrage Vérifier Cause possible Solution Régler ou remplacer les cliquets. Cliquets de lanceur à rappel Cliquets de blocage Nettoyer alentour des cliquets. Contactez un atelier d’entretien agréé. Réservoir d’essence Type de carburant inapproprié Vidanger et utiliser le carburant approprié. Carburateur Réglage du régime de ralenti Régler la vitesse de ralenti à l’aide de la vis T.
ENTRETIEN Schéma d’entretien La liste ci-dessous indique l’entretien à effectuer sur la machine. La plupart des points sont décrits à la section Entretien. Entretien Quotidien Entretien hebdomadaire Entretien mensuel Nettoyer l’extérieur de la machine. Contrôlez le système de refroidissement chaque semaine. Inspectez le degré d’usure du ruban de freinage du frein de chaîne. Remplacez-le quand les parties les plus usées sont inférieures à 0,6 mm.
CARACTÉRISTIQUES TECHNIQUES Caractéristiques techniques 135 135e 135e TrioBrake Cylindrée, po3/cm3 2.49/40,9 2.49/40,9 2.49/40,9 Alésage, po/mm 1.61/41 1.61/41 1.61/41 Course, po/mm 1.22/31 1.22/31 1.22/31 Régime de ralenti, tr/min 2900 2900 2900 Puissance, kW/hp @ tr/min 1,5/2,0 @ 9000 1,5/2,0 @ 9000 1,5/2,0 @ 9000 125 125 Moteur Période de durabilité des émissions selon la commission californienne chargée de la qualité de 125 l'air.
CARACTÉRISTIQUES TECHNIQUES Du fait que nous ayons listé les rayons maximums des guide-chaîne, vous pouvez utiliser un guide-chaîne avec un rayon de pointe inférieur à ceux de notre liste. Pour les guide-chaîne de mêmes longueurs, toutes les guide-chaîne à pointe à roue dentée et ayant le même nombre de dents peuvent être considérés comme ayant des valeurs énergétiques de rebond équivalentes. Les équipements de coupe suivants sont homologués pour les modèles Husqvarna 135, 135e et 135e TrioBrake.
PRÉCAUTIONS SÉCURITAIRES CONFORMANT AUX NORMES AMÉRICAINES Consignes de sécurité pour les utilisateurs de tronçonneuses N’utilisez que des chaînes et des guides de remplacement spécifiés par le fabricant ou des équivalents. (ANSI B175.1-2012 Annexe C) Autres consignes de sécurité Précautions à prendre pour se protéger des rebonds ! AVERTISSEMENT! Un rebond peut se produire quand le nez ou l’extrémité du guide heurte un objet ou quand le bois se referme et coince la chaîne dans l’entaille.
DÉCLARATION DE GARANTIE CONTRÔLE DES ÉMISSIONS EN CALIFORNIE ET AU NIVEAU FÉDÉRAL matière de tronçonneuse. (Par exemple, si un outil incorrect est utilisé pour retirer le rotor volant magnétique ou pour le tenir lors du retrait de l’embrayage, le rotor volant magnétique peut subir des dommages qui entraîneront son explosion ultérieurement.) Utilisez la protection de guide-chaîne appropriée lors de tout transport de votre tronçonneuse.
DÉCLARATION DE GARANTIE CONTRÔLE DES ÉMISSIONS EN CALIFORNIE ET AU NIVEAU FÉDÉRAL révisions ou réparations couvertes par la garantie seront disponibles dans tous les centres de distribution Husqvarna Forest & Garden agréés pour l’entretien de ce type de moteur. Durant la période de garantie de deux ans des systèmes de contrôle des émissions, Husqvarna Forest & Garden s’engage à maintenir un stock adéquat des pièces sous garantie afin de répondre à la demande pour ce type de pièces.
ACLARACION DE LOS SIMBOLOS Símbolos en la máquina: ¡ATENCION! ¡Las motosierras pueden ser peligrosas! Su uso descuidado o erróneo puede provocar heridas graves o mortales al operador o terceros. Lea detenidamente el manual de instrucciones y asegúrese de entender su contenido antes de utilizar la máquina. Bomba de combustible. La placa de identificación muestra el número de serie. yyyy es el año de producción, ww es la semana de producción.
ACLARACION DE LOS SIMBOLOS Símbolos en el manual de instrucciones: Los trabajos de control y/o mantenimiento deben efectuarse con el motor desconectado. ¡NOTA! El contacto de arranque/ parada retorna automáticamente a la posición de marcha. Por consiguiente, para evitar el arranque involuntario hay que quitar siempre el capuchón de encendido de la bujía antes de realizar trabajos de montaje, control y/o mantenimiento.
INDICE Índice ACLARACION DE LOS SIMBOLOS Símbolos en la máquina: ...................................... Símbolos en el manual de instrucciones: ............. INDICE Índice .................................................................... INTRODUCCION Apreciado cliente: ................................................. ¿QUE ES QUE? ¿Qué es qué en la motosierra? ............................ INSTRUCCIONES GENERALES DE SEGURIDAD Medidas a tomar antes de utilizar una motosierra nueva .........................
INTRODUCCION Apreciado cliente: ¡Felicidades por haber adquirido un producto Husqvarna! La historia de Husqvarna data del año 1689, cuando el Rey Karl XI encargó la construcción de una fábrica en la ribera del río Huskvarna para la fabricación de mosquetes. La ubicación junto al río Huskvarna era lógica, dado que el río se utilizaba para generar energía hidráulica.
INSTRUCCIONES GENERALES DE SEGURIDAD Medidas a tomar antes de utilizar una motosierra nueva • Lea detenidamente el manual de instrucciones. • (1) - (107) refiérase a las figuras en p. 2-6. • Compruebe el montaje y ajuste del equipo de corte. Vea las instrucciones bajo el título Montaje. • Ponga combustible y arranque la motosierra. Vea las instrucciones en los capítulos Manipulación del combustible y Arranque y parada.
INSTRUCCIONES GENERALES DE SEGURIDAD Importante ¡IMPORTANTE! Esta motosierra para los servicios forestales está concebida para realizar tareas en el bosque como la tala, la poda y el corte. La utilización de esta máquina podría estar regulada por la legislación nacional. Utilice solamente las combinaciones de espada/cadena de sierra recomendadas en el capítulo Datos técnicos.
INSTRUCCIONES GENERALES DE SEGURIDAD de la máquina para ver dónde están situados estos componentes en su máquina. La vida útil de la máquina puede acortarse y el riesgo de accidentes puede aumentar si el mantenimiento de la máquina no se hace de forma adecuada y si los trabajos de servicio y/o reparación no se efectúan de forma profesional. Para más información, consulte con el taller de servicio oficial más cercano. ! protección contra reculadas con la inscripción «TIRAR HACIA ATRÁS PARA REINICIAR».
INSTRUCCIONES GENERALES DE SEGURIDAD reculada debe tener la fuerza suficiente para activar el freno de cadena. Si el freno de cadena fuera demasiado sensible, se activaría constantemente, lo que sería molesto. ¿Me protegerá siempre el freno de cadena contra daños si se produce una reculada? blandas (la mayoría de las coníferas). El corte con un equipo de corte desafilado o incorrecto (modelo incorrecto o mal afilado) incrementa el nivel de vibraciones. ! No.
INSTRUCCIONES GENERALES DE SEGURIDAD ! ¡ATENCION! No utilice nunca una motosierra sin silenciador o con el silenciador defectuoso. Un silenciador defectuoso puede incrementar considerablemente el nivel de ruido y el riesgo de incendio. Tenga a mano herramientas para la extinción de incendios. No utilice nunca una motosierra sin red apagachispas o con red apagachispas defectuosa si la normativa del país exige este equipo. Equipo de corte Este capítulo describe cómo Ud.
INSTRUCCIONES GENERALES DE SEGURIDAD • Ancho de la guía de la espada (pulgadas/mm). El ancho de la guía de la espada debe estar adaptado al ancho del eslabón de arrastre de la cadena. • Orificio para aceite de cadena y orificio para pasador tensor de cadena. La espada debe estar adaptada al diseño de la motosierra.
INSTRUCCIONES GENERALES DE SEGURIDAD Tensado de la cadena • Cerrar la manija para fijar el tensado. (33) Lubricación del equipo de corte ! ! ¡ATENCION! Una cadena insuficientemente tensada puede soltarse y ocasionar accidentes graves, incluso mortales. ¡ATENCION! La lubricación insuficiente del equipo de corte puede ocasionar roturas de cadena, con el riesgo consiguiente de accidentes graves e incluso mortales. Aceite para cadena de motosierra La cadena se alarga con la utilización.
INSTRUCCIONES GENERALES DE SEGURIDAD minuto de funcionamiento a 3/4 de aceleración debe verse una línea de aceite clara en el objeto. Si no funciona la lubricación de la cadena: Cuando sólo queden 4 mm (5/32 de pulgada) de longitud de diente cortante, la cadena está gastada y debe cambiarse. • Compruebe que el canal de aceite de cadena en la espada esté abierto. Límpielo si es necesario. (34) Espada • Compruebe que la guía de la espada esté limpia. Límpiela si es necesario.
MONTAJE Montaje de la espada y la cadena ! ¡ATENCION! Para manipular la cadena deben utilizarse guantes protectores. 135 Compruebe que no esté activado el freno de cadena empujando la protección contra reculadas del freno de cadena hacia el mango delantero. (38) Desenrosque la tuerca de la espada y desmonte la carcasa del embrague (el freno de cadena). Saque la protección de transporte (A). (39) Monte la espada sobre el perno de la espada. Coloque la espada en la posición posterior extrema.
MANIPULACION DEL COMBUSTIBLE Carburante Aclaración! La máquina tiene motor de dos tiempos, por lo que debe utilizarse siempre una mezcla de gasolina con aceite para motores de 2 tiempos. Es importante medir con precisión la cantidad de aceite que se mezcla para conseguir la proporción de mezcla adecuada. Al mezclar pequeñas cantidades de combustible, incluso los pequeños errores en la cantidad de aceite tienen una gran incidencia en la proporción de mezcla.
MANIPULACION DEL COMBUSTIBLE Repostaje ! ¡ATENCION! Las siguientes medidas preventivas reducen el riesgo de incendio: 1 Si ha derramado sobre la máquina combustible o aceite para cadena. Seque cualquier residuo y espere a que se evaporen los restos de combustible. 2 Si se salpicó el cuerpo o las ropas, cambie de ropas. Lave las partes del cuerpo que han entrado en contacto con el combustible. Use agua y jabón. 3 Si hay fugas de combustible en la máquina.
ARRANQUE Y PARADA Arranque y parada ! Motor caliente ¡ATENCION! Antes de arrancar, observe lo siguiente: Posición de arranque, 1: Para la función combinada de estrangulamiento/aceleración de arranque en caliente, mueva el estrangulador tirando del mando rojo hacia fuera y hacia arriba. (44) El freno de cadena debe estar aplicado cuando se arranca la motosierra, para reducir el riesgo de contacto con la cadena en movimiento al ponerse en marcha.
ARRANQUE Y PARADA capítulo Arranque y parada. No arranque nunca la motosierra agarrando el cordón de arranque y soltando la máquina. Este método es muy peligroso porque se pierde fácilmente el control de la motosierra. (48) • No ponga nunca en marcha la máquina en interiores. Tenga en cuenta el riesgo de inhalación de los gases de escape del motor. • Observe el entorno y asegúrese de que no haya riesgo de tocar a personas o animales con el equipo de corte.
TECNICA DE TRABAJO Antes de utilizar la máquina: (50) 1 Compruebe que el freno de cadena funcione correctamente y no esté dañado. 2 Compruebe que la protección trasera de la mano derecha no esté dañada. 3 Compruebe que el fiador contra aceleraciones involuntarias funcione correctamente y no esté dañado. 4 Compruebe que el botón de parada funciona bien y está en buen estado. 5 Compruebe que todos los mangos estén libres de aceite.
TECNICA DE TRABAJO mangos con todos los dedos. Este agarre deben utilizarlo todos los usuarios, incluso los zurdos. Este agarre es la mejor forma de reducir el efecto de una reculada y, al mismo tiempo, mantener el control de la motosierra. ¡No suelte los mangos! (51) 3 Controle la pieza de trabajo. Si las piezas de trabajo que sierra son pequeñas y ligeras, pueden atascarse en la cadena de sierra y ser lanzadas contra usted.
TECNICA DE TRABAJO A continuación, se indica un listado teórico de la forma de tratar las situaciones más comunes con que puede enfrentarse un usuario de motosierra. Técnica de tala ¡IMPORTANTE! La tala de árboles requiere mucha experiencia. Un usuario de motosierra inexperto no debe talar árboles. ¡Evite los trabajos para los que no se considere suficientemente capacitado! Desramado Para cortar ramas gruesas deben aplicarse los mismos principios que para el tronzado. Corte las ramas difíciles por partes.
TECNICA DE TRABAJO Corte de ramas bajas y camino de retirada Desrame el ronco hasta la altura del hombro. Es más seguro trabajar de arriba a abajo y tener el tronco entre usted y la motosierra. (70) Limpie la vegetación que hay alrededor del árbol y elimine los eventuales obstáculos (piedras, ramas, huecos, etc.) para tener preparado un camino de retirada cuando empiece a caer el árbol. El camino de retirada debe estar a unos 135°, oblicuamente hacia atrás, de la dirección de derribo prevista.
TECNICA DE TRABAJO Sierre el árbol/rama desde el lado opuesto después de soltar la tensión. Medidas preventivas de las reculadas ! ¡ATENCION! Las reculadas pueden ser rapidísimas, repentinas y violentas, lanzando la motosierra, la espada y la cadena contra el usuario. Si la cadena en movimiento toca al usuario, pueden producirse lesiones muy graves e incluso mortales. Es necesario comprender las causas de las reculadas y que pueden evitarse procediendo con cuidado y trabajando con la técnica correcta.
MANTENIMIENTO Generalidades El usuario sólo puede efectuar los trabajos de mantenimiento y servicio descritos en este manual. Los trabajos de mayor envergadura debe efectuarlos un taller de servicio oficial. Ajuste del carburador Su producto Husqvarna ha sido construido y fabricado conforme a especificaciones que reducen los gases de escape tóxicos. Funcionamiento • • El régimen del motor se controla mediante el acelerador y el carburador.
MANTENIMIENTO afianzado en su articulación en el envolvente del embrague. (86) Sistema amortiguador de vibraciones ¡La sierra no se debe llevar ni colgar nunca por/en la horquilla! De hacerlo, puede dañarse el mecanismo, con lo que deja de funcionar el freno de cadena. (88) Control del efecto de frenado Coloque la motosierra sobre una base firme y arránquela. Fíjese que la cadena no entre en contacto con el suelo u otro objeto. Consulte las instrucciones bajo el título Arranque y parada.
MANTENIMIENTO Mecanismo de arranque ! ¡ATENCION! El muelle de retorno está tensado en el cuerpo del mecanismo de arranque y, con una manipulación negligente, puede soltarse y causar lesiones. Para cambiar el muelle de arranque o el cordón de arranque, proceda con cuidado. Utilice gafas protectoras y guantes protectores. Cambio del cordón de arranque • Afloje los tornillos que fijan el mecanismo de arranque en el cárter y saque el mecanismo.
MANTENIMIENTO • Mezcla de aceite inadecuada en el combustible (demasiado aceite o aceite inadecuado). • Filtro de aire sucio. Estos factores producen revestimientos en los electrodos de la bujía que pueden ocasionar perturbaciones del funcionamiento y dificultades de arranque. Si la potencia de la máquina es demasiado baja, si es difícil arrancar la máquina o si el ralentí es irregular: revise primero la bujía antes de tomar otras medidas.
MANTENIMIENTO Tabla de localización de fallos Fallo de arranque Compruebe Causa posible Medida Ajuste o reemplace los ganchos. Ganchos de arranque Ganchos de sujeción Limpie alrededor de los ganchos. Póngase en contacto con un taller de servicio autorizado. Depósito de combustible Tipo de combustible incorrecto Vacíelo y utilice el combustible adecuado. Carburador Reglaje del régimen de ralentí Ajuste la velocidad de ralentí con el tornillo T. Bujía sucia o húmeda.
MANTENIMIENTO Programa de mantenimiento A continuación incluimos una lista con los puntos de mantenimiento a efectuar en la máquina. La mayoría de los puntos se describen en el capítulo “Mantenimiento”. Mantenimiento Diario Mantenimiento semanal Mantenimiento mensual Limpie la parte exterior de la máquina. Compruebe el sistema de refrigeración cada semana. Compruebe si está desgastada la cinta del freno de cadena. Cámbiela cuando quede menos de 0,6 mm en el punto más gastado.
DATOS TECNICOS Datos técnicos 135 135e 135e TrioBrake Cilindrada, pulgadas3/cm3 2.49/40,9 2.49/40,9 2.49/40,9 Diámetro del cilindro, pulgadas/mm 1.61/41 1.61/41 1.61/41 Carrera, pulgadas/mm 1.22/31 1.22/31 1.22/31 Régimen de ralentí, rpm 2900 2900 2900 Potencia, kW/hp @ rpm 1,5/2,0 @ 9000 1,5/2,0 @ 9000 1,5/2,0 @ 9000 125 125 Motor Período de durabilidad de las emisiones según la 125 Junta de Recursos del Aire de California.
DATOS TECNICOS Información de reculadas El radio de la punta de la espada viene determinado bien por el número mínimo de dientes del piñón de la punta o por el radio de punta máximo correspondiente de una punta dura. En la lista se indica el radio de punta de espada máximo, por lo que también es posible usar una espada con radio de punta más pequeño que el indicado en la lista.
PRECAUCIONES DE SEGURIDAD DE LA NORMA AMERICANA Precauciones de seguridad para usuarios de motosierras (ANSI B175.1-2012 Anexo C) Precauciones de seguridad en reculadas ! ATENCIÓN! La reculada se puede producir cuando la punta de la espada toca en un objeto o cuando la madera se cierra y agarra la cadena de la motosierra en el corte. En algunos casos el contacto de la punta de la espada puede causar una reacción de inversión rapidísima que hace rebotar la espada hacia arriba y atrás hacia el operador.
DECLARACIÓN DE GARANTÍA DE CONTROL DE EMISIONES FEDERAL Y CALIFORNIANA Para transportar la motosierra, utilice la protección de espada adecuada. Proceda con suma precaución al cortar arbustos y arbolitos pequeños porque podría agarrarse material fino en la cadena y ser lanzado contra usted o hacerle perder el equilibrio.
DECLARACIÓN DE GARANTÍA DE CONTROL DE EMISIONES FEDERAL Y CALIFORNIANA mantenimiento estará garantizada para el período de tiempo previo al primer cambio programado. Si la pieza falla antes del primer cambio programado, Husqvarna Forest & Garden la reparará o la sustituirá sin ningún coste. Cualquier pieza que se repare o cambie en el periodo de garantía seguirá cubierta por la garantía durante el periodo de tiempo restante hasta el primer cambio programado.
Original instructions Instructions d’origine Instrucciones originales 1158605-49 ´®zÆ+Z¶5°¨ ´®zÆ+Z¶5°¨ 2017-04-28