
Operating Guide


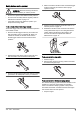
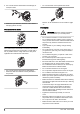
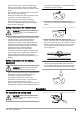
Table Of Contents
- Contents
- Introduction
- Safety
- Assembly
- Operation
- Maintenance
- Introduction
- Maintenance schedule
- To adjust the idle speed
- To do maintenance on the muffler
- Cooling system
- To examine the spark plug
- Air filter
- Two piece-shaft
- To check the chain drive sprocket
- To examine the cutting equipment
- To do a check of the guide bar
- To sharpen the saw chain
- Information about the guide bar and saw chain
- General information about how to sharpen the cutters
- To sharpen the cutters
- General information about how to adjust the depth gauge setting
- To adjust the depth gauge setting
- To tension the chain
- To fill with chain oil
- To check the chain lubrication
- To adjust chain lubrication
- Troubleshooting
- Transportation, storage and disposal
- Technical data
- Accessories
- Warranty
- Contenido
- Introducción
- Seguridad
- Montaje
- Funcionamiento
- Mantenimiento
- Introducción
- Programa de mantenimiento
- Para ajustar el régimen de ralentí
- Para realizar tareas de mantenimiento en el silenciador
- Sistema refrigerante
- Para examinar la bujía
- Filtro de aire
- Eje de dos piezas
- Para comprobar el piñón de arrastre de la cadena
- Para examinar el equipo de corte
- Para comprobar la espada guía
- Para afilar la cadena de sierra
- Información sobre la espada guía y la cadena de sierra
- Información general sobre cómo afilar las cortadoras
- Para afilar las cortadoras
- Información general sobre cómo ajustar la configuración del calibre de profundidad
- Para ajustar el calibre de profundidad
- Para tensar la cadena
- Para llenar con aceite para cadena
- Para comprobar la lubricación de la cadena
- Para ajustar la lubricación de la cadena
- Solución de problemas
- Transporte, almacenamiento y eliminación de residuos
- Datos técnicos
- Accesorios
- Garantía
- Table des matières
- Introduction
- Sécurité
- Montage
- Fonctionnement
- Entretien
- Introduction
- Calendrier d’entretien
- Réglage du régime de ralenti
- Pour entretenir le silencieux
- Système de refroidissement
- Vérification de la bougie d’allumage
- Filtre à air
- Arbre en deux pièces
- Pour vérifier le pignon d’entraînement de la chaîne
- Pour examiner l’équipement de coupe
- Pour vérifier le guide-chaîne
- Affûter la chaîne.
- Renseignements à propos du guide-chaîne et de la chaîne
- Renseignements généraux sur comment affûter les découpeuses.
- Pour affûter les découpeuses
- Renseignements généraux sur comment ajuster le réglage de la jauge de profondeur
- Réglage de la jauge de profondeur
- Pour tendre la chaîne
- Pour remplir au moyen d’huile pour chaîne
- Pour vérifier la lubrification de la chaîne
- Pour régler la lubrification de la chaîne
- Dépannage
- Transport, entreposage et mise au rebut
- Données techniques
- Accessoires
- Garantie

1. Loosen the screw on the cutting head, (A)
2. Fit the cutting head on the shaft so that the screw (A)
is aligned with the hole in the shaft as shown.
3. Finger tighten the screw (A). Make sure that screw
(A) fits into the hole in the shaft.
4. Tighten screw (A).
5. Tighten screw (B).
To assemble the bar and chain
1. Unscrew the bar nut and remove the protective
cover.
2. Fit the bar over the bar bolt. Place the bar in its
rearmost position. Place the chain over the drive
sprocket and in the groove on the bar. Begin on the
top side of the bar.
3. Make sure that the edges of the cutting links are
facing forward on the top edge of the guide bar.
4. Fit the cover and locate the chain adjuster pin (A) in
the hole in the bar. Check that the drive links of the
chain fit correctly on the drive sprocket (B) and that
the chain is in the groove in the bar (C). Tighten the
bar nut finger-tight.
B
A
C
5. Tension the chain by turning the chain tensioning
screw clockwise using the combination spanner. The
chain should be tensioned until it does not sag from
the underside of the bar.
6. The chain is correctly tensioned when it does not
sag from the underside of the bar, but can still be
turned easily by hand. Hold up the bar tip and tighten
the bar nuts with the combination spanner.
7. When fitting a new chain, the chain tension has to be
checked frequently until the chain is run-in. Check
the chain tension regularly. A correctly tensioned
chain ensures good cutting performance and long
life.
To adjust the harness
You should always use the harness with the machine to
give maximum control over the machine and reduce the
risk of fatigue in your arms and back.
1. Put on the harness.
2. Hook the machine onto the harness support hook.
3. Adjust the length of the harness so that the support
hook is roughly level with your right hip.
525P5S
525P4S
To assemble the two-piece shaft
525P5S
1. Turn the knob to loosen the coupling.
2. Align the tab of the cutting attachment (A) with the
arrow of the coupling (B).
A
B
10
703 - 005 - 20.10.2020