
User Manual

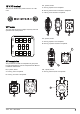
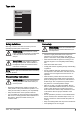
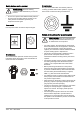
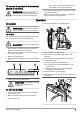
Table Of Contents
- Contents
- Introduction
- Safety
- Assembly
- Installation
- Operation
- Maintenance
- Troubleshooting
- To prepare the product for long-term storage
- Technical data
- EC Declaration of Conformity
- Съдържание
- Въведение
- Безопасност
- Монтаж
- Инсталиране
- Операция
- Поддръжка
- Отстраняване на проблеми
- За да подготвите продукта за продължително съхранение
- Технически данни
- Декларация за съответствие на ЕО
- Obsah
- Úvod
- Bezpečnost
- Montáž
- Instalace
- Provoz
- Údržba
- Odstraňování problémů
- Příprava výrobku na dlouhodobé uskladnění
- Technické údaje
- ES Prohlášení o shodě
- Περιεχόμενα
- Εισαγωγή
- Ασφάλεια
- Συναρμολόγηση
- Εγκατάσταση
- Λειτουργία
- Συντήρηση
- Αντιμετώπιση προβλημάτων
- Προετοιμασία του προϊόντος για μακροχρόνια αποθήκευση
- Τεχνικά στοιχεία
- Δήλωση Συμμόρφωσης ΕΚ
- Contenido
- Introducción
- Seguridad
- Montaje
- Instalación
- Funcionamiento
- Mantenimiento
- Resolución de problemas
- Preparación del producto para un almacenamiento prolongado
- Datos técnicos
- Declaración de conformidad CE
- Sommaire
- Introduction
- Sécurité
- Montage
- Installation
- Utilisation
- Entretien
- Dépannage
- Pour préparer votre produit pour un entreposage à long terme
- Caractéristiques techniques
- Déclaration de conformité CE
- TARTALOMJEGYZÉK
- Bevezető
- Biztonság
- Összeszerelés
- Telepítés
- Üzemeltetés
- Karbantartás
- Hibaelhárítás
- A termék felkészítése hosszú időn át tartó tárolásra
- Műszaki adatok
- EK megfelelőségi nyilatkozat
- Sommario
- Introduzione
- Sicurezza
- Montaggio
- Installazione
- Utilizzo
- Manutenzione
- Ricerca guasti
- Preparazione del prodotto per l'immagazzinamento a lungo termine
- Dati tecnici
- Dichiarazione di conformità CE
- SPIS TREŚCI
- Wstęp
- Bezpieczeństwo
- Montaż
- Instalacja
- Przeznaczenie
- Przegląd
- Rozwiązywanie problemów
- Przygotowanie produktu do długotrwałego przechowywania
- Dane techniczne
- Deklaracja zgodności WE
- ÍNDICE
- Introdução
- Segurança
- Montagem
- Instalação
- Funcionamento
- Manutenção
- Resolução de problemas
- Preparar o produto para um armazenamento a longo prazo
- Especificações técnicas
- Declaração CE de conformidade
- CUPRINS
- Introducere
- Siguranţă
- Asamblarea
- Instalare
- Funcţionarea
- Întreținerea
- Depanarea
- Pregătirea produsului pentru depozitarea pe termen lung
- Date tehnice
- Declarație de conformitate CE
- Obsah
- Úvod
- Bezpečnosť
- Montáž
- Inštalácia
- Prevádzka
- Údržba
- Riešenie problémov
- Príprava generátora na dlhodobé skladovanie
- Technické údaje
- ES vyhlásenie o zhode
- İçindekiler
- Giriş
- Güvenlik
- Montaj
- Kurulum
- Çalışma
- Bakım
- Sorun giderme
- Ürünü uzun süreli saklama için hazırlama
- Teknik veriler
- AT Uyumluluk Bildirimi

Note: For G1300P, the ON and OFF positions of
the choke are at the opposite positions.
To connect the electrical loads
WARNING: Do not connect 240 (230)
V to 120 (110) V receptacles. Do not
connect 3-phase electrical loads to a 1-
phase product. Do not connect 50 Hz
electrical loads to a 60 Hz product.
1. Start the engine and let it become warm for some
minutes. Refer to
To start the product on page 9
.
2. Connect and start the electrical loads.
3. Make sure that there is no overload in the product.
Refer to
To prevent overload in the product on page
10
.
To prevent overload in the product
Overload in the product can cause damage to the
product and to connected electrical devices. Do the
steps that follow to prevent overload in the product.
• Add the total amount of W of all electrical devices to
be connected at the same time.
CAUTION: The total W must not be
more than the W capacity of the product.
• The rated W of lights can be used from light bulbs.
The rated W of tools, equipment and motors can be
found on a decal on the device.
• If there is no amount of W specified in the product,
tool or equipment, multiply V with the rated A value.
• Always connect electrical devices with the highest
start up W to the product first. Then add the W of all
other connected electrical loads.
To stop the product
1. Stop and disconnect the electrical loads from the
receptacles on the control panel.
WARNING: Do not stop the engine
if the electrical loads are on and
connected to the product.
2. Let the engine operate without load for 30 seconds.
3. Set the power switch to the OFF position.
4. Close the fuel valve.
Maintenance
Introduction
WARNING: Read and understand the
safety chapter before you do maintenance
on the product.
Maintenance schedule
* Clean at a more regular interval if the product is used
in conditions with much dust.
** Maintenance must be done by an approved servicing
dealer.
Maintenance
Daily
mainte-
nance
before
opera-
tion
Maintenance interval in hours
20
hours or
each
month
50
hours or
each 3
months
100
hours or
each 6
months
300
hours or
1 time
each
year
Each 2
years
Clean the product. X
Do a check of the engine oil level. X
Do a check of the air filter. X
Clean the air filter. X
Do a check of the deposit cup. X
Replace the engine oil. X*
Clean or replace the air filter. X*
Do a check of and clean the spark plug. X
10 1420 - 003 - 09.07.2020