H U SQVARNA AUTOMOWE R ™ 230 ACX / 220 AC MAN U E L D ’UTILISATION
TABLE DES MATIÈRES 1. Introduction et sécurité ........................................................ 1.1 Introduction ............................................................................... 1.2 Les Symboles sur Automower™ ........................................ 1.3 Les Symboles dans le manuel d'utilisation ..................... 1.4 Consignes de sécurité ........................................................... 5 5 6 7 8 2. Présentation ........................................................
TABLE DES MATIÈRES Husqvarna AB travaille continuellement au développement de ses produits et se réserve le droit d’en modifier, entre autres, la conception et l’aspect sans préavis. Ce mode d’emploi concerne la version 2.4x du programme logiciel de la tondeuse.
1. INTRODUCTION ET SÉCURITÉ 1. Introduction et sécurité 1.1 Introduction Félicitations d’avoir choisir un produit de qualité exceptionnelle. Pour pouvoir utiliser votre Husqvarna Automower™ de façon optimale, vous devez savoir comment elle fonctionne. Ce manuel d'utilisation contient des informations importantes sur la tondeuse, la manière de l'installer et de l'utiliser.
1. INTRODUCTION ET SÉCURITÉ 1.2 Les Symboles sur Automower™ Ces symboles peuvent se trouver sur la tondeuse. Étudiez-les attentivement afin de comprendre leur signification. • Lisez attentivement le manuel d'utilisation pour en comprendre le contenu avant d'utiliser votre Automower. • Les avertissements et les consignes de sécurité contenus dans ce manuel doivent être soigneusement respectés pour une utilisation sûre et efficace de la tondeuse.
1. INTRODUCTION ET SÉCURITÉ 1.3 Les Symboles dans le manuel d'utilisation Ces symboles figurent dans le manuel d’utilisation. Étudiez-les attentivement afin de comprendre leur signification. • Les contrôles et/ou l'entretien doivent être effectués avec l’interrupteur principal sur OFF. OFF 3012-288 • Utilisez toujours des gants de protection pour travailler sous la tondeuse. • N’utilisez jamais de nettoyeur à eau haute pression ou de jet d’eau lors du nettoyage de Automower.
1. INTRODUCTION ET SÉCURITÉ 1.4 Consignes de sécurité Utilisation • Lisez attentivement le manuel d’utilisation pour en comprendre le contenu avant d’utiliser Automower. • Il est interdit de modifier la version originale de Automower. Toutes les modifications sont effectuées sous la responsabilité de l'utilisateur. • 1001-003 Contrôlez que la surface de tonte est exempte de pierres, branches, outils, jouets et autres objets susceptibles d’endommager les lames et de bloquer la tondeuse.
1. INTRODUCTION ET SÉCURITÉ Déplacement En cas de long transport, placez Automower dans son emballage d’origine. Déplacement depuis ou dans la zone de travail : 1. Appuyez sur le bouton STOP pour arrêter la tondeuse. Si la protection Protection stop contre le vol (voir la page 62) est activée, saisissez le premier chiffre de votre code PIN. Vous choisissez un code PIN à quatre chiffres quand vous démarrez la tondeuse pour la première fois, voir la page 34. 3012-388 2.
2. PRÉSENTATION 2. Présentation Ce chapitre contient des informations indispensables à la planification de l’installation. L'installation d'une Husqvarna Automower™ est constituée de quatre étapes principales : Automower est une tondeuse entièment autonome et automatique qui prend en charge l’entretien de votre pelouse. La tondeuse est alimentée par une batterie et ne nécessite pas d’entretien particulier.
2. PRÉSENTATION 2.1 Les pièces de Automower™ 2 7 3 7 6 4 1 10 8 5 9 14 13 11 12 16 17 15 19 18 20 21 22 23 24 25 26 3012-692 Les chiffres sur la figure correspondent à: 1. 2. 3. 4. 5. 6. 7. 8. 9. 10. 11. 12. 13.
2. PRÉSENTATION 2.2 Fonctionnement de Automower™ Capacité de travail Automower est recommandée pour des pelouses d’une surface jusqu’à 3000 m2 (1800 m2 pour 220 AC). La surface tondue dépend essentiellement de l’état des lames et du type d’herbe, de la vitesse de pousse et du taux d’humidité. La forme du jardin a aussi son importance.
2. PRÉSENTATION Méthode de travail Automower tond automatiquement la pelouse. Elle alterne en permanence tonte et charge de la batterie. La station de charge émet un signal que Automower peut détecter à 6 – 7 mètres de distance. La tondeuse commence à chercher sa station de charge quand sa batterie est trop faible. Automower ne tond pas lorsqu’elle recherche sa station de charge.
2. PRÉSENTATION Le bouton STOP sur le dessus de Automower est surtout utilisé pour arrêter la tondeuse quand elle est en marche. L’appui sur le bouton STOP ouvre un volet sous lequel se trouve le panneau de commande. Le bouton STOP reste enfoncé jusqu’à ce que le volet soit de nouveau fermé. Le démarrage est alors impossible. 3012-388 Le panneau de commande sur le dessus de Automower permet d’effectuer tous les réglages de la tondeuse. L’interrupteur principal se trouve aussi sur le panneau de commande.
2. PRÉSENTATION Mode de déplacement lors de la tonte Le déplacement de la tondeuse est déterminé par Automower elle-même. Un certain trajet ne se répète jamais. Ainsi, la pelouse est tondue uniformément sans que des traces soient laissées derrière la tondeuse. 3012-695 Si Automower arrive dans une zone où l’herbe est plus haute que précédemment, elle peut changer mode de déplacement.
2. PRÉSENTATION Méthode de recherche 2 : Retour station charge Automower se déplace selon un trajet aléatoire jusqu'à ce qu'elle atteigne le câble périphérique. La tondeuse suit ensuite le câble périphérique jusqu'à la station de charge. Cette méthode convient tout particulièrement aux installations sur une pelouse ouverte avec des passages larges (plus de 3 mètres env.) et ne comportant pas ou très peu d’îlots. Cette méthode a l’avantage d’avoir des temps de recherche généralement courts.
2. PRÉSENTATION 2.4 Plusieurs Automower™ dans un jardin Si vous utilisez plusieurs Automower sur un même terrain, chaque tondeuse doit posséder son propre code PIN. Une installation complète est nécessaire pour chaque tondeuse, station de charge comprise. Les câbles périphériques des différentes installations peuvent être placés les uns près des autres. Consultez votre revendeur pour davantage d’information. 2.
3. INSTALLATION 3. Installation Ce chapitre décrit comment installer une Husqvarna Automower™. Avant d’entreprendre l’installation, veuillez lire le chapitre précédent 2. Présentation. Lisez ce chapitre dans son entier avant de commencer l'installation. Le bon fonctionnement de Automower dépend de la manière dont l'installation a été effectuée. Il est donc important de planifier soigneusement l'installation. Il est pour cela conseillé de dessiner un schéma de la zone de travail, avec tous les obstacles.
3. INSTALLATION 3.1 Préparations 1. Si l'herbe dans la zone de travail prévue dépasse les 10 cm de hauteur, tondez-la avec une tondeuse ordinaire. Ramassez ensuite l’herbe coupée. 2. Lisez attentivement toutes les étapes de l’installation. 3. Vérifiez que vous disposez de toutes les pièces nécessaires à l’installation : Les chiffres entre parenthèses renvoient au dessin des pièces 2.1 Les pièces de Automower™, page 11.
3. INSTALLATION 3.2 Installation de la station de charge Meilleur emplacement pour la station de charge Pour des exemples d’emplacements de la station de charge, voir 7. Exemples de jardins, page 66. Si vous devez installer un câble guide, lisez le chapitre 3.8 Installation du câble guide, voir page 34, avant de déterminer l'emplacement de la station de charge. Veillez à conserver une grande surface libre (d'au moins 3 mètres) devant la station de charge.
3. INSTALLATION INFORMATION IMPORTANTE Le câble basse tension ne peut pas être prolongé. Le transformateur doit être placé dans un endroit ventilé et ne pas être soumis aux rayons du soleil. Il est aussi préférable de placer le transformateur sous un toit. Il est recommandé d’utiliser un interrupteur différentiel pour la connexion du transformateur à la prise murale. Ne placez pas la station de charge dans un coin ou un recoin de la zone de travail.
3. INSTALLATION Installation et connexion de la station de charge 1. Placez la station de charge dans un emplacement approprié. 2. Attachez la station de charge au sol à l’aide des clous fournis. INFORMATION IMPORTANTE Il est interdit de percer de nouveaux trous dans la plaque. Seuls les trous déjà percés peuvent être utilisés pour attacher la plaque au sol. 3012-549 3. Connectez le câble basse tension à la station de charge. Seuls le transformateur et le câble d’origine doivent être utilisés.
3. INSTALLATION 3.3 Mise en charge de la batterie Automower est livrée avec une batterie non chargée. Dès que la station de charge est connectée au secteur, la tondeuse peut être chargée. 1. Mettez l’interrupteur principal sur OFF. 2. Placez Automower dans la station de charge pour charger la batterie pendant que vous installez le câble périphérique. Comme la batterie est vide, il faut 1 heure 1/2 à 2 heures 1/2 pour qu’elle soit totalement chargée.
3. INSTALLATION • En fonction de type de délimitation de la zone de travail, le câble périphérique doit être posé à différentes distances des obstacles. La figure ci-dessous montre comment poser le câble périphérique autour de la zone de travail et autour des obstacles. 3012-688 Délimitations de la zone de travail Si un obstacle haut, comme un mur, délimite la zone de travail, le câble périphérique doit être placé à 35 cm de l’obstacle.
3. INSTALLATION Si la zone de travail est contiguë à une allée au même niveau que la pelouse, il est possible de laisser Automower s’avancer quelque peu sur cette allée. Le câble périphérique doit être placé à 10 cm du bord de l’allée. 10 cm Si la zone de travail est divisée par une allée dallée de même niveau que la pelouse, il est possible de laisser Automower traverser l’allée. Le câble périphérique peut très bien être posé sous les dalles.
3. INSTALLATION Délimitations à l'intérieur de la zone de travail Utilisez le câble périphérique pour délimiter certaines sections de la zone de travail en créant des îlots autour des obstacles résistants tels que les plates-bandes, les buissons et les fontaines. Tirez le câble jusqu'à la zone, passez-le autour de la section à délimiter, et revenez en suivant le même parcours. Si vous utilisez des cavaliers, le câble de retour doit être attaché sous les même cavaliers que le câble de l'aller.
3. INSTALLATION Passages lors de la tonte Les passages longs et étroits ainsi que les zones d'une largeur inférieure à 1,5 - 2 mètres doivent être évités. Quand Automower tond, elle risque de tourner et virer trop longtemps dans le passage ou la zone. L'herbe risque alors d'être aplatie.
3. INSTALLATION Pentes Le câble périphérique peut être posé en travers d'une pente d'une inclinaison inférieure à 10 %. 3012-668 Le câble périphérique ne doit pas être posé en travers d'une pente d'une inclinaison supérieure à 10 %. Automower aurait du mal à tourner. La tondeuse s'arrête et affiche le message d'erreur En dehors zone de tonte. Le risque est particulièrement important par temps humide dans la mesure où les roues risquent de déraper dans l'herbe mouillée.
3. INSTALLATION Pose du câble périphérique Placez le câble périphérique autour de la zone de travail mais ne le connectez pas tout de suite à la station de charge. 3012-221 INFORMATION IMPORTANTE Le câble supplémentaire ne doit pas être enroulé à l'extérieur du câble périphérique. Il pourrait alors perturber le fonctionnement de Automower™. Conseils ! Utilisez la règle fournie pour vous aider à poser le câble périphérique.
3. INSTALLATION Le câble périphérique ne doit pas être croisé sur son parcours vers et depuis un îlot. 3012-686 Placement du câble périphérique vers la station de charge Le câble périphérique peut être agencé de différentes manières à l’entrée de la station de charge : La meilleure solution consiste à amener le câble à l’extérieur de la station de charge, voir la solution 1. Le câble peut aussi être placé sous la plaque de la station de charge comme indiqué par la solution 2 de l’illustration.
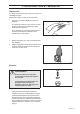
3. INSTALLATION Raccord du câble périphérique Si le câble périphérique est trop court et doit être prolongé : Utilisez le raccord sans soudure d’origine. Il est étanche et assure une connexion électrique fiable. Pour joindre les câbles : Enfoncez les deux extrémités des câbles dans le raccord. Appuyez ensuite sur le bouton sur le dessus du raccord. L'utilisation d'une pince ou d'un outil similaire est recommandée dans la mesure où le bouton du raccord est difficile à enfoncer à l'aide des doigts.
3. INSTALLATION 2. Enfoncez les extrémités du câble périphérique dans les orifices inférieurs de la station de charge et faites-les ressortir par les orifices supérieurs. L’extrémité de droite doit être enfoncée dans l’orifice de droite et la gauche dans l’orifice de gauche. 3012-508 INFORMATION IMPORTANTE Le câble périphérique ne doit pas être croisé lors de la connexion à la station de charge.
3. INSTALLATION 5. Coupez le câble périphérique en excès. Coupez 1 à 2 cm au dessus de chaque connecteur. 6. Enfoncez le connecteur sur la broche marquée A de la station de charge. 3012-265 INFORMATION IMPORTANTE Le connecteur de droite doit être connecté à la broche de droite de la station de charge et vice-versa. 3012-507 7. Remettez le capot sur la station de charge. Veillez à ce que les trois ergots de la station de charge se placent correctement dans le capot. 3012-270 3.
3. INSTALLATION 3.7 Connexion de Automower™ à sa station de charge 1. Ouvrez le volet du panneau de commande en appuyant sur le bouton STOP. 2. Placez Automower dans sa station de charge. 3. Mettez l’interrupteur principal sur ON. Quand Automower est mise en marche pour la première fois, une séquence de démarrage est exécutée. On vous demande ce qui suit : langue, format de l’heure, l’heure, format de la date, la date et un code PIN à quatre chiffres. Toutes les combinaisons sont autorisées sauf 0000.
3. INSTALLATION • Le câble périphérique est posé le long d'une pente abrupte (inclinaison supérieure à 25 %). Quand Automower suit le câble périphérique le long d'une pente abrupte, la tondeuse change de direction et s'éloigne du câble périphérique. • Des îlots nombreux ou de grande taille. Si Automower est autorisée à suivre le câble périphérique, elle fait environ deux tours autour d'un îlot avant de le quitter et de chercher de nouveau le câble périphérique.
3. INSTALLATION Placement et connexion du câble guide Le texte ci-dessous fait référence aux câbles guide avec les dénominations guide 1 et guide 2 ; ces indications apparaissent également à l’arrière de la station de charge (seulement guide 1 pour 220 AC). 1. Contrôlez que la station de charge est installée sur le meilleur emplacement possible. Le câble guide et la section du câble périphérique retournant à la station de charge constituent la boucle guide.
3. INSTALLATION 5. Tirez le câble guide tout droit sur au moins 2 mètres depuis le bord avant de la plaque de charge. Distance maximale Au moins 30 cm Au moins 2m 3012-648 Si vous devez installer le câble guide à travers un passage : • Automower suit le câble guide du même côté du câble quand elle va vers la station de charge et quand elle en revient.
3. INSTALLATION 9. Connectez le câble guide au câble périphérique à l'aide d'un raccord : • Enfoncez les extrémités du câble périphérique dans les trous de droite et de gauche du raccord. • Introduisez l’extrémité du câble guide dans le trou du milieu. • Appuyez sur le bouton du raccord. 10. Attachez le raccord sur l’herbe à l’aide des cavaliers ou enterrez-le dans la pelouse. 3012-675 INFORMATION IMPORTANTE Le rôle du câble guide varie en fonction de l'aspect de la zone de travail.
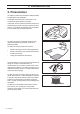
4. UTILISATION 4. Utilisation 4.1 Charge d’une batterie vide Quand l'Husqvarna Automower™ est neuve ou a été remisée sur une longue période, la batterie est vide et doit être chargée avant la mise en service de la tondeuse. La charge prend de1,5 à 2,5 heures. 1. Placez Automower dans sa station de charge. Poussez la tondeuse le plus loin possible. 3012-385 Un bon contact est établi quand les deux contacts de charge de la tondeuse se trouvent au centre des plaques de contact de la station de charge.
4. UTILISATION 4.2 Utilisation de la minuterie Le meilleur résultat de tonte est obtenu quand l’herbe n’est pas trop coupée. Utilisez la fonction minuterie (voir 6.4 Minuterie (2), page 50) pour éviter une pelouse aplatie et pour maximiser la durée de vie de votre Automower. Par exemple, l’herbe est plus belle si elle est coupée un jour sur deux au lieu de 12 heures par jour. De plus, il est bon pour l’herbe de se reposer pendant au moins une période de trois jours par mois. 4.3 Démarrez Automower™ 1.
4. UTILISATION 4.5 Redémarrage Redémarrage dans les 20 secondes 1. Fermez le volet du panneau de commande. Automower démarre automatiquement. 3012-389 Redémarrage après plus de 20 secondes S’il s’est écoulé plus de 20 secondes depuis le dernier appui sur le bouton STOP ou sur une touche du clavier, la fermeture du volet ne suffit pas à démarrer Automower. Pour démarrer : 1. Appuyez sur le bouton YES. 2. Fermez le volet du panneau de commande. 3012-402 4.6 Mise hors tension de Automower™ 1.
4. UTILISATION 4.7 Réglage de la hauteur de coupe La hauteur de coupe peut varier, en continu, entre 2 cm (minimum) et 6 cm (maximum). Si l’herbe est haute, il est préférable que Automower commence à tondre avec la hauteur de coupe MAX. Quand l’herbe est plus courte, vous pouvez progressivement réduire la hauteur de coupe. Pour régler la hauteur de coupe : 1. Appuyez sur le bouton STOP pour arrêter la tondeuse. 2. Ouvrez le capot du réglage de la hauteur de coupe.
5. PANNEAU DE COMMANDE 5. Panneau de commande Le panneau de commande permet de passer des commandes à l'Husqvarna Automower™ et d'effectuer des réglages. Toutes les fonctions sont accessibles via le système de menus. 3012-694 Le panneau de commande est constitué d’un écran d’affichage et d’un clavier. Toutes les informations sont affichées sur l’écran et toutes les saisies sont effectuées à l’aide des touches du clavier.
5. PANNEAU DE COMMANDE Le clavier est constitué de cinq groupes de touches : Les touches de commandes rapides, les touches de programmes, les touches de sélection, les touches numériques et l’interrupteur principal. Menu principal Commandes Minuterie Jardin Réglages 3012-416 5.1 Les commandes rapides 1. Maison : • Envoie la tondeuse à sa station de charge. Elle y reste jusqu’à un nouvel appui sur la touche. Suite à l’appui sur la touche, le symbole de la maison s’allume sur le côté droit de l’écran.
5. PANNEAU DE COMMANDE 5.2 Les touches de Programmes 3. A 4. B 5. C 3 Les touches de programmes permettent de sauvegarder certains groupes de réglages afin de les réutiliser ou de faciliter l’utilisation d’une Automower dans plusieurs jardins. Chaque touche correspond à des réglages préprogrammés. Vous pouvez choisir de les utiliser ou de les modifier. • • 4 5 Pour modifier les réglages : faites les réglages souhaités.
5. PANNEAU DE COMMANDE 5.4 Les touches Numériques 9. Utilisées dans la structure de menus pour saisir des valeurs comme le code PIN, l’heure et les réglages de sortie de la station. Utilisées aussi pour indiquer un code numérique servant de sélection rapide (raccourci) vers les différents menus. Pour davantage d’information sur le code numérique, voir Code numérique, page 47. 3012-407 5.5 Interrupteur principal 10. Mettez l’interrupteur principal sur ON pour pouvoir démarrer Automower.
6. LE FONCTIONNEMENT DES MENUS 6. Le fonctionnement des menus 6.1 Menu principal Le menu principal est composé de quatre options : 6.3 Commandes (1) 6.4 Minuterie (2) 6.5 Jardin (3) 6.6 Réglages (4) Les chiffres entre parenthèses renvoient aux lignes de menu de l'écran de l'Husqvarna Automower™. Menu principal Commandes Minuterie Jardin Réglages 3012-679 Chaque option contient plusieurs sous-menus. Ils vous permettent d’accédez à toutes les fonctions de réglage de Automower.
6. LE FONCTIONNEMENT DES MENUS Sous-menus Dans certains sous-menus, une case se trouve à droite de certaines lignes. Une case cochée indique que la fonction est sélectionnée. Dans certains sous-menus, des informations sont indiquées à droite de certaines lignes. Ces informations indiquent les choix effectués pour cette fonction.
Charger puis AUTO Voir dernières erreurs Commandes Lun Mar Mer Jeu Jours de tonte Ven Sam Sélect. tous Dim Copier minut.
6. LE FONCTIONNEMENT DES MENUS 6.3 Commandes (1) Cette option du menu principal permet d’accéder aux fonctions suivantes de Automower. • Charger puis AUTO (1-1) Pour que Automower se dirige immédiatement vers sa station de charge, charge sa batterie et repasse ensuite en mode de fonctionnement automatique. Sélectionnez cette fonction et appuyez sur YES quand le curseur est sur Oui. • Voir dernières erreurs (1-2) Pour afficher une liste des messages d’erreurs sauvegardés.
6. LE FONCTIONNEMENT DES MENUS Suspendre minuterie (2-1) Si vous avez activé la minuterie de votre Automower, cette fonction vous permet de désactiver temporairement les réglages • • OUI Suspendre minuterie OUI (2-1-1) NON 2-1- Mettez le curseur sur OUI et appuyez sur YES pour arrêter la fonction minuterie. Minuterie semaine NON (2-1-2) Minuterie week-end Mettez le curseur sur NON et appuyez sur YES pour activer la fonction minuterie.
6. LE FONCTIONNEMENT DES MENUS • Heure départ 1 (2-3-2) • Heure arrêt 1 (2-3-3) • Heure départ 2 (2-3-4) • Heure arrêt 2 (2-3-5) • Copier minuterie semaine (2-3-6) Appuyez sur YES après la question Copier ? pour transférer toutes les heures programmées dans la minuterie semaine. Jours de tonte (2-4) Utilisez la touche YES pour marquer/démarquer les jours où Automower doit tondre/ne pas tondre. Automower tond durant les jours cochés.
6. LE FONCTIONNEMENT DES MENUS • Avancé (3-4) Pour contrôler que le câble est intact, pour trouver le câble dans la pelouse et pour régler la distance de dépassement du câble périphérique. Pour des exemples de réglages de jardin, voir 7. Exemples de jardins, page 66. Angles de sortie (3-1) Automower quitte normalement sa station de charge dans une direction comprise dans un angle de sortie de 90° à 270°, pour lequel 90° est appelé début angle et 270° fin angle.
6. LE FONCTIONNEMENT DES MENUS • % sortie angle 1 (3-1-6) Quand vous utilisez deux angles de sortie : indiquez un pourcentage pour déterminer le pourcentage de cas où Automower doit quitter sa station de charge dans l’angle 1. Pour tester les réglages des Angles de sortie : indiquez la valeur 100 % pour % sortie angle 1 pour tester le secteur 1. indiquez la valeur 0 % pour % sortie angle 1 pour tester le secteur 2.
6. LE FONCTIONNEMENT DES MENUS Jusqu’à cinq zones éloignées peuvent être activées: Zone1, Zone 2, Zone 3, Zone 4 et Zone 5 (seulement trois zones pour 220 AC). Trois données doivent être indiquées pour activer une zone : Zone 1 Zones éloignées Zone 2 Zone 3 Retour station charge Zone 4 Largeur couloir Zone 5 Test retour station • Direction Test zones éloignées 3-2-1 Indiquez droite, gauche, guide 1 ou guide en fonction de l’emplacement de la zone par rapport à la station de charge.
6. LE FONCTIONNEMENT DES MENUS • Retour station charge (3-2-2) Cette fonction permet de déterminer de quelle manière Automower cherche sa station de charge. Automower commence toujours à chercher sa station de charge d’une manière aléatoire. Dans certains jardin, ceci ne suffit pas pour que la tondeuse puisse trouver rapidement sa station de charge. La recherche peut être optimisée à l’aide de la fonction Retour station charge.
6. LE FONCTIONNEMENT DES MENUS • Largeur couloir (3-2-3) Le réglage Largeur couloir indique la distance entre la tondeuse et le câble périphérique ou le câble guide quand elle suit l'un ou l'autre de ces câbles vers ou depuis la station de charge. La surface près du câble périphérique/de guidage que la tondeuse utilise est appelée Couloir. Couloir Une valeur de largeur de couloir faible correspond à un couloir étroit et une valeur élevée à un couloir large.
6. LE FONCTIONNEMENT DES MENUS INFORMATION IMPORTANTE La distance à laquelle la tondeuse suit le câble périphérique varie en fonction de l'aspect de la zone de travail. Testez plusieurs solutions pour trouver la Largeur couloir la plus élevée possible. Utilisez la fonction Test retour station (3-2-4) pour tester différentes valeurs. • Test retour station (3-2-4) La fonction Test retour station (3-2-4) vous permet de tester comment Automower trouve la station de charge.
6. LE FONCTIONNEMENT DES MENUS • Test zones éloignées (3-2-5) La fonction Test zones éloignées (3-2-5) permet de tester différents réglages de sortie et de déterminer la distance de la station de charge à une zone éloignée. Pour tester les réglages de Zones éloignées (3-2-1) : • Indiquez 100 % pour % sortie zone pour la zone éloignée qui va être testée. Placez Automower dans la station de charge et sélectionnez Test zones éloignées (3-2-5).
6. LE FONCTIONNEMENT DES MENUS • Normal (3-3-2) Pour une quantité moyenne d’obstacles et/ou de passages. • Complexe (3-3-3) Pour une grande pelouse et de nombreux obstacles et/ou passages. Avancé (3-4) • Contrôler câble (3-4-1) Cette fonction permet d’une part de contrôler si la tondeuse reçoit correctement le signal du câble périphérique, et d’autre part de déterminer exactement où se trouve le câble périphérique dans la pelouse.
6. LE FONCTIONNEMENT DES MENUS 6.6 Réglages (4) Cette option du menu principal permet d’accéder aux possibilités suivantes de réglages. • Sécurité (4-1) pour les réglages relatifs au Code PIN, à la Protection Stop, au Verrou réglages et à l'Alarme. Le code PIN doit être saisi pour pouvoir accéder au menu Sécurité. • Sons (4-2) Commandes Minuterie Sécurité Jardin Sons Réglages Langue pour activer/désactiver les signaux sonores des activités de la tondeuse et pour régler le niveau sonore du clavier.
6. LE FONCTIONNEMENT DES MENUS Pour : • Activer : mettez le curseur sur Activer code PIN et appuyez sur YES. Mettez le curseur sur Nbre jours et appuyez sur YES. Indiquez le nombre de jours pendant lesquels Automower doit tondre avant d’exiger le code PIN. Terminez en appuyant sur YES. Quand le nombre sélectionné de jours s’est écoulé, Automower termine la tonte en cours et charge sa batterie. Le message Entrer code PIN s’affiche ensuite sur l’écran. Saisissez alors le code et appuyez sur YES.
6. LE FONCTIONNEMENT DES MENUS • Verrou réglages (4-1-4) Cette fonction empêche les personnes ne connaissant pas le code PIN de modifier des réglages. Il n’est pas non plus possible de choisir ou de sauvegarder les programmes A, B ou C. Code PIN Activer code PIN Pour : • Activer : mettez le curseur sur Verrou réglages et appuyez sur YES. Choisissez ensuite ACTIF pour activer. Protection Stop ACTIF Verrou réglages INACTIF • Désactiver : mettez le curseur sur Verrou réglages et appuyez sur YES.
6. LE FONCTIONNEMENT DES MENUS .
6. LE FONCTIONNEMENT DES MENUS • Format heure (4-4-3) Mettez le curseur sur Format heure et appuyez sur YES. Mettez le curseur sur le format souhaité pour l’heure : • 12h • 24h Terminez en appuyant sur YES. • Format date (4-4-4) Mettez le curseur sur Format date et appuyez sur YES. Mettez le curseur sur le format souhaité pour la date : • AA-MM-JJ (année-mois-jour) • MM-JJ-AA (mois-jour-année) • JJ-MM-AA (jour-mois-année) Terminez en appuyant sur YES.
7. EXEMPLES DE JARDINS 7. Exemples de jardins - Suggestions d’installations et de réglages Le comportement de la tondeuse dépend des réglages effectués. Si les réglages de la tondeuse sont correctement adaptés au jardin, l'Husqvarna Automower™ accède plus facilement à toutes les zones du jardin et le résultat de tonte est impeccable. En fonction des jardins, les réglages peuvent être différents.
7. EXEMPLES DE JARDINS Suggestions d’installations et de réglages Surface : 1800 m2. Aucun câble guide n’est nécessaire. Minuterie : temps de fonctionnement de 24 heures par jour. Angles de sortie : un secteur de 90° - 270°. Méthode de recherche : Aléatoire et Suivre câble périph. Retour station charge : Guide 1 7 minutes, Guide 2 7 minutes et câble périphérique 11 minutes. Largeur couloir : câble périphérique 20. 3012-543 Surface : 1800 m2.
7. EXEMPLES DE JARDINS Suggestions d’installations et de réglages Surface : 600 m2. Jardin en forme de L avec station de charge placée sur la petite surface. Un ou deux îlots. Aucun câble guide n’est nécessaire. Minuterie : temps de fonctionnement de 8 heures par jour. Angles de sortie : Angle 1 70° - 130° et Angle 2 250° - 290°. % sortie angle 1 10 %. Méthode de recherche : Aléatoire et Suivre câble périph. Retour station charge : Guide 1 7 minutes, Guide 2 7 minutes et câble périphérique 99 minutes.
7. EXEMPLES DE JARDINS Suggestions d’installations et de réglages Surface : 800 m2. Jardin rectangulaire avec station de charge placée près d'un îlot. Une grande partie du câble périphérique est installée sur une pente d'une inclinaison supérieure à 10 %. Il est recommandé d’utiliser un câble guide. Minuterie : temps de fonctionnement de 10 heures par jour. Angles de sortie : un secteur de 90° - 270°. Méthode de recherche : Aléatoire et Suivre câble guide.
7. EXEMPLES DE JARDINS Suggestions d’installations et de réglages Cet exemple est valable uniquement pour 230 ACX. Surface : 2200 m2. Deux câbles guides sont recommandés. Minuterie : temps de fonctionnement de 19 heures par jour. Angles de sortie : un secteur de 90°-270°. Zones éloignées : Zones éloignées : Zone 1 ; Direction Guide 1, Distance 40 m et % sortie zone 20 %. Zone 2 ; Direction Guide 2, Distance 30 m et % sortie zone 40 %.
8. ENTRETIEN 8. Entretien Pour une meilleure fiabilité et une plus longue durée de vie, contrôlez et nettoyez régulièrement votre Husqvarna Automower™ et remplacez les pièces usées. Pour davantage d’information sur le nettoyage, voir 8.5 Nettoyage, page 73. Pendant les premiers temps d’utilisation de Automower, le disque de coupe, le disque de protection et les lames doivent être contrôlés une fois par semaine. Si l’usure est faible pendant cette période, la fréquence des contrôles peut être réduite.
8. ENTRETIEN 8.1 Batterie La batterie ne nécessite aucun entretien mais sa durée de vie est limitée à 1 - 4 ans. La durée de vie est dépendante d’une part de la longueur de la saison, d’autre part du nombre d’heures d’utilisation de Automower par jour. Si la saison est longue et les heures d’utilisation nombreuses, la batterie doit être remplacée plus souvent. INFORMATION IMPORTANTE Chargez totalement la batterie à la fin de la saison avant le remisage hivernal. 8.
8. ENTRETIEN 8.3 Service Apportez votre Automower chez votre revendeur pour une révision avant le remisage hivernal. Lors de la révision, le revendeur peut effectuer un nettoyage en profondeur de la tondeuse, tester ses fonctions et ses composants et, si nécessaire, remplacer les pièces d’usure. Si de nouvelles fonctions ont été développées durant l'année, votre revendeur peut installer un nouveau logiciel sur Automower. 8.
8. ENTRETIEN 4. Nettoyez le disque de coupe et le dessous de la tondeuse avec une brosse à vaisselle par exemple. Contrôlez que le disque de coupe tourne librement par rapport au support du moteur juste au-dessus. Contrôlez aussi que le disque de protection tourne librement par rapport au disque de coupe. En cas de pénétration de longues herbes ou d’autres objets, le disque de coupe et/ou de protection sont freinés.
8. ENTRETIEN 8.6 Remplacement des lames AVERTISSEMENT Utilisez toujours des lames et des vis d’origine lors des échanges. Si vous remplacez seulement la lame et réutilisez la vis, elle peut s’user au cours de la tonte et se rompre. La lame peut alors être projetée et causer des dommages. Les trois lames de Automower sont vissées sur le disque de coupe. Pour une plus longue durée de vie, les lames sont à double tranchant. Le disque de coupe tourne parfois vers la gauche, parfois vers la droite.
9. RECHERCHE DE PANNES 9. Recherche de pannes 9.1 Messages d’erreur Vous trouverez ci-dessous une liste des messages d'erreur qui peuvent être affichés sur l'écran de l'Husqvarna Automower™. Si une même erreur se produit souvent : contactez votre revendeur. Message d’erreur Cause Mesure Moteur roue gauche bloqué De l’herbe ou un autre objet s’est coincé autour de la roue motrice. Contrôlez la roue motrice et retirez ce qui gêne.
9. RECHERCHE DE PANNES Message d’erreur Cause Mesure En dehors zone de tonte Si l’erreur ne se produit qu’à certains endroits, il peut s’agir de perturbations dues à des objets métalliques (clôture, ronds à béton) ou à des câbles enterrés à proximité. Essayez de déplacer le câble périphérique. La zone de travail présente une trop grande inclinaison. Contrôlez que le câble périphérique est correctement posé. Le câble périphérique est tiré dans la mauvaise direction autour d’un îlot.
9. RECHERCHE DE PANNES 9.2 Symptôme d’erreur Si votre Automower ne fonctionne pas correctement, suivez le schéma de recherche de pannes ci-dessous. Si le problème persiste, consultez votre revendeur. Symptôme Cause Mesure Résultat de coupe irrégulier Automower ne fonctionne pas assez longtemps chaque jour. Augmentez le temps de travail, voir 6.4 Minuterie (2), page 50. La zone de travail est trop grande. Essayez de limiter la zone de travail ou allongez le temps de travail, voir 6.
10. CARACTÉRISTIQUES TECHNIQUES 10.
12. ASSURANCE DE CONFORMITÉ UNION 12.
13. INDEX 13. Index % sortie angle 1 .........................................................54 % sortie zone dans Zones éloignées .........................55 A A l'envers (sur le dos) ................................................77 Activer code PIN ........................................................61 Alarme .......................................................................62 Allée ...........................................................................25 Angles de sortie ...............
13. INDEX Jardin ...................................................................52 Minuterie ..............................................................50 Réglages .............................................................61 Fontaines ...................................................................25 Format date ...............................................................65 Format heure .............................................................65 Fossé ....................................
13. INDEX État de la batterie ................................................43 Horloge ................................................................43 Icône de l’horloge ................................................43 Icône de programme ...........................................43 Interrupteur principal ............................................46 Menu principal .....................................................47 Mode de fonctionnement .....................................
13. INDEX T Tension batterie faible ...............................................77 Test retour station .....................................................58 Test zones éloignées ................................................59 Tonte mode carré ......................................................15 Touche YES ..............................................................45 Touches Interrupteur principal ...........................................46 Touches de programmes .............................
115 03 20-31 AUTOMOWER est une marque déposée par Husqvarna AB. Copyright © 2006 HUSQVARNA. All rights reserved. www.automower.