Operator’s manual Manuel d’utilisation Manual de instrucciones T435 Please read the operator’s manual carefully and make sure you understand the instructions before using the machine. Lire attentivement et bien assimiler le manuel d’utilisation avant d’utiliser la machine. Lea detenidamente el manual de instrucciones y asegúrese de entender su contenido antes de utilizar la máquina.
KEY TO SYMBOLS Symbols on the machine: WARNING! Chain saws can be dangerous! Careless or improper use can result in serious or fatal injury to the operator or others. Please read the operator’s manual carefully and make sure you understand the instructions before using the machine. Always wear: • Approved protective helmet • Approved hearing protection • Protective goggles or a visor Air purge. Refuelling. Adjustment of the oil pump. Chain oil fill.
KEY TO SYMBOLS Symbols in the operator’s manual: You will find the following labels on your chain saw: Switch off the engine before carrying out any checks or maintenance. Always wear approved protective gloves. Regular cleaning is required. Visual check. Protective goggles or a visor must be worn. EPA III Refuelling. Filling with oil and adjusting oil flow. The chain brake must be engaged when the chain saw is started.
CONTENTS Contents KEY TO SYMBOLS Symbols on the machine: ...................................... Symbols in the operator’s manual: ........................ CONTENTS Contents ............................................................... INTRODUCTION Dear customer! ..................................................... WHAT IS WHAT? What is what on the chain saw? ........................... GENERAL SAFETY PRECAUTIONS Before using a new chain saw .............................. Important .......................
INTRODUCTION Dear customer! Congratulations on your choice to buy a Husqvarna product! Husqvarna is based on a tradition that dates back to 1689, when the Swedish King Karl XI ordered the construction of a factory on the banks of the Huskvarna River, for production of muskets. The location was logical, since water power was harnessed from the Huskvarna River to create the waterpowered plant.
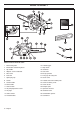
WHAT IS WHAT? What is what on the chain saw? 1 Front hand guard 16 Throttle trigger 2 Information and warning decal 17 Stop switch 3 Top handle 18 Guide bar 4 Adjuster screws carburetor 19 Saw chain 5 Filter cover 20 Bar tip sprocket 6 Fuel tank 21 Fixing eye for safety line 7 Spark plug cap 22 Clutch cover 8 Starter 23 Product and serial number plate 9 Starter handle 24 Chain tensioning screw 10 Front handle 25 Chain catcher 11 Chain oil tank 26 Bumper spike 12 Oil pump adju
GENERAL SAFETY PRECAUTIONS Before using a new chain saw • Please read this manual carefully. • Check that the cutting equipment is correctly fitted and adjusted. See instructions under the heading Assembly. • Refuel and start the chain saw. See the instructions under the headings Fuel Handling and Starting and Stopping. • • Do not use the chain saw until sufficient chain oil has reached the chain. See instructions under the heading Lubricating cutting equipment.
GENERAL SAFETY PRECAUTIONS Important IMPORTANT! possible. Your dealer, forestry school or your library can provide information about which training materials and courses are available. This chain saw for tree service is designed for pruning and dismantling standing tree crowns. You should only use the saw with the bar and chain combinations we recommend in the chapter Technical data.
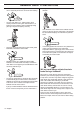
GENERAL SAFETY PRECAUTIONS • Fire Extinguisher and Shovel Chain brake and front hand guard Your chain saw is equipped with a chain brake that is designed to stop the chain if you get a kickback. The chain brake reduces the risk of accidents, but only you can prevent them. Generally clothes should be close-fitting without restricting your freedom of movement. IMPORTANT! Sparks can come from the muffler, the bar and chain or other sources.
GENERAL SAFETY PRECAUTIONS • The chain brake must be engaged when the chain saw is started to prevent the saw chain from rotating. • Use the chain brake as a ”parking brake” when starting and when moving over short distances, to reduce the risk of moving chain accidentally hitting your leg or anyone or anything close by. designed to be activated by the inertia in the kickback direction.
GENERAL SAFETY PRECAUTIONS Will my inertia activated chain brake always activate during kickback in the event of a kickback? No. First your brake must be in working order. Second the kickback must be strong enough to activate the chain brake. If the chain brake is too sensitive it would activate all the time which would be a nuisance. Will my chain brake always protect me from injury in the event of a kickback? No. First, the chain brake must be in working order to provide the intended protection.
GENERAL SAFETY PRECAUTIONS ! WARNING! The exhaust fumes from the engine are hot and may contain sparks which can start a fire. Never start the machine indoors or near combustible material! CAUTION! The muffler gets very hot during and after use. This also applies during idling. Be aware of the fire hazard, especially when working near flammable substances and/or vapours. ! WARNING! Never use a saw without a muffler, or with a damaged muffler.
GENERAL SAFETY PRECAUTIONS Guide bar • Length (inches/cm) • Number of teeth on bar tip sprocket (T). • Number of drive links. Sharpening your chain and adjusting depth gauge setting • Chain pitch (inches). The spacing between the drive links of the chain must match the spacing of the teeth on the bar tip sprocket and drive sprocket. • Number of drive links. The number of drive links is determined by the length of the bar, the chain pitch and the number of teeth on the bar tip sprocket.
GENERAL SAFETY PRECAUTIONS 4 Round file diameter It is very difficult to sharpen a chain correctly without the right equipment. We recommend that you use our file gauge. This will help you obtain the maximum kickback reduction and cutting performance from your chain. • General advice on adjusting depth gauge setting • See instructions under the heading Technical data for information about sharpening your chain. ! File all the teeth to the same length.
GENERAL SAFETY PRECAUTIONS resistance as you draw the file along the depth gauge tool. Tensioning the chain • Use the combination spanner to tighten the bar nut while holding up the tip of the bar. Check that you can pull the saw chain round freely by hand, and that there is no slack on the underside of the bar. The position of the chain tensioning screw on our chain saws varies from model to model. See instructions under the heading What is what? to find out where it is on your model.
GENERAL SAFETY PRECAUTIONS before the fuel), and that you adjust the carburetor as recommended (a lean mixture may mean that the fuel lasts longer than the oil) and that you also use the recommended cutting equipment (a bar that is too long will use more chain oil). Checking chain lubrication • Chain drive sprocket The clutch drum is fitted with a Spur sprocket (the chain sprocket is welded on the drum). Check the chain lubrication each time you refuel.
GENERAL SAFETY PRECAUTIONS • Whether the tip of the bar is uneven or badly worn. If a hollow forms on the underside of the bar tip this is due to running with a slack chain. • To prolong the life of the bar you should turn it over daily. ! WARNING! Most chain saw accidents happen when the chain touches the operator. Wear personal protective equipment. See instructions under the heading ”Personal protective equipment”. Do not tackle any job that you feel you are not adequately trained for.
ASSEMBLY Fitting the bar and chain ! correctly located in the groove in the bar. Tighten the bar nuts finger tight. WARNING! Always wear gloves, when working with the chain. Check that the chain brake is in disengaged position by moving the front hand guard towards the front handle. Tension the chain by turning the chain tensioning screw clockwise using the combination spanner. See instructions under the heading Tensioning the chain.
FUEL HANDLING Fuel Gasoline, litre Note! The machine is equipped with a two-stroke engine and must always be run using a mixture of gasoline and two-stroke oil. It is important to accurately measure the amount of oil to be mixed to ensure that the correct mixture is obtained. When mixing small amounts of fuel, even small inaccuracies can drastically affect the ratio of the mixture. 2% (50:1) WARNING! Always ensure there is adequate ventilation when handling fuel.
FUEL HANDLING • In temperatures below 32°F (0°C) some oils become too viscous. This can overload the oil pump and result in damage to the oil pump components. • Contact your service agent when choosing chain oil. • Move the machine at least 10 ft (3 m) from the refuelling point before starting it. • Never start the machine: 1 If you have spilled fuel or chain oil on the machine. Wipe off the spillage and allow remaining fuel to evaporate.
STARTING AND STOPPING Starting and stopping ! Choke: Set the choke control in the choke position. WARNING! Note the following before starting: The chain brake must be engaged when the chain saw is started to reduce the chance of contact with the moving chain during starting. Warm engine Never start a chain saw unless the bar, chain and all covers are fitted correctly. Otherwise the clutch can come loose and cause personal injuries. Place the machine on firm ground.
STARTING AND STOPPING the engine starts, quickly apply full throttle; the throttle start lock will automatically disengage. • Observe your surroundings and make sure that there is no risk of people or animals coming into contact with the cutting equipment. • Always hold the saw with both hands. The right hand should be on the top handle, and the left hand on the front handle. All people, whether right or left handed, should use this grip.
WORKING TECHNIQUES Before use: 2 3 1 • To ensure that people, animals or other things cannot affect your control of the machine. • To make sure that none of the above might come within reach of your saw or be injured by falling trees. 4 9 5, 7 6 8 1 Check that the chain brake works correctly and is not damaged. 2 Check that the throttle lockout works correctly and is not damaged. 3 Check that the stop switch works correctly and is not damaged. 4 Check that all handles are free from oil.
WORKING TECHNIQUES handle. Wrap your fingers and thumbs around the handles. You should use this grip whether you are right-handed or left-handed. This grip minimizes the effect of kickback and lets you keep the chain saw under control. suddenly. Take great care when working on sloping ground. 3 7 Take great care when cutting a tree that is under tension. A tree that is under tension may spring back to its normal position before or after being cut.
WORKING TECHNIQUES 6 If you have to cut branches or the like that are above shoulder height, a working platform or scaffold tower is recommended. Working with tree service chain-saws from a rope and harness This chapter sets out working practices to reduce the risk of injury from tree service chainsaws when working at height from a rope and harness. While it may form the basis of guidance and training literature, it should not be regarded as a substitute for formal training.
WORKING TECHNIQUES inappropriate one-handed use of the saw. In the vast majority of accidents, operators fail to adopt a secure work position witch allows them to hold both handles of the saw. This results in an increased risk of injury due to: • not having a firm grip on the saw if it kicks back.
WORKING TECHNIQUES 3 Make sure the chain will not strike the ground or any other object during or after cutting. 4 Is there a risk of kickback? 5 Do the conditions and surrounding terrain affect how safely you can stand and move about? - If it is possible (can you turn the log?) stop cutting about 2/3 of the way through the log. - Turn the log and finish the cut from the opposite side. The log is supported at one end. There is a high risk that it will split.
WORKING TECHNIQUES Cut difficult branches piece by piece. • Felling technique for tree tops You may find you are forced to let the tree-top fall in its natural direction because it is impossible or dangerous to try to make it fall in the direction you first intended. ! WARNING! It takes a lot of experience to fell a tree. Inexperienced users of chain saws should not fell trees.
WORKING TECHNIQUES The directional cuts should run 1/4 of the diameter through the trunk and the angle between the top cut and bottom cut should be 45°. The felling hinge controls the direction that the tree falls in. All control over the felling direction is lost if the felling hinge is too narrow or non-existent, or if the directional cuts and felling cut are badly placed. The line where the two cuts meet is called the directional cut line.
WORKING TECHNIQUES situations the only safe method is to put aside your chain saw and use a winch. Kickback only occurs if the kickback zone of the bar touches an object. General advice: Position yourself so that you will be clear of the tree or branch when the tension is released. Make one or more cuts at or near the point of maximum tension. Make as many cuts of sufficient depth as necessary to reduce the tension and make the tree or branch break at the point of maximum tension.
MAINTENANCE General higher engine speed and a rich mixture gives a lower engine speed. The user must only carry out the maintenance and service work described in this manual. IMPORTANT! Any maintenance other than that described in this manual must be carried out by your servicing dealer (retailer). Carburetor adjustment Due to existing environmental and emissions legislation your chain saw is equipped with movement limiters on the carburetor adjuster screws.
MAINTENANCE High speed jet H Checking the front hand guard At the factory the engine is adjusted at sea level. When working at a high altitude or in different weather conditions, temperatures and atmospheric humidity, it may be necessary to make minor adjustments to the high speed jet. Make sure the front hand guard is not damaged and that there are no visible defects such as cracks. CAUTION! If the high speed jet is screwed in too far, it may damage the piston/cylinder.
MAINTENANCE Throttle lockout Vibration damping system • Make sure the throttle control is locked at the idle setting when the throttle lockout is released. Regularly check the vibration damping units for cracks or deformation. • Press the throttle lockout and make sure it returns to its original position when you release it. Make sure the vibration damping units are securely attached to the engine unit and handle unit.
MAINTENANCE Regularly check that the muffler is securely attached to the machine. Note! The screen must be replaced if it is damaged. If the screen is blocked the machine will overheat and this will cause damage to the cylinder and piston. Never use a machine with a muffler that is in poor condition. Never use a muffler if the spark arrestor screen is missing or defective. Starter ! Loosen the screws (1 and 2).
MAINTENANCE screw in the center of the pulley. Insert the starter cord through the hole in the starter housing and the starter handle. Make a secure knot in the end of the starter cord. Tensioning the recoil spring • Hook the starter cord in the notch in the pulley and turn the starter pulley about 2 turns clockwise. • Lubricate the recoil spring with light oil. Fit the cassette with recoil spring in the starter. Fit the starter pulley and tension the recoil spring.
MAINTENANCE against the filter holder. Clean the filter by brushing or shaking it. (0.65 mm). The spark plug should be replaced after about a month in operation or earlier if necessary. The filter can be cleaned more thoroughly by washing it in water and detergent. An air filter that has been in use for a long time cannot be cleaned completely. The filter must therefore be replaced with a new one at regular intervals. A damaged air filter must always be replaced.
MAINTENANCE ! WARNING! The engine must be stopped when making adjustments. Cooling system To keep the working temperature as low as possible the machine is equipped with a cooling system. The cooling system consists of: 1 Air intake on the starter. 2 Air guide plate. 3 Fins on the flywheel. 4 Cooling fins on the cylinder. 5 Clutch cover Clean the cooling system with a brush once a week, more often in demanding conditions.
MAINTENANCE Maintenance schedule The following is a list of the maintenance that must be performed on the machine. Most of the items are described in the Maintenance section. Daily maintenance Weekly maintenance Monthly maintenance Clean the outside of the machine. Check the cooling system weekly. Check the brake band on the chain brake for wear. Replace when less than 0.024 inch (0.6 mm) remains at the most worn point. Check that the components of the throttle control work safely.
TECHNICAL DATA MAINTENANCE Technical data T435 Motor Cylinder displacement, cu.in/cm3 2.15/35,2 Cylinder bore, inch/mm 1.57/40 Stroke, inch/mm 1.10/28 Idle speed, rpm 2900 Recommended max. speed, rpm 12500 Power, kW/ rpm 1,5/2,0 @ 10000 Emissions Durability Period according to California Air Resources Board, h. 125 Ignition system Spark plug NGK CMR6H Electrode gap, inch/mm 0.026/0,65 Fuel and lubrication system Fuel tank capacity, US pint/litre 0.
TECHNICAL DATA MAINTENANCE Recommended cutting equipment for USA Following is a list of recommended cutting equipment for Husqvarna chain saw model T435. This chain saw model equipped with either of the listed bar and saw chain combination(s), fulfills the requirements according to ANSI B175.12000 (Gasoline Powered Chain Saws - Safety Requirements). The following list is the chain saw manufacturers recommendations. There may be other combinations available, which will also achieve kickback reduction.
FEDERAL AND CALIFORNIA EMISSIONS CONTROL WARRANTY STATEMENT IMPORTANT: This product is compliant with U.S. EPA Phase 3 regulations for exhaust and evaporative emissions. To ensure EPA Phase 3 compliance, we recommend using only genuine Husqvarna brand replacement parts. Use of non-compliant replacement parts is a violation of federal law. YOUR WARRANTY RIGHTS AND OBLIGATIONS The EPA (U.S.
FEDERAL AND CALIFORNIA EMISSIONS CONTROL WARRANTY STATEMENT CONSEQUENTIAL DAMAGES Husqvarna Forest & Garden is liable for damages to other engine components proximately caused by a failure under warranty of any warranted part. EMISSION WARRANTY PARTS LIST 1 Carburetor and internal parts 2 Intake pipe, airfilter holder and carburetor bolts. 3 Airfilter and fuelfilter covered up to maintenance schedule.
AMERICAN STANDARD SAFETY PRECAUTIONS Safety precautions for chain saw users (ANSI B175.1-2000 Annex C) Kickback safety precautions ! WARNING! Kickback may occur when the nose or tip of the guide bar touches an object, or when the wood closes in and pinches the saw chain in the cut. Tip contact in some cases may cause a lightning fast reverse reaction, kicking the guide bar up and back towards the operator.
EXPLICATION DES SYMBOLES Symboles sur la machine: AVERTISSEMENT! Cette tronçonneuse peut être dangereuse! Une utilisation erronée ou négligente peut occasionner des blessures graves, voire mortelles pour l’utilisateur ou une tierce personne. Lire attentivement et bien assimiler le manuel d’utilisation avant d’utiliser la machine.
EXPLICATION DES SYMBOLES Symboles dans le manuel: L’autocollant comportant ce symbol d’avertissement est placé sur la tronçonneuse: Tout contrôle et/ou entretien doit être effectué avec le moteur à l’arrêt. Toujours porter des gants de protection homologués. Un nettoyage régulier est indispensable. Examen visuel. Porter des lunettes protectrices ou une visière. Remplissage d’essence. EPA III Remplissage d’huile et réglage du débit d’huile.
SOMMAIRE Sommaire EXPLICATION DES SYMBOLES Symboles sur la machine: ..................................... Symboles dans le manuel: .................................... SOMMAIRE Sommaire ............................................................. INTRODUCTION Cher client, ............................................................ QUELS SONT LES COMPOSANTS? Quels sont les composants de la tronçonneuse? . INSTRUCTIONS GÉNÉRALES DE SÉCURITÉ Mesures à prendre avant de mettre en usage une tronçonneuse neuve .
INTRODUCTION Cher client, Félicitations pour ce choix d’un produit Husqvarna. Husqvarna a vu le jour en 1689 lorsque le roi Karl XI décida de construire un arsenal pour la fabrication des mousquets au bord de la rivière Huskvarna. Le choix de l’emplacement était logique puisque la rivière Huskvarna servait à produire de l’énergie hydraulique et constituait donc une sorte de centrale hydraulique.
QUELS SONT LES COMPOSANTS? Quels sont les composants de la tronçonneuse? 1 Arceau protecteur 16 Commande de l’accélération 2 Autocollant d’information et d’avertissement 17 Gâchette d’arrêt 3 Poignée supérieure 18 Guide-chaîne 4 Vis de réglage du carburateur 19 Chaîne 5 Capot de filtre 20 Pignon avant 6 Réservoir d’essence 21 Trou de fixation pour corde de sécurité 7 Capot de bougie 22 Carter d’embrayage 8 Lanceur 23 Plaque de numéro de série et de produit 9 Poignée de lanceur 24
INSTRUCTIONS GÉNÉRALES DE SÉCURITÉ Mesures à prendre avant de mettre en usage une tronçonneuse neuve • Lisez attentivement ce manuel d’utilisation. • Vérifier le montage et le réglage de l’outil de coupe. Voir les instructions au chapitre Montage. • Remplissez de carburant et démarrez la tronçonneuse. Voir les instructions aux chapitres Manipulation du carburant et Démarrage et arrêt. • Ne pas utiliser la tronçonneuse avant que la chaîne ait reçu une quantité suffisante d’huile de chaîne.
INSTRUCTIONS GÉNÉRALES DE SÉCURITÉ Important! IMPORTANT! Cette tronçonneuse est conçue pour l’élagage et le destruction de cimes d’arbres encore en position verticale. Utilisez seulement les combinaisons guide-chaîne/ chaîne recommandées au chapitre Caractéristiques techniques. N’utilisez jamais la machine si vous êtes fatigué, avez bu de l’alcool ou pris des médicaments susceptibles d’affecter votre vue, votre jugement ou la maîtrise de votre corps.
INSTRUCTIONS GÉNÉRALES DE SÉCURITÉ • Casque de protection homologué • Protecteur d’oreilles • Lunettes protectrices ou visière • Gants protecteurs anti-chaîne • Pantalon avec protection anti-chaîne • Utiliser les protections conformes pour les bras. • Bottes avec protection anti-chaîne, embout acier et semelle antidérapante • Une trousse de premiers secours doit toujours être disponible.
INSTRUCTIONS GÉNÉRALES DE SÉCURITÉ • Pousser l’arceau (B) vers l’avant pour activer le frein de chaîne. • Tirer l’arceau vers l’arrière contre la poignée avant pour désactiver le frein de chaîne. • Un rebond peut être rapide et très violent. Toutefois la plupart des rebonds sont courts et n’activent pas nécessairement le frein de chaîne. Dans ce cas, tenir fermement la tronçonneuse et ne pas la lâcher.
INSTRUCTIONS GÉNÉRALES DE SÉCURITÉ protection anti-rebond, le frein de chaîne ne peut être activé que par inertie. initiales. Cette position signifie que la commande d’accélération est alors automatiquement bloquée sur le ralenti. A Ma main active-t-elle toujours le frein de chaîne en cas de rebond? Non. Il faut une certaine force pour pousser la protection anti-rebond vers l’avant.
INSTRUCTIONS GÉNÉRALES DE SÉCURITÉ défectueuse (type inadéquat ou affûtage défectueux), le taux de vibrations augmente. ! AVERTISSEMENT! Une exposition excessive aux vibrations peut entraîner des troubles circulatoires ou nerveux chez les personnes sujettes à des troubles cardio-vasculaires. Consultez un médecin en cas de symptômes liés à une exposition excessive aux vibrations.
INSTRUCTIONS GÉNÉRALES DE SÉCURITÉ lubrifié augmente le risque de rupture de chaîne ainsi que l’usure du guide, de la chaîne et du pignon. • Nombre de dents par pignon (T). • Pas de chaîne (=pitch) (pouces). Le pignon du nez et le pignon d’entraînement doivent correspondre à l’espace entre les maillons. • Nombre de maillons entraîneurs (pce). La longueur du guide, le pas de chaîne et le nombre de dents au pignon donnent un nombre déterminé de maillons entraîneurs.
INSTRUCTIONS GÉNÉRALES DE SÉCURITÉ Affûtage et réglage de l’épaisseur du copeau de la chaîne donc d’utiliser notre gabarit d’affûtage qui assure un affûtage permettant une réduction du risque de rebond et des performances de coupe optimales. Généralités concernant l’affûtage des dents • N’utilisez jamais une tronçonneuse dont les dents sont émoussées.
INSTRUCTIONS GÉNÉRALES DE SÉCURITÉ • Généralités sur le réglage de l’épaisseur du copeau • quand vous pouvez passer la lime sur le gabarit sans ressentir de résistance. Limer de manière à amener toutes les dents à la même hauteur. Si la hauteur de dent est inférieure à 4 mm (5/32"), la chaîne est usée et doit être remplacée. Tension de la chaîne Quand la dent est affûtée, l’épaisseur du copeau (=profondeur de coupe) diminue.
INSTRUCTIONS GÉNÉRALES DE SÉCURITÉ universelle. Tendre la chaîne jusqu’à ce qu’elle ne soit plus molle sous le guide. • Remplissage d’huile de chaîne • Toutes nos tronçonneuses sont dotées d’un dispositif de lubrification automatique de la chaîne. Certains modèles ont également un débit réglable. • Le réservoir d’huile de chaîne et le réservoir de carburant sont dimensionnés pour que le carburant prenne fin avant l’huile de chaîne.
INSTRUCTIONS GÉNÉRALES DE SÉCURITÉ • S’assurer que la gorge du guide est propre. La nettoyer au besoin. Il est recommandé de comparer avec une chaîne neuve pour évaluer le degré d’usure. Si la hauteur de dent est inférieure à 4 mm (5/32 pouce), la chaîne est usée et doit être remplacée. Guide-chaîne • Vérifier que le pignon du nez tourne librement et que l’orifice de graissage est propre. Nettoyer et graisser au besoin.
INSTRUCTIONS GÉNÉRALES DE SÉCURITÉ ! AVERTISSEMENT! La plupart des accidents surviennent quand la chaîne de la tronçonneuse touche l’utilisateur. Utiliser les équipements de protection personnelle. Voir au chapitre ”Équipement de protection personnelle”. L’utilisateur se doit d’éviter tous les travaux pour lesquels il se sent mal préparé. Voir aux chapitres Équipement de protection personnelle, Mesures antirebond, Équipement de coupe et Méthodes de travail.
MONTAGE Montage du guide-chaîne et de la chaîne ! pignon et que la chaîne est correctement placée dans la gorge du guide. Serrer les écrous du guide à la main. AVERTISSEMENT! Utiliser des gants pour toute manipulation de la chaîne. S’assurer que le frein de chaîne ne s’est pas déclenché en amenant l’arceau protecteur contre l’étrier de la poignée avant. Tendre la chaîne en tournant la vis du tendeur de chaîne vers la droite à l’aide de la clé universelle.
MANIPULATION DU CARBURANT Carburant Essence, litres Remarque! La machine est équipée d’un moteur deux temps et doit toujours être alimentée avec un mélange d’essence et d’huile deux temps. Afin d’assurer un rapport de mélange correct, il est important de mesurer avec précision la quantité d’huile à mélanger. Pour le mélange de petites quantités de carburant, même de petites erreurs au niveau de la quantité d’huile affectent sérieusement le rapport du mélange.
MANIPULATION DU CARBURANT • Il est important d’utiliser une huile adaptée à la température de l’air (viscosité appropriée). • Les températures inférieures à 0°C rendent certaines huiles visqueuses. Ceci peut causer une surcharge de la pompe à huile, endommageant les pièces de la pompe. • Contacter l’atelier spécialisé pour obtenir des conseils sur le choix d’une huile de chaîne adéquate. Sécurité carburant • Ne jamais effectuer le remplissage de la machine lorsque le moteur tourne.
MANIPULATION DU CARBURANT Remisage prolongé Videz les réservoirs de carburant et d’huile dans un endroit bien aéré. Conservez le carburant dans des bidons approuvés dans un endroit sûr. Montez la protection du guide-chaîne. Nettoyez la machine. Voir les instructions au chapitre Schéma d’entretien. Avant de remiser la machine pour une période prolongée, veiller à ce qu'elle soit bien nettoyée et que toutes les mesures d'entretien aient été effectuées.
DÉMARRAGE ET ARRÊT Démarrage et arrêt ! AVERTISSEMENT! Contrôler les points suivants avant la mise en marche: Allumage: Mettre le contacteur d’arrêt en position de démarrage. Starter: Tirer la commande de starter. Le frein de chaîne doit être activé lors du démarrage de la tronçonneuse afin de réduire le risque de contact avec la chaîne en rotation. Ne pas démarrer la tronçonneuse si le guide, la chaîne et tous les capots ne sont pas montés.
DÉMARRAGE ET ARRÊT tourner brièvement à plein régime. Ceci désenclenche automatiquement le ralenti accéléré. • S’assurer que la zone de travail est bien dégagée et qu’aucune personne et aucun animal ne risquent d’entrer en contact avec l’équipement de coupe. • Toujours tenir la tronçonneuse des deux mains. Tenir la poignée supérieure de la main droite et la poignée avant de la main gauche. L’utilisateur, qu’il soit droitier ou gaucher, doit la tenir de la sorte.
TECHNIQUES DE TRAVAIL Avant chaque utilisation: 2 3 corde de sécurité dans le trou de la tronçonneuse prévu à cet effet. 1 Utiliser les équipements de protection personnelle. Voir au chapitre ”Équipement de protection personnelle”. 4 9 5, 7 6 8 1 Contrôler que le frein de chaîne fonctionne correctement et n’est pas endommagé. 2 Contrôler que le blocage de l’accélération fonctionne correctement et n’est pas endommagé.
TECHNIQUES DE TRAVAIL 6 7 S’assurer de pouvoir se tenir et se déplacer en toute sécurité. Repérer les éventuels obstacles en cas de déplacement imprévu: souches, pierres, branchages, fondrières, etc. Observer la plus grande prudence lors de travail sur des terrains en pente. Observer la plus grande prudence lors de l’abattage des arbres sous tension. Avant et après le sciage, les arbres sous tension risquent de brutalement retrouver leur position initiale.
TECHNIQUES DE TRAVAIL Le tronçonnage avec la partie inférieure de la chaîne, c’est à dire par dessus (de haut en bas), s’appelle méthode ”poussée”. La tronçonneuse est attirée vers l’arbre et le bord avant de la tronçonneuse devient un appui naturel contre l’arbre. Dans ce cas, l’utilisateur contrôle mieux à la fois sa tronçonneuse et la zone de rebond du nez. éviter de couper avec la pointe du guide-chaîne.
TECHNIQUES DE TRAVAIL a) serrez l’estrope au point d’attache à l’arrière de la tronçonneuse. b) utilisez des mousquetons adéquats pour permettre une attache indirecte (via l’estrope) et une attache directe (au point d’attache de la tronçonneuse) de la tronçonneuse au harnais de l’utilisateur. c) vérifiez que la tronçonneuse est solidement attachée avant de la hisser à l’utilisateur.
TECHNIQUES DE TRAVAIL • si nécessaire, utiliser une scie manuelle ou une seconde tronçonneuse et couper à un minimum de 30 cm de la tronçonneuse coincée pour la dégager. Si l’on utilise une scie manuelle ou une autre tronçonneuse pour dégager une tronçonneuse coincée, il convient de toujours procéder aux coupes de dégagement du côté extérieur (du côté de la pointe de la branche) afin d’éviter que la tronçonneuse soit prise dans la section coupée, ce qui pourrait compliquer la situation.
TECHNIQUES DE TRAVAIL Une extrémité du tronc repose sur un support. Risque important de fendage. Couper les branches gênantes par étapes, une par une. Commencer par couper le tronc par en bas (environ 1/3 du diamètre). Techniques d’abattage des cimes d’arbre - Finir la coupe par en haut, de manière que les deux traits de coupe se rencontrent. ! AVERTISSEMENT! L’abattage d’un arbre demande beaucoup d’expérience. Un utilisateur non expérimenté ne doit pas effectuer d’abattages.
TECHNIQUES DE TRAVAIL • La densité des branches • Le poids éventuel de la neige L’encoche doit faire 1/4 du diamètre du tronc et l’angle entre les deux entailles doit être d’au moins 45°. La ligne de jointure entre les deux entailles s’appelle le trait de chute. Le trait de chute doit être horizontal et former un angle de 90° avec le sens de chute prévu.
TECHNIQUES DE TRAVAIL Le contrôle de la direction de chute de l’arbre fonctionne mal si la charnière est trop petite ou coupée trop profondément ou si les deux entailles ne coïncident pas. Nous recommandons une longueur de guide-chaîne supérieure au diamètre du tronc, ce qui simplifie que le trait de chute et l’encoche s’effectuent avec un simple trait de scie. Voir aux Caractéristiques techniques les longueurs de guide-chaîne recommandées pour chaque modèle de tronçonneuse.
TECHNIQUES DE TRAVAIL Le rebond ne peut se produire que quand la pointe ou nez du guide-chaîne (zone de rebond) touche un objet quelconque. Tronçonnage en rondins Voir les instructions au chapitre Technique de base pour la coupe.
ENTRETIEN Généralités le mélange est plus pauvre (moins d’essence); s’ils sont tournés dans le sens contraire des aiguilles d’une montre, le mélange est alors plus riche (plus d’essence). Un mélange pauvre donne un régime plus haut et un mélange riche donne un régime plus bas. L’utilisateur ne peut effectuer que les travaux d’entretien et de révision décrits dans ce manuel d’utilisation.
ENTRETIEN la chaîne commence à tourner. Ensuite, dévisser jusqu’à l’arrêt de la chaîne. Un ralenti correctement réglé permet au moteur de tourner régulièrement dans toutes les positions en offrant une bonne marge avant la mise en rotation de la chaîne. ! AVERTISSEMENT! Si le réglage de ralenti est impossible sans que la chaîne soit entraînée, contacter un atelier spécialisé compétent. Ne pas utiliser la tronçonneuse tant qu’elle n’est pas correctement réglée ou réparée.
ENTRETIEN tout autre obstacle. Voir les instructions au chapitre Démarrage et arrêt. Tenir fermement la tronçonneuse des deux mains, les doigts et le pouce épousant bien les poignées. • Vérifier que le blocage de l’accélération, la commande d’accélération et leurs ressorts de rappel fonctionnent correctement. • Mettre la tronçonneuse en marche et accélérer au maximum. Lâcher la commande de l’accélération et s’assurer que la chaîne s’arrête et demeure immobile.
ENTRETIEN Bouton d’arrêt Appuyer sur le carter du silencieux comme illustré sur la figure. Mettre le moteur en marche et s’assurer qu’il s’arrête lorsque le bouton d’arrêt est amené en position d’arrêt. Silencieux Desserrer les vis et les écrous. Retirer et vérifier si le silencieux est en bon état de marche. Ne jamais utiliser une machine dont le silencieux est défectueux. Le silencieux est conçu pour atténuer le bruit et dévier le flux des gaz d’échappement loin de l’utilisateur.
ENTRETIEN Lanceur ! lanceur et dans la poignée. Faire un nœud robuste à l’extrémité de la corde. AVERTISSEMENT! Le ressort de rappel est tendu et risque, en cas de manipulation imprudente, de sortir du boîtier et de causer des blessures. Observez la plus grande prudence lors du remplacement du ressort de démarrage ou de la corde de lanceur. Utilisez des lunettes et des gants de protection.
ENTRETIEN lanceur. Monter la poulie du lanceur et tendre le ressort de rappel. support. Nettoyer le filtre en le tapotant ou à l’aide d’une brosse. Pour un nettoyage plus sérieux, laver le filtre à l’eau savonneuse. Un filtre ayant servi longtemps ne peut plus être complètement nettoyé. Le filtre à air doit donc être remplacé à intervalles réguliers. Tout filtre endommagé doit être remplacé immédiatement.
ENTRETIEN électrodes est de 0,65 mm. Remplacer la bougie une fois par mois ou plus souvent si nécessaire. En principe, quand le carburant est épuisé, le réservoir d’huile est pratiquement vide. Veillez à remplir le réservoir d’huile à chaque fois que vous réapprovisionnez la tronçonneuse en carburant. ! AVERTISSEMENT! Arrêter le moteur avant d’effectuer le réglage.
ENTRETIEN Schéma d’entretien La liste ci-dessous indique l’entretien à effectuer sur la machine. La plupart des points sont décrits à la section Entretien. Entretien quotidien Entretien hebdomadaire Entretien mensuel Nettoyer l’extérieur de la machine. Contrôlez le système de refroidissement chaque semaine. Inspectez le degré d’usure du ruban de freinage du frein de chaîne. Remplacez-le quand les parties les plus usées sont inférieures à 0,6 mm.
CARACTÉRISTIQUES TECHNIQUES ENTRETIEN Caractéristiques techniques T435 Moteur Cylindrée, po3/cm3 2.15/35,2 Alésage, po/mm 1.57/40 Course, po/mm 1.10/28 Régime de ralenti, tr/min 2900 Régime d’emballement maximal recommandé, tr/min 12500 Puissance, kW/tr/min 1,5/2,0 @ 10000 Période de durabilité des émissions selon la commission californienne chargée de la qualité de l'air. 125 Système d’allumage Bougie NGK CMR6H Écartement des électrodes, po/mm 0.
CARACTÉRISTIQUES TECHNIQUES ENTRETIEN Équipement de coupe recommandé pour Canada Ce qui suit est une liste de combinaisons recommandées pour tronçonneuses Husqvarna T435. La/les combinaison(s) répertoriée(s) de tête motrice, guide-chaîne et chaîne répond(ent) à toutes les exigences indiquées par les normes Z62.1-03 (Tronçonneuses) et Z62.3-04 (Rebond des tronçonneuses) de l’Association canadienne de normalisation.
DÉCLARATION DE GARANTIE CONTRÔLE DES ÉMISSIONS EN CALIFORNIE ET AU NIVEAU IMPORTANT: Ce produit est conforme à la réglementation de la Phase 3 de l’Agence de Protection de l’Environnement des États-Unis (EPA) en ce qui touche les emissions d’échappement et d’évaporation. Pour assurer la conformité à la Phase 3 de l’EPA, nous recommandons le recours à des pièces de remplacement d’origin Husqvarna uniquement. L’utilisation de pièces de remplacement non conformes est une infraction à la législation fédérale.
DÉCLARATION DE GARANTIE CONTRÔLE DES ÉMISSIONS EN CALIFORNIE ET AU NIVEAU n’est pas supposée être remplacée comme requis dans le calendrier de maintenance est garantie deux (2) ans. Si la pièce tombe en panne durant la période de garantie, elle sera réparée ou remplacée gratuitement par Husqvarna Forest & Garden. Toute pièce réparée ou remplacée durant la période de garantie est garantie pour la période de garantie restante.
PRÉCAUTIONS SÉCURITAIRES CONFORMANT AUX NORMES AMÉRICAINES Consignes de sécurité pour les utilisateurs de tronçonneuses (ANSI B175.1-2000 Annexe C) Précautions à prendre pour se protéger des rebonds ! AVERTISSEMENT! Un rebond peut se produire quand le nez ou l’extrémité du guide heurte un objet ou quand le bois se referme et coince la chaîne dans l’entaille.
PRÉCAUTIONS SÉCURITAIRES CONFORMANT AUX NORMES AMÉRICAINES matière de tronçonneuse. (Par exemple, si un outil incorrect est utilisé pour retirer le rotor volant magnétique ou pour le tenir lors du retrait de l’embrayage, le rotor volant magnétique peut subir des dommages qui entraîneront son explosion ultérieurement.) Utilisez la protection de guide-chaîne appropriée lors de tout transport de votre tronçonneuse.
ACLARACION DE LOS SIMBOLOS Símbolos en la máquina: ¡ATENCION! ¡Las motosierras pueden ser peligrosas! Su uso descuidado o erróneo puede provocar heridas graves o mortales al operador o terceros. Lea detenidamente el manual de instrucciones y asegúrese de entender su contenido antes de utilizar la máquina. Utilice siempre: • Casco protector homologado • Protectores auriculares homologados • Gafas protectoras o visor Bomba de combustible. Carga de combustible. Ajuste de la bomba de aceite.
ACLARACION DE LOS SIMBOLOS Símbolos en el manual de instrucciones: Etiquetas que se encuentran en la motosierra: Los trabajos de control y/o mantenimiento deben efectuarse con el motor desconectado. Utilice siempre guantes protectores homologados. La máquina debe limpiarse regularmente. Control visual. Debe utilizarse gafas protectoras o visor. Carga de combustible. EPA III Carga de aceite y regulación del caudal de aceite. El freno de cadena debe estar activado al poner en marcha la motosierra.
INDICE Índice ACLARACION DE LOS SIMBOLOS Símbolos en la máquina: ...................................... Símbolos en el manual de instrucciones: ............. INDICE Índice .................................................................... INTRODUCCION Apreciado cliente: ................................................. ¿QUE ES QUE? ¿Qué es qué en la motosierra? ............................ INSTRUCCIONES GENERALES DE SEGURIDAD Medidas a tomar antes de utilizar una motosierra nueva .........................
INTRODUCCION Apreciado cliente: ¡Felicidades por haber adquirido un producto Husqvarna! La historia de Husqvarna data del año 1689, cuando el Rey Karl XI encargó la construcción de una fábrica en la ribera del río Huskvarna para la fabricación de mosquetes. La ubicación junto al río Huskvarna era lógica, dado que el río se utilizaba para generar energía hidráulica.
¿QUE ES QUE? ¿Qué es qué en la motosierra? 1 Protección contra reculadas 16 Acelerador 2 Etiqueta adhesiva de información y advertencia 17 Mando de parada 3 Mango superior 18 Espada 4 Tornillos de reglaje del carburador 19 Cadena 5 Tapa del cilindro 20 Cabezal de rueda 6 Depósito de combustible 21 Agujero para sujetar la cuerda de seguridad 7 Cubierta de la bujía 22 Cubierta del embrague 8 Mecanismo de arranque 23 Placa de identificatión 9 Empuñadura de arranque 24 Tornillo de ten
INSTRUCCIONES GENERALES DE SEGURIDAD Medidas a tomar antes de utilizar una motosierra nueva • Lea detenidamente el manual de instrucciones. • Compruebe el montaje y ajuste del equipo de corte. Vea las instrucciones bajo el título Montaje. • Ponga combustible y arranque la motosierra. Vea las instrucciones en los capítulos Manipulación del combustible y Arranque y parada. • • No utilice la motosierra hasta que haya llegado suficiente aceite lubricante a la cadena.
INSTRUCCIONES GENERALES DE SEGURIDAD tiene alguna duda en cuanto al empleo de la motosierra. Estamos a su disposición para darle consejos que le ayuden a emplear su motosierra de forma mejor y más segura. Le recomendamos hacer un cursillo sobre empleo de motosierras. El distribuidor local, una escuela de silvicultura o una biblioteca pueden informarle acerca del material de formación y los cursos disponibles. • Utilice protecciones apropiadas para brazos.
INSTRUCCIONES GENERALES DE SEGURIDAD arrastre de la cadena (D) en el motor (tambor de embrague). de servicio y/o reparación no se efectúan de forma profesional. Para más información, consulte con el taller de servicio oficial más cercano. ¡ATENCION! No emplee nunca una máquina con equipo de seguridad defectuoso. El equipo de seguridad se debe controlar y mantener. Vea las instrucciones del capítulo Control, mantenimiento y servicio del equipo de seguridad de la motosierra.
INSTRUCCIONES GENERALES DE SEGURIDAD estos casos debe sujetarse la motosierra con fuerza, sin soltarla. • El modo de activación del freno de cadena, manual o por inercia, depende de la fuerza de la reculada y de la posición de la motosierra en relación al objeto con el que toca el sector de riesgo de reculada de la espada.
INSTRUCCIONES GENERALES DE SEGURIDAD el acelerador queda automáticamente bloqueado en ralentí. incorrecto o mal afilado) incrementa el nivel de vibraciones. A B ! Captor de cadena El captor de cadena está diseñado para captar las cadenas que se sueltan o se rompen. Normalmente esto se evita con el tensado correcto de la cadena (vea las instrucciones bajo el título Montaje) y con un mantenimiento adecuado de la espada y la cadena (vea las instrucciones bajo el título Instrucciones generales de trabajo).
INSTRUCCIONES GENERALES DE SEGURIDAD ! ¡ATENCION! No utilice nunca una motosierra sin silenciador o con el silenciador defectuoso. Un silenciador defectuoso puede incrementar considerablemente el nivel de ruido y el riesgo de incendio. Tenga a mano herramientas para la extinción de incendios. roturas de cadena y se aumenta el desgaste de la espada, la cadena y el piñón de arrastre. Equipo de corte reductor de reculadas Equipo de corte ! Este capítulo describe cómo Ud.
INSTRUCCIONES GENERALES DE SEGURIDAD • Número de dientes en el cabezal de rueda (T). • Paso de cadena (=pitch) (pulgadas). El cabezal de rueda de la espada y el piñón de arrastre de la cadena de la motosierra deben adaptarse a la distancia entre los eslabones de arrastre. • Número de eslabones de arrastre (unidades) Afilado y ajuste del talón de profundidad de una cadena de sierra • • • Número de eslabones de arrastre (unidades).
INSTRUCCIONES GENERALES DE SEGURIDAD 3 Posición de la lima 4 Diámetro de la lima redonda Es muy difícil afilar correctamente una cadena de sierra sin los accesorios adecuados. Por ello le recomendamos que utilice nuestro calibrador de afilado. La plantilla garantiza un afilado de la cadena de sierra para una reducción de la reculada y una capacidad de corte óptimas. afile todos los dientes de un lado y, luego, vuelva la motosierra y afile los dientes del otro lado.
INSTRUCCIONES GENERALES DE SEGURIDAD • Ponga el calibrador de afilado sobre la cadena de sierra. En el envase del calibrador hay instrucciones sobre su empleo. Utilice la lima plana para limar el sobrante de la parte sobresaliente del talón de profundidad. La profundidad de corte es correcta cuando no se nota resistencia alguna al pasar la lima sobre el calibrador. combinada. Tense la cadena hasta que deje de colgar en la parte inferior de la espada.
INSTRUCCIONES GENERALES DE SEGURIDAD modelos pueden obtenerse también con flujo de aceite regulable. • • Compruebe que la guía de la espada esté limpia. Límpiela si es necesario. • Compruebe que el cabezal de rueda de la espada gire con facilidad y que su orificio de lubricación esté abierto. Limpie y lubrique si es necesario. El depósito de aceite de cadena y el depósito de combustible están dimensionados para que se termine el combustible antes de terminarse el aceite de cadena.
INSTRUCCIONES GENERALES DE SEGURIDAD Para comprobar el desgaste de la cadena que utiliza, le recomendamos que la compare con una cadena nueva. Cuando sólo queden 4 mm (5/32 de pulgada) de longitud de diente cortante, la cadena está gastada y debe cambiarse. Espada Controle a intervalos regulares: • • Si se han formado rebabas en los lados de la espada. Lime si es necesario. Si la guía de la espada presenta un desgaste anormal. Cambie la espada si es necesario.
MONTAJE Montaje de la espada y la cadena ! colocada en la guía de la espada. Apriete a mano las tuercas de la espada. ¡ATENCION! Para manipular la cadena deben utilizarse guantes protectores. Compruebe que no esté activado el freno de cadena empujando la protección contra reculadas del freno de cadena hacia el mango delantero. Tense la cadena enroscando en el sentido de las agujas del reloj el tornillo de tensado con la llave combinada.
MANIPULACION DEL COMBUSTIBLE Carburante Aclaración! La máquina tiene motor de dos tiempos, por lo que debe utilizarse siempre una mezcla de gasolina con aceite para motores de 2 tiempos. Es importante medir con precisión la cantidad de aceite que se mezcla para conseguir la proporción de mezcla adecuada. Al mezclar pequeñas cantidades de combustible, incluso los pequeños errores en la cantidad de aceite tienen una gran incidencia en la proporción de mezcla.
MANIPULACION DEL COMBUSTIBLE Aceite para cadena • Para lubricar se recomienda un aceite especial (aceite para lubricar cadenas) con buena aptitud adherente. • No utilice nunca aceite residual. Puede ocasionar averías en la bomba de aceite, la espada y la cadena. • Es importante utilizar un aceite adecuado para la temperatura ambiente (con la viscosidad correcta). • Con temperaturas bajo cero, algunos aceites se espesan.
MANIPULACION DEL COMBUSTIBLE Transporte y almacenamiento • Almacene la motosierra y el combustible de forma que no haya riesgo de que los eventuales vapores y fugas entren en contacto con chispas o llamas. Por ejemplo, cerca de máquinas eléctricas, motores eléctricos, contactos/interruptores eléctricos, calderas de calefacción o similares. • Para el almacenamiento del combustible deben utilizarse recipientes especiales homologados.
ARRANQUE Y PARADA Arranque y parada ! ¡ATENCION! Antes de arrancar, observe lo siguiente: Encendido: Coloque el mando de detención en posición de arranque. Estrangulador: Ponga el estrangulador en la posición de estrangulamiento. El freno de cadena debe estar aplicado cuando se arranca la motosierra, para reducir el riesgo de contacto con la cadena en movimiento al ponerse en marcha. No ponga en marcha la motosierra sin haber montado antes la espada, la cadena y todas las cubiertas.
ARRANQUE Y PARADA porque se pierde fácilmente el control de la motosierra. arranque el motor, acelere al máximo y se desacoplará automáticamente la aceleración de arranque. ¡IMPORTANTE! Dado que el freno de cadena todavía está activado, se deben bajar las revoluciones del motor lo antes posible a ralentí, y esto se logra desconectando rápidamente el fiador contra aceleraciones involuntarias. De ese modo, se evita un desgaste innecesario del embrague, del tambor del embrague y de la cinta de freno.
TECNICA DE TRABAJO Antes de utilizar la máquina: 2 3 1 4 9 sujetando una cuerda de seguridad en el orificio de sujeción de la motosierra. Utilice el equipo de protección personal. Vea las instrucciones bajo el título ”Equipo de protección personal”. Reglas básicas de seguridad 5, 7 6 1 2 3 4 5 6 7 8 9 8 Compruebe que el freno de cadena funcione correctamente y no esté dañado. Compruebe que el fiador contra aceleraciones involuntarias funcione correctamente y no esté dañado.
TECNICA DE TRABAJO 6 Compruebe que pueda caminar y mantenerse de pie con seguridad. Vea si hay eventuales impedimentos para desplazamientos imprevistos (raíces, piedras, ramas, fosos, zanjas, etc.). Proceda con sumo cuidado al trabajar en terreno inclinado. 7 Sea sumamente cuidadoso al cortar en árboles en tensión. Un árbol en tensión puede, tanto antes como después de terminar de cortar, volver a su posición normal. Si Ud. o el corte están mal ubicados, el árbol puede golpearlo a Ud.
TECNICA DE TRABAJO 5 Corte con velocidad de cadena alta, acelerando al máximo. 6 Si debe cortar ramas o trabajar a una altura superior a la de sus hombros, se recomienda el uso de una plataforma o andamio. 9 Siga las instrucciones de afilado y mantenimiento de la espada y la cadena. Al cambiar la espada y la cadena sólo deben utilizarse las combinaciones recomendadas por nosotros. Vea las instrucciones bajo los títulos Equipo de corte y Datos técnicos.
TECNICA DE TRABAJO motosierra en el punto central trasero evitará que haya cuerdas de escalada en medio, y su peso recaerá en el centro, bajo la columna vertebral del operario. Al mover la motosierra de un punto de sujeción a otro, el operario debe asegurarse de que está bien fijada en la nueva posición antes de desengancharla del punto de sujeción anterior.
TECNICA DE TRABAJO la resistencia de la cadena en el aserrado, produce avería grave del motor). • Corte descendente = con cadena ”tirante”. • Corte ascendente = con cadena ”impelente”. La técnica con cadena ”impelente” supone un mayor riesgo de reculada. Vea las instrucciones bajo el título Medidas preventivas de las reculadas. abajo. Así se neutraliza la propensión del objeto a cortar a apretar la cadena o a partirse.
TECNICA DE TRABAJO Empiece cortando desde abajo (aproximadamente 1/3 del diámetro del tronco). Técnica para talar la corona de un árbol ! - Termine el corte desde arriba, hasta que se encuentren los dos surcos. ¡ATENCION! La tala de árboles requiere mucha experiencia. Un usuario de motosierra inexperto no debe talar árboles. ¡Evite los trabajos para los que no se considere suficientemente capacitado! Distancia de seguridad El tronco está apoyado en ambos extremos. Gran riesgo de atasco de la cadena.
TECNICA DE TRABAJO • Peso de la nieve, si la hay Una vez considerados estos factores, puede verse obligado a dejar que la copa del árbol caiga en su dirección natural, ya que es imposible, o demasiado arriesgado, intentar hacerla caer en la dirección deseada inicialmente. Otro factor muy importante, que no afecta a la dirección de derribo pero sí a su seguridad personal, es el control de que el árbol no tenga ramas dañadas o ”muertas” que puedan romperse por sí solas y dañarle a Ud. durante la tala.
TECNICA DE TRABAJO de ruptura en el corte en cuando tenga la profundidad suficiente. El corte de derribo debe quedar paralelo con la línea de corte de indicación, con una distancia mínima entre ambos de 1/10 del diámetro del tronco. La parte del tronco sin cortar se denomina faja de desgaje. sector de riesgo de reculada de la espada toque un objeto.
TECNICA DE TRABAJO Medidas preventivas de las reculadas ! ¡ATENCION! Las reculadas pueden ser rapidísimas, repentinas y violentas, lanzando la motosierra, la espada y la cadena contra el usuario. Si la cadena en movimiento toca al usuario, pueden producirse lesiones muy graves e incluso mortales. Es necesario comprender las causas de las reculadas y que pueden evitarse procediendo con cuidado y trabajando con la técnica correcta.
MANTENIMIENTO Generalidades combustible se empobrece (menos combustible) girando en el sentido de las agujas del reloj, y se enriquece (más combustible) girando en sentido contrario a las agujas del reloj. El régimen se aumenta con una mezcla pobre y se reduce con una mezcla rica. El usuario sólo puede efectuar los trabajos de mantenimiento y servicio descritos en este manual.
MANTENIMIENTO Reglaje preciso del ralentí, tornillo T El ralentí se regula con el tornillo marcado con una T. Para regular, enrosque (en el sentido de las agujas del reloj) el tornillo T con el motor en marcha hasta que empiece a girar la cadena. A continuación, desenrosque (en sentido contrario a las agujas del reloj) hasta que la cadena se pare.
MANTENIMIENTO firmemente anclada a su articulación en la cubierta del embrague. • Apriete el fiador del acelerador y compruebe que vuelva a su posición de partida al soltarlo. Control del efecto de frenado • Compruebe que el acelerador y el fiador se muevan con facilidad y que funcionen sus muelles de retorno. • Arranque la motosierra y acelere al máximo. Suelte el acelerador y compruebe que la cadena se pare y permanezca inmóvil.
MANTENIMIENTO Compruebe que los elementos antivibraciones estén bien anclados entre la parte del motor y la parte de los mangos, respectivamente. Afloje los tornillos de ajuste (1 y 2). Botón de parada Oprima la cubierta del silenciador tal y como se muestra en la imagen. Arranque el motor y compruebe que se pare cuando se mueve el botón de parada a la posición de parada. Silenciador Afloje los tornillos y las tuercas. Saque el silenciador y compruebe que se encuentra en buen estado.
MANTENIMIENTO Mecanismo de arranque ! empuñadura de arranque. Haga un nudo resistente en el cordón. ¡ATENCION! El muelle de retorno está tensado en el cuerpo del mecanismo de arranque y, con una manipulación negligente, puede soltarse y causar lesiones. Para cambiar el muelle de arranque o el cordón de arranque, proceda con cuidado. Utilice gafas protectoras y guantes protectores.
MANTENIMIENTO de arranque. Monte la polea y tense el muelle de retorno. colocado herméticamente contra el soporte. Para limpiar el filtro, sacúdalo o cepíllelo. Para una limpieza a fondo del filtro, lávelo en agua jabonosa. Un filtro utilizado durante mucho tiempo no puede limpiarse del todo. Por tanto, hay que cambiarlo a intervalos regulares. Un filtro de aire averiado debe cambiarse.
MANTENIMIENTO debe cambiarse aproximadamente después de un mes de funcionamiento o más a menudo si es necesario. El depósito de aceite debería estar casi vacío cuando el combustible estuviera agotándose. Asegúrese de rellenar el depósito de aceite cada vez que añada combustible a la motosierra. ! ¡ATENCION! Al efectuar el ajuste, el motor no debe estar en marcha. Sistema refrigerante Aclaración! ¡Utilice siempre el tipo de bujía recomendado! Una bujía incorrecta puede arruinar el pistón y el cilindro.
MANTENIMIENTO Programa de mantenimiento A continuación incluimos una lista con los puntos de mantenimiento a efectuar en la máquina. La mayoría de los puntos se describen en el capítulo “Mantenimiento”. Mantenimiento diario Mantenimiento semanal Mantenimiento mensual Limpie la parte exterior de la máquina. Compruebe el sistema de refrigeración cada semana. Compruebe si está desgastada la cinta del freno de cadena. Cámbiela cuando quede menos de 0,6 mm en el punto más gastado.
DATOS TECNICOS MANTENIMIENTO Datos técnicos T435 Motor Cilindrada, pulgadas/cm3 2.15/35,2 Diámetro del cilindro, pulgadas/mm 1.57/40 Carrera, pulgadas/mm 1.10/28 Régimen de ralentí, rpm 2900 Régimen máximo de embalamiento recomendado, r.p.m. 12500 Potencia, kW/rpm 1,5/2,0 @ 10000 Período de durabilidad de las emisiones según la Junta de 125 Recursos del Aire de California. Sistema de encendido Bujía NGK CMR6H Distancia de electrodos, pulgadas/mm 0.
DATOS TECNICOS MANTENIMIENTO Equipo de corte recomendado para EE.UU. A continuación, se indica una lista del equipo de corte recomendado para el modelo de motosierra T435 de Husqvarna. Se trata de un modelo de motosierra equipado con una combinación de espada y cadena de sierra que cumple con la norma ANSI B175.1-2000, relativa a los requisitos de seguridad de las motosierras a gasolina. La lista siguiente contiene las recomendaciones del fabricante de la motosierra.
DECLARACIÓN DE GARANTÍA DE CONTROL DE EMISIONES FEDERAL Y CALIFORNIANA IMPORTANTE: Este producto es conforme con la normativa Fase 3 de la Agenicia de Protección Ambiental de los Estados Unidos (EPA) referente a emisiones de escape y evaporación. Para asegurar la conformidad con EPA fase 3, se recomienda utilizar sólo repuestos originales de la marca Husqvarna. El uso de otro tipo de repuestos incumple las leyes federales. SUS DERECHOS Y OBLIGACIONES DE GARANTIA La EPA de los EE. UU.
DECLARACIÓN DE GARANTÍA DE CONTROL DE EMISIONES FEDERAL Y CALIFORNIANA regulares según el programa de mantenimiento tendrá una garantía de dos años. Una declaración contenida en las instrucciones según la cual la pieza se deba «reparar o cambiar cuando sea necesario» no reducirá el período de garantía. Cualquier pieza que se repare o cambie en el periodo de garantía seguirá cubierta por la garantía durante el periodo de tiempo restante.
PRECAUCIONES DE SEGURIDAD DE LA NORMA AMERICANA Precauciones de seguridad para usuarios de motosierras (ANSI B175.1-2000 Anexo C) Precauciones de seguridad en reculadas ! ATENCIÓN! La reculada se puede producir cuando la punta de la espada toca en un objeto o cuando la madera se cierra y agarra la cadena de la motosierra en el corte. En algunos casos el contacto de la punta de la espada puede causar una reacción de inversión rapidísima que hace rebotar la espada hacia arriba y atrás hacia el operador.
PRECAUCIONES DE SEGURIDAD DE LA NORMA AMERICANA volante cuando se desmonta el embrague, pueden producirse daños estructurales en el volante que causen la rotura del mismo.) Para transportar la motosierra, utilice la protección de espada adecuada. Aclaración: Este anexo está destinado principalmente al consumidor o usuario ocasional.
www.husqvarna.