
Operation Manual

8
Instruction book/Manual de instrucciones 315, 325, 335
Connecting the foot
control
Among the accessories you will fi nd the foot con-
trol cord and the main cord.
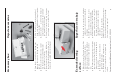
1. Remove the foot control cord. Place the foot
control on its narrow side. Fit the plug into the
socket inside the foot control compartment.
2. Push it fi rmly to make sure it is properly
con-nected. This ope ra tion is only necessary
the very fi rst time you are going to use the
machine.
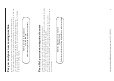
3. To correctly turn away the cord, place it into
the slot, see picture.
Note: Before plugging in, check to ensure that
the foot control is of ”type FR2”.
Connecting to the
power supply
On the underside of the
machine you will fi nd
information about the
power supply (V) and the
frequency (Hz). Check the
power supply setting in the
machine to ensure that this
agrees with the main supply
before you connect the
machine.
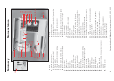
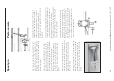
1. Connect the foot control
cord to the fi rst socket on
the bottom right side of the machine.
2. Connect the main cord to the back socket on
the bottom right side of the machine.
3. When you press the power switch, both the
machine and the light are switched on.
For the USA and Canada
This Sewing Machine has a polarized plug (one
blade wider than the other). To reduce the risk
of electric shock, this plug is intended to fi t in a
polarized outlet only one way. If the plug does not
fi t fully in the outlet, reverse the plug. If it still does
not fi t, contact a qualifi ed electrician to install the
proper outlet. Do not modify the plug in any way.
Conexión del pedal
El cable del pedal está entre los accessorios. Este
cable ha de conectarse al mando de pie.
1. Sacar el cable del pedal. Ponga de canto el pe-
dal. Introducir la clavija pequeña en el zócalo
dentro del mando de pie.
2. Controlar que la clavija de contacto está bien
fi ja. Esto solo ha de hacerse la primera vez,
cuando se desembala la máquina.
3. Para poder desenrollar correctamente el cable,
colóquelo en la ranura según la fi gura.
!
Atención! Controlar que el pedal tiene la
marca ”type FR2”.
Debajo del zócalo están
indicadas la tensión (voltaje)
y la frecuencia (Hz). Antes
de conectar la máquina a
red, asegurarse de que los
valores indicados coincidan
con los de la red.
1. Conectar el cable del
pedal en la entalladura
central abajo en el lado
derecho de la máquina.
2. Conectar el cable de la
red en el enchufe trasero, debajo del lado
derecho de la máquina.
3. Al pulsar el interruptor principal, se conecta la
máquina y la iluminación.
Conexión eléctrica
3
1
2