User’s Guide KEEPING THE WORLD SEWING™
This household sewing machine is designed to comply with IEC/EN 60335-2-28 and UL1594 IMPORTANT SAFETY INSTRUCTIONS When using an electrical appliance, basic safety precautions should always be followed, including the following: Read all instructions before using this household sewing machine.
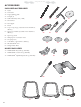
TABLE OF CONTENTS 1 Getting to know your machine 1:5 MACHINE OVERVIEW 1:6 Needle area .......................................................................1:7 Rear side............................................................................1:7 $FFHVVRU\ WUD\ ..................................................................1:7 Parts of the embroidery unit .........................................1:7 ACCESSORIES 1:8 Included accessories........................................................
%DUWDFNV...........................................................................4:21 Manual bartack ..............................................................4:21 6DYH WR 0\ 6WLWFKHV .......................................................4:22 6SHFLDO 6HZLQJ 7HFKQLTXHV .........................................4:23 'HFRUDWLYH 7DSHULQJ 6WLWFKHV .......................................4:23 'LPHQVLRQDO 6WLWFKHV 0HQX < ..................................
1 GETTING TO KNOW YOUR MACHINE
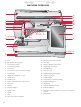
1 Getting to know your machine MACHINE OVERVIEW 1 24 25 2 3 4 26 27 28 29 5 6 30 7 15 16 17 18 14 13 19 20 21 22 23 8 31 32 8 9 10 33 34 11 12 1. 2. 3. 4. 5. 6. 7. 8. 9. 10. 11. 12. 13. 14. 15. 16. 17. 18.
1 Getting to know your machine NEEDLE AREA 35. 36. 37. 38. 39. 40. 41. 6HQVRU 2QH 6WHS %XWWRQKROH )RRW VRFNHW %XLOW ,Q QHHGOH WKUHDGHU Needle bar Needle clamp Needle thread guide Presser foot bar and presser foot ankle Presser foot 37 35 36 38 39 40 41 REAR SIDE 42 42. +DQGOH 43. )UHH DUP 44.
1 Getting to know your machine ACCESSORIES INCLUDED ACCESSORIES 54. 55. 56. 57. 58. 59. 60. 61. 62. 63. 64. 65. 66. 67. 68 69.
1 Getting to know your machine ACCESSORIES INCLUDED - NOT IN THE PICTURE &RPSOLPHQWDU\ 6RIWZDUH 3& WR GRZQORDG &DUU\LQJ &DVH DWWDFKHG RQ WKH PDFKLQH XSRQ GHOLYHU\ 6FLVVRUV Luggage style carrying bag with packing insert )RRW FRQWURO Power cord 86% 3& FDEOH Needles Embroidery thread Pieces of fabric and stabilizer &ODVVLF &ROOHFWLRQ &' '(6,*1(5 ',$021' Royale™ 6DPSOHU %RRN User´s Guide Warranty card 0LFURÀEHU FORWK PRESSER FEET 7 Utility Foot A 6QDSSHG RQWR
1 Getting to know your machine Edging Foot J 7KLV IRRW LV XVHG IRU RYHUFDVWLQJ DQG VHDP RYHUFDVWLQJ ZLWK VWLWFKHV WKDW KDYH D VWLWFK ZLGWK RI DQG PP 6WLWFKHV IRUP RYHU WKH SLQ ZKLFK SUHYHQWV SXFNHULQJ DW WKH HGJH RI WKH IDEULF Quilter’s 1/4” Piecing foot P 7KLV IRRW LV XVHG ZKHQ SLHFLQJ TXLOW EORFNV 7KH IRRW KDV GLVWDQFH JXLGHOLQHV PDUNV PP DQG PP IURP WKH QHHGOH Embroidery/Darning Foot R 7KLV IRRW LV XVHG IRU )UHH 0RWLRQ HPEURLGHU\ TXLOWLQJ VWLWFKLQJ DQG GDUQLQJ
1 Getting to know your machine STITCHES Stitch Stitch no. Stitch name Presser Foot A1, A2, A3 6WUDLJKW 6WLWFK OHIW FHQWHU and right needle position $ )RU DOO W\SHV RI VHZLQJ 7RXFK VWLWFK ZLGWK DQG 6LGH WR 6LGH PLUURU LPDJH WR VHOHFW different needle positions.
1 Getting to know your machine A27 PP 6DWLQ 6WLWFK % )RU DSSOLTXpV VHZLQJ RQ ODFHV DQG WULPV )RU OLJKW DQG PHGLXP IDEULFV A28 PP 6DWLQ 6WLWFK % )RU DSSOLTXpV VHZLQJ RQ ODFHV DQG WULPV )RU OLJKW DQG PHGLXP IDEULFV A29 PP 6DWLQ 6WLWFK % )RU DSSOLTXpV VHZLQJ RQ ODFHV DQG WULPV )RU KHDY\ IDEULFV A30 (ODVWLF RU 6PRFNLQJ 6WLWFK % 6HZ RYHU WZR URZV RI HODVWLF WKUHDG IRU HODVWLF VKLUULQJ A31 %ULGJLQJ 6WLWFK % )RU MRLQLQJ WZR SLHFHV RI IDEULF ZLWK ÀQLVKHG HGJHV DQG IRU HODVWLF
1 Getting to know your machine B1 :LGH %DUWDFN %XWWRQKROH 6HQVRU %XWWRQK )RRW & )RU PHGLXP DQG KHDY\ IDEULFV ZLWK H[WUD FXWWLQJ VSDFH B2 %DUWDFN %XWWRQKROH 6HQVRU %XWWRQK )RRW & )RU PRVW IDEULF ZHLJKWV B3 5RXQGHG %DUWDFN %XWWRQKROH 6HQVRU %XWWRQK )RRW & )RU OLJKW ZHLJKW IDEULFV B4 Round End %XWWRQKROH 6HQVRU %XWWRQK )RRW & )RU EORXVHV DQG FKLOGUHQ·V JDUPHQWV B5 +HDY\ 5HLQIRUFHG %XWWRQKROH 6HQVRU %XWWRQK )RRW & )RU XWLOLW\ DQG KHDY\ IDEULFV B6 Medium Reinforc
1 Getting to know your machine C - Pictogram Stitches E - Quilt Stitches 1:14 D - Heirloom Stitches F - Appliqué Stitches
1 Getting to know your machine G - Children Stitches H - Scallop Stitches J - Vintage Stitches K - Omnimotion Stitches 1:15
1 Getting to know your machine L - Decorative Stitches N - Fashion Stitches 1:16 M - Crafting Stitches S - 4-way Stitches
1 Getting to know your machine T - 8-way Stitches X - Specialty Stitches U - My Stitches Y - Dimensional Stitches 1:17
1 Getting to know your machine Z - Decorative Tapering Stitches Block Alphabet Script Alphabet Hiragana Alphabet 1:18 Cyrillic Alphabet Outline Alphabet Brush Line Alphabet
2 SET UP
2 Set Up UNPACKING 3ODFH WKH ER[ RQ D VWHDG\ ÁDW VXUIDFH /LIW RII WKH machine carrying case. Lift your machine out of the ER[ DQG UHPRYH WKH RXWHU SDFNDJLQJ 5HPRYH DOO RWKHU SDFNLQJ PDWHULDO DQG WKH SODVWLF EDJ 3. Wipe the machine, particularly around the needle and VWLWFK SODWH WR UHPRYH DQ\ VRLO EHIRUH VHZLQJ Note: Styrofoam left in the accessory tray while sewing may affect stitch quality. The styrofoam is for packing purposes only and should be removed.
2 Set Up ADJUSTABLE E LIGHT™
2 Set Up SPOOL PINS
2 Set Up THREADING THE UPPER THREAD Make sure that the presser foot is raised and the needle is in the up position. HORIZONTAL SPOOL PIN D +ROG WKH WKUHDG QHDU WKH VSRRO XVLQJ \RXU ULJKW KDQG 8VH \RXU OHIW KDQG WR EULQJ WKH HQG RI WKH WKUHDG RYHU and behind the 3UH 7HQVLRQ 7KUHDG JXLGH $ DQG under the WKUHDG JXLGH % %ULQJ WKH WKUHDG EHWZHHQ the thread WHQVLRQ GLVFV & 3.
2 Set Up THREADING FOR TWIN NEEDLE Replace the sewing needle with a twin needle. Make sure the presser foot is raised and the needle is in the up position. 1. Raise the KRUL]RQWDO VSRRO SLQ WR WKH YHUWLFDO SRVLWLRQ Raise the DX[LOLDU\ VSRRO SLQ WR WKH YHUWLFDO SRVLWLRQ 6OLGH D large spool cap and a felt pad on each one. Place the thread spools on the spool caps.
2 Set Up BOBBIN WINDING BOBBIN WINDING THROUGH THE NEEDLE Make sure that the presser foot and the needle are in the up position. 1. Place an empty bobbin on the bobbin spindle on WKH WRS RI WKH PDFKLQH 7KH EREELQ RQO\ ÀWV RQ one way, with the logo facing up. Use only original +8649$51$ 9,.,1*® bobbins. 2. Thread the machine with the main spool pin in the horizontal position.
2 Set Up BOBBIN WINDING WHILE EMBROIDERING OR SEWING 1. Raise the auxiliary spool pin. Place the large spool cap, felt pad and thread spool on the spool pin. %ULQJ WKH EREELQ WKUHDG DURXQG WKH thread tension GLVF $ DQG WKURXJK WKH WKUHDG JXLGH % DV LOOXVWUDWHG 3. Guide the thread through the hole in the bobbin from the inside to the outside. 3XVK WKH EREELQ ZLQGHU OHYHU WRZDUGV WKH EREELQ WR ZLQG $ SRS XS PHVVDJH DSSHDUV RQ VFUHHQ 7R adjust winding speed drag the slider with your stylus.
2 Set Up PRESSER FOOT CHANGING THE PRESSER FOOT 1. Make sure that the needle is in the highest position. Pull the presser foot down and towards you. 2. Line up the cross pin on the foot with the gap in the presser foot ankle. 3. Push the foot into the clip until the foot snaps into place. ATTACHING THE SENSOR Q-FOOT 8VLQJ WKH VFUHZGULYHU UHPRYH WKH SUHVVHU IRRW DQNOH 3ODFH WKH 6HQVRU 4 IRRW IURP EHKLQG DQG ORZHU the needle into the opening of the foot by turning the handwheel towards you.
2 Set Up 5HPRYH WKH SUHVVHU IRRW DQNOH E\ XQVFUHZLQJ WKH DQNOH screw. 2. Place the dual feed on your machine from the back, SRVLWLRQLQJ WKH IRUN RYHU WKH QHHGOH FODPS VFUHZ 7KHQ screw the dual feed onto the presser foot bar with the presser foot ankle screw. Reduce presser foot pressure to 3. 1. Snap-on and remove the presser foot 3. With presser foot bar in the up position, place the presser foot under the dual feed. 4. Push the foot upwards so that it snaps into place.
2 Set Up CHANGING THE NEEDLE 1. Use the hole in the multipurpose tool to hold the needle. 2. Loosen the QHHGOH VFUHZ ZLWK WKH VFUHZGULYHU 5HPRYH WKH QHHGOH 4. Insert the new needle using the multipurpose tool. 3XVK WKH QHZ QHHGOH XSZDUGV ZLWK WKH ÁDW VLGH DZD\ from you until it will go no further.
2 Set Up THREADS STABILIZERS 7KHUH DUH PDQ\ WKUHDGV RQ WKH PDUNHW WRGD\ GHYHORSHG IRU different purposes. Tear-away stabilizers 7HDU DZD\ VWDELOL]HUV DUH XVHG ZLWK VWDEOH ZRYHQ IDEULFV 3ODFH XQGHUQHDWK IDEULF IRU GHFRUDWLYH VWLWFKLQJ RU KRRS with the fabric when embroidering. Tear away excess stabilizer after stitching. All purpose sewing thread $OO SXUSRVH VHZLQJ WKUHDG LV PDGH RI V\QWKHWLF FRWWRQ RU FRWWRQ FRYHUHG SRO\HVWHU 7KLV W\SH RI WKUHDG LV XVHG IRU sewing garments and projects.
2 Set Up USB PORTS
2 Set Up COMPLIMENTARY SOFTWARE (PC) $ 3& VRIWZDUH SDFNDJH LV DYDLODEOH IRU \RXU +8649$51$ 9,.,1*® '(6,*1(5 ',$021' Royale™ sewing and embroidery machine. It adds the following features: Communication module allows you to connect the PDFKLQH WR \RXU FRPSXWHU 5HTXLUHG WR XVH WKH 6HQG 7R IHDWXUHV LQ DQ\ (PEURLGHU\ 6\VWHP PRGXOH 4XLFN)RQW SURJUDP WR FUHDWH XQOLPLWHG QXPEHU of embroidery fonts from most TrueType™ and 2SHQ7\SH™ fonts on your computer.
3 ULTIMATE INTERACTIVE SCREEN
3 Ultimate Interactive Screen ULTIMATE INTERACTIVE SCREEN This section of the User´s Guide will help you navigate on the Ultimate Interactive Screen. We will start at the top of the screen and work our way down. HOW TO USE THE SCREEN 7KH VFUHHQ LV YHU\ HDV\ WR XVH MXVW WRXFK LW ZLWK \RXU VW\OXV to make your choices.
3 Ultimate Interactive Screen DESIGNS MENU Designs Menu Selecting a Design 2SHQ HPEURLGHULHV E\ VHOHFWLQJ WKH ÁRZHU LFRQ RQ WKH WRROEDU 6HOHFW DQ HPEURLGHU\ GHVLJQ E\ WRXFKLQJ LW 8VH WKH scroll bar to browse through additional designs. Scroll Bar Note: When a design is selected, the machine will automatically switch to Embroidery Mode and the design will be loaded into Embroidery Edit.
3 Ultimate Interactive Screen T - ZD\ 6WLWFKHV 6WUDLJKW VWLWFK DQG UHLQIRUFHG VWUDLJKW stitch in eight different directions without turning the fabric. U - 0\ 6WLWFKHV 6DYH \RXU RZQ SHUVRQDOO\ DGMXVWHG DQG IDYRULWH VWLWFKHV DQG VWLWFK SURJUDPV X - 6SHFLDOW\ 7HFKQLTXH 6WLWFKHV 6HZ VSHFLDO WHFKQLTXHV including candlewicking and edging. Extra accessories PD\ EH QHHGHG 8VH 4XLFN +HOS IRU GHWDLOHG information. Z 'HFRUDWLYH 7DSHULQJ 6WLWFKHV 'HFRUDWLYH VWLWFKHV ZLWK tapering.
3 Ultimate Interactive Screen FILE MANAGER 7KH )LOH 0DQDJHU OHWV \RX DGG PRYH UHPRYH DQG FRS\ GHVLJQV IRQWV DQG VWLWFK ÀOHV HDVLO\ /RDG GHVLJQV RU VDYH GHVLJQV WR WKH EXLOW LQ PHPRU\ H[WHUQDO GHYLFHV FRQQHFWHG WR WKH 86% SRUWV \RXU FRPSXWHU RU WKH 86% HPEURLGHU\ VWLFN 7RXFK +ROG D IROGHU WR RSHQ LW
3 Ultimate Interactive Screen SET MENU ,Q WKH 6(7 0HQX \RX FDQ RYHUULGH DXWRPDWLF VHWWLQJV DQG PDNH SHUVRQDO DGMXVWPHQWV WR WKH 6WLWFK 6HWWLQJV 6HZLQJ 6HWWLQJV 0DFKLQH 6HWWLQJV 6RXQG 6HWWLQJV DQG 6FUHHQ DQG /LJKW 6HWWLQJV 7RXFK WKH LFRQV WR DFWLYDWH D IXQFWLRQ RU RSHQ D OLVW RI FKRLFHV :KHQ FKDQJLQJ WKH 6HZLQJ 0DFKLQH 6RXQG RU 6FUHHQ DQG /LJKW 6HWWLQJ WKH VHWWLQJV DUH VDYHG DIWHU WXUQLQJ RII WKH PDFKLQH ,I \RX PDNH FKDQJHV WR 6WLWFK 6HWWLQJV WKH FKDQJHV ZLOO QRW EH VDYHG DIWHU WXUQLQJ
3 Ultimate Interactive Screen SEWING SETTINGS Twin Needle Touch the Twin Needle icon to open a list for twin needle width selections. When a twin needle size is selected, the width of all stitches is limited for the selected twin needle VL]H WR SUHYHQW QHHGOH EUHDNDJH 7KH VHWWLQJ LV NHSW XQWLO you deselect the twin needle width.
3 Ultimate Interactive Screen Sensor Presser Foot Lift :KHQ VHOHFWHG WKH 6HQVRU 3UHVVHU )RRW /LIW LV DFWLYDWHG 7KH SUHVVHU IRRW ZLOO UDLVH WR SLYRW KHLJKW IRU H[DPSOH ZKHQ VWRSSLQJ to sew with the needle in the down position. When deselected, the SUHVVHU IRRW ZLOO VWD\ ORZHUHG HYHQ LI WKH PDFKLQH VWRSV ZLWK WKH needle in down position or after a thread cut.
3 Ultimate Interactive Screen MACHINE SETTINGS The settings that are made on the screen will be retained when the machine is turned off. Language 7RXFK WKH /DQJXDJH LFRQ WR YLHZ WKH ODQJXDJHV 6HOHFW \RXU desired Language by touching it. Owner’s Name 7RXFK WKH 2ZQHU·V 1DPH LFRQ WR RSHQ D VFUHHQ WKDW DOORZV you to enter your name. Timer The timer displays a total of the sewing and embroidery time of your machine. Touch the icon to reset the timer.
3 Ultimate Interactive Screen Tension/Portioning Compensations ,I \RX ÀQG WKDW WKH 7KUHDG 7HQVLRQ 7KUHDG 3RUWLRQLQJ needs to be increased or decreased for most stitches or embroideries, you can change the general setting for HPEURLGHULQJ DQG RU VHZLQJ
3 Ultimate Interactive Screen SOUND SETTINGS
3 Ultimate Interactive Screen SCREEN AND LIGHT SETTINGS Touch Screen Adjust When touching the icons on the screen, the screen might need calibration to adjust to your touch. 7RXFK WR RSHQ D YLHZ IRU FDOLEUDWLQJ WKH WRXFK VFUHHQ )ROORZ WKH LQVWUXFWLRQV RQ WKH VFUHHQ WR FDOLEUDWH WKH screen. Lock screen If there is the possibility of bumping the Ultimate ,QWHUDFWLYH 6FUHHQ DQG FKDQJLQJ WKH VWLWFK RU VHWWLQJV ZKLOH sewing, it is easy to lock the screen.
3 Ultimate Interactive Screen INFORMATION MENU 8VH WKH ,QIRUPDWLRQ 0HQX WR HDVLO\ JHW +HOS WRSLFV DQG LQIRUPDWLRQ 7KH ,QIR PHQX LV D EXLOW LQ DEULGJHG YHUVLRQ of the User’s Guide. When you touch the Info Menu icon on the Extended 7RROEDU \RX KDYH IRXU RSWLRQV WR VHOHFW IURP ,QGH[ Category, My Info and Text. %URZVH WKURXJK WKH WRSLFV XVLQJ \RXU VW\OXV RQ WKH VOLGHU bar on the right side of the screen.
3 Ultimate Interactive Screen Start/Stop Speed + and STOP (Monochrome) Stitch Re-Start Needle Stop Up/Down (Trim position) FIX (Baste) Selective Thread Cutter Sensor Foot Up and Extra Lift Sensor Foot Down and Pivot FUNCTION BUTTONS (Embroidery mode functions are in brackets) START/STOP Touch this button to start and stop the machine sewing or embroidering without using the foot control.
3 Ultimate Interactive Screen Start/Stop Speed + and STOP (Monochrome) Stitch Re-Start Needle Stop Up/Down (Trim position) FIX (Baste) Selective Thread Cutter Sensor Foot Up and Extra Lift Sensor Foot Down and Pivot SELECTIVE THREAD CUTTER STITCH RE-START Sewing Mode 7RXFK WKH 6HOHFWLYH 7KUHDG &XWWHU EXWWRQ DQG \RXU PDFKLQH cuts the top and bobbin threads, raises the presser foot and WKH QHHGOH DQG DFWLYDWHV WKH ),; IXQFWLRQ IRU WKH QH[W VWDUW To cut threads at the end of a stitch or stitch progr
3 Ultimate Interactive Screen REVERSE )RU SHUPDQHQW UHYHUVH SUHVV WKH 5HYHUVH EXWWRQ RQFH EHIRUH VWDUWLQJ WR VHZ 7KH UHYHUVH LQGLFDWRU ZLOO EH OLW DQG WKH PDFKLQH VHZV LQ UHYHUVH XQWLO \RX SUHVV WKH EXWWRQ DJDLQ WR FDQFHO ,I \RX SUHVV WKH UHYHUVH EXWWRQ ZKLOH VHZLQJ WKH PDFKLQH ZLOO VHZ LQ UHYHUVH IRU DV ORQJ DV \RX NHHS WKH EXWWRQ SUHVVHG 7KH UHYHUVH LQGLFDWRU LV OLW ZKHQ WKH UHYHUVH EXWWRQ LV SUHVVHG Reverse indicator 5HYHUVH LV DOVR XVHG ZKHQ VHZLQJ EXWWRQKROHV GDUQLQJ stitches and tape
4 SEWING
4 Sewing SEWING MODE ,Q 6HZLQJ 0RGH \RX FDQ VHOHFW VWLWFKHV DGMXVW DQG VHZ WKHP
4 Sewing EXCLUSIVE SEWING ADVISOR™ Your new sewing machine has the HUSQVARNA VIKING® Exclusive SEWING ADVISOR™ feature. It is always active and is located at the bottom of the Ultimate Interactive Screen. When beginning a sewing project, touch your fabric type and weight, then touch the technique you desire. 7KH ([FOXVLYH 6(:,1* $'9,625™ feature sets the best stitch, stitch length, stitch width, sewing speed, Thread 7HQVLRQ 7KUHDG 3RUWLRQLQJ DQG 6HQVRU )RRW 3UHVVXUH IRU your project.
4 Sewing SEWING TECHNIQUES 1 SEAM: sews two pieces of fabric together. 2 OVERCAST: RYHUFDVW IDEULF HGJHV WR SUHYHQW WKHP IURP IUD\LQJ DQG WR KHOS WKHP OD\ ÁDW 3 SEAM/OVERCAST: VHZV WKH VHDP DQG RYHUFDVWV WKH HGJH all at one time. 4 BASTE: D WHPSRUDU\ VWLWFKLQJ IRU ÀWWLQJ JDUPHQWV gathering and marking. 5 BLIND HEM: FUHDWHV DQ LQYLVLEOH KHP RQ JDUPHQWV ,V QRW UHFRPPHQGHG IRU OLJKW ZHLJKW IDEULF RU IRU OHDWKHU YLQ\O
4 Sewing TOOLBAR 2Q WKH WRROEDU LQ 6HZLQJ 0RGH \RX ZLOO ÀQG WKH 6WLWFK 0HQX )RQW 0HQX )LOH 0DQDJHU 'LDPRQG 0HQX LFRQ ZKLFK RSHQV WKH ([WHQGHG 7RROEDU WKH 4XLFN +HOS LFRQ DQG 6HZLQJ (PEURLGHU\ 0RGH WRJJOH WR VZLWFK EHWZHHQ 6HZLQJ 0RGH DQG (PEURLGHU\ 0RGH )LUVW WRXFK WKH 4XLFN +HOS LFRQ DQG WKHQ VRPHWKLQJ \RX ZDQW LQIRUPDWLRQ DERXW RQ WKH VFUHHQ 2Q WKH ([WHQGHG 7RROEDU \RX ZLOO ÀQG WKH 6(7 0HQX ([WHQGHG 6(:,1* $'9,625™ DQG ,QIRUPDWLRQ 0HQX LQ 6HZLQJ Mode.
4 Sewing STITCH SETTINGS
4 Sewing Stitch Width 'HFUHDVH RU LQFUHDVH WKH VWLWFK ZLGWK XVLQJ DQG 'HIDXOW settings are shown in black numbers, adjusted settings in red. Stitch Length ,QFUHDVH RU GHFUHDVH WKH VWLWFK OHQJWK XVLQJ DQG ,I OHQJWKHQLQJ D ]LJ]DJ VWLWFK RU D GHFRUDWLYH VWLWFK WKH HQWLUH stitch will be longer. If lengthening a satin stitch where the density can be adjusted, the entire stitch will be longer but the density will remain the same.
4 Sewing FREE MOTION TECHNIQUE :KHQ WRXFKLQJ WKH )UHH 0RWLRQ 7HFKQLTXH LFRQ D SRS XS will appear allowing you to choose between two options: )UHH 0RWLRQ )ORDWLQJ DQG )UHH 0RWLRQ 6SULQJ $FWLRQ Free Motion Floating $FWLYDWH WR VHW WKH PDFKLQH LQ )UHH 0RWLRQ )ORDWLQJ PRGH for presser foot R. The feed teeth will lower automatically.
4 Sewing deLuxe™ STITCH SYSTEM The deLuxe™ 6WLWFK 6\VWHP KDV WZR ZD\V WR FRQWURO WKH needle thread: Thread Tension and Thread Portioning. The deLuxe™ 6WLWFK 6\VWHP LPSURYHV WKH FRUUHFW EDODQFH between needle thread and bobbin thread. It will automatically use Thread Portioning when possible, to get the best result. Thread Portioning automatically and continuously measures the fabric thickness to portion the correct amount of thread for the selected stitch.
4 Sewing STITCH SETTINGS IN SET MENU Diamond Menu If you want to check the balance or presser foot pressure RQ WKH DFWLYH VWLWFK \RX FDQ JR WR \RXU 6(7 0HQX 7RXFK WKH 'LDPRQG 0HQX WR RSHQ WKH ([WHQGHG 7RROEDU 2Q WKH ([WHQGHG 7RROEDU WRXFK WKH 6(7 0HQX LFRQ WKHQ WRXFK 6WLWFK 6HWWLQJV WR VHH WKH DFWXDO VHWWLQJ RI WKH VWLWFK SET Menu BALANCE When sewing on special fabrics or doing a special WHFKQLTXH WKH EDODQFH PD\ QHHG WR EH DGMXVWHG Stitch Settings 6WDUW E\ VHZLQJ D VWLWFK RQ D SLHFH RI VF
4 Sewing SEWING TECHNIQUES SEAM $ VHDP VHZV WZR SLHFHV RI IDEULF WRJHWKHU ZLWK D VHDP allowance that will usually be pressed open. In most cases, HGJHV RI WKH VHDP DOORZDQFH DUH ÀQLVKHG ZLWK DQ RYHUFDVW stitch before sewing the seam. 6HDPV LQ VWUHWFK IDEULF PXVW VWUHWFK ZLWK WKH IDEULF 7KH stretch stitch makes a stretchy seam that is suitable for sewing together pieces of light stretch fabric.
4 Sewing OVERCAST 2YHUFDVW IDEULF HGJHV WR SUHYHQW IUD\LQJ DQG WR KHOS WKHP OD\ ÁDW ,W LV HDVLHVW WR RYHUFDVW EHIRUH WKH JDUPHQW is sewn together. Presser foot J is recommended for light DQG PHGLXP ZHLJKW IDEULF WR SUHYHQW SXFNHULQJ DORQJ WKH HGJH 3UHVVHU IRRW % LV XVHG IRU KHDY\ ZHLJKW IDEULF
4 Sewing SEAM AND OVERCAST 7KH 6HDP 2YHUFDVW VWLWFK VHZV WKH VHDP DQG RYHUFDVWV the edges all at one time. There are a number of different 6HDP 2YHUFDVW VWLWFKHV RQ \RXU PDFKLQH
4 Sewing BASTE %DVWLQJ LV WHPSRUDU\ VWLWFKLQJ IRU ÀWWLQJ JDUPHQWV gathering and marking. 7KH ([FOXVLYH 6(:,1* $'9,625™ feature automatically sets a long stitch length and reduces the WHQVLRQ VR WKH WKUHDGV DUH HDV\ WR UHPRYH RU WR SXOO IRU gathering. FABRIC: :RYHQ PHGLXP FXW LQ WZR SELECT: :RYHQ PHGLXP IDEULF DQG %DVWH USE: 3UHVVHU IRRW $ DQG VL]H QHHGOH DV UHFRPPHQGHG Place the fabrics right sides together. Put the fabric in position under the presser foot.
4 Sewing HEM 7KH +HP WHFKQLTXH RQ \RXU ([FOXVLYH 6(:,1* $'9,625™ IHDWXUH ZLOO VHOHFW WKH YLVLEOH RU WRSVWLWFK KHP WKDW LV EHVW IRU \RXU IDEULF ZHLJKW DQG W\SH )RU ZRYHQ IDEULF DQG OHDWKHU DQG YLQ\O D VWUDLJKW VWLWFK LV VHOHFWHG )RU VWUHWFK IDEULFV VWLWFKHV WKDW VWUHWFK DUH VHOHFWHG JEANS HEM :KHQ VHZLQJ RYHU VHDPV LQ H[WUD KHDY\ IDEULF RU D EOXH MHDQV KHP WKH IRRW FDQ WLS DV LW ULGHV RYHU WKH VHDP The needle can hit the tipped foot and break.
4 Sewing PERFECTLY BALANCED SENSOR ONE-STEP BUTTONHOLE 7KH ([FOXVLYH 6(:,1* $'9,625™ feature will select WKH EHVW EXWWRQKROH DQG 6WLWFK 6HWWLQJV IRU \RXU IDEULF )DEULF VKRXOG EH LQWHUIDFHG DQG RU VWDELOL]HG ZKHUH buttonholes are to be sewn.
4 Sewing 6WHS RQ WKH IRRW FRQWURO 7KH 6HQVRU 2QH 6WHS %XWWRQKROH )RRW ORZHUV DXWRPDWLFDOO\ $ VWUDLJKW stitch is sewn away from you stabilizing the left buttonhole column, then the satin column is sewn toward you. This is repeated for the right column. 7KH EDUWDFNV DUH DXWRPDWLF VHH LOOXVWUDWLRQ .
4 Sewing PROGRAMMABLE BUTTON SEW ON 6HZ EXWWRQV VQDSV KRRNV DQG H\HV TXLFNO\ ZLWK \RXU machine. FABRIC: :RYHQ PHGLXP SELECT: :RYHQ PHGLXP DQG %XWWRQ RQ WKH ([FOXVLYH 6(:,1* $'9,625™ feature. The feed teeth are lowered automatically. USE: 6L]H QHHGOH DQG WKH multipurpose tool to create a WKUHDG VKDQN DV UHFRPPHQGHG 6QDS RII SUHVVHU IRRW SEW: 3ODFH IDEULF PXOWLSXUSRVH WRRO DQG EXWWRQ XQGHU WKH ankle with the holes in the button lined up with the swing of the needle.
4 Sewing 4-WAY STITCHES - MENU S 7KH ZD\ PHQGLQJ VWLWFK DOORZV \RX WR VWLWFK VHYHUDO VWXUG\ VWLWFKHV LQ IRXU GLIIHUHQW GLUHFWLRQV
4 Sewing 8-WAY STITCHES – MENU T There are two different stitches, straight and reinforced straight stitch, in the T menu. Touch the arrows to select RQH RI WKH SUH VHW VHZLQJ GLUHFWLRQV 7R ÀQH WXQH WKH direction of the stitch, use the stitch width and stitch length icons. Note: The stitch length and width icons no longer adjust the length and width of the stitch. In menu T, these icons change the sewing direction of the stitch.
4 Sewing BARTACKS 6HFXUH HODVWLF HQGV GUDSHU\ SOHDWV EHOW ORRSV DQG SRFNHW corners with the same look as ready-to-wear. FABRIC: :RYHQ KHDY\ SELECT: :RYHQ KHDY\ DQG VWLWFK $ USE: 3UHVVHU IRRW % DQG VL]H QHHGOH DV UHFRPPHQGHG SEW: 3ODFH IDEULF XQGHU WKH SUHVVHU IRRW 7R ORZHU WKH SUHVVHU IRRW VWHS RQ WKH IRRW FRQWURO DQG stitch.
4 Sewing SAVE TO MY STITCHES ,I \RX KDYH PDGH FKDQJHV WR D VWLWFK DQG ZDQW WR VDYH WKHP WRXFK WKH 6DYH WR 0\ 6WLWFKHV LFRQ $ ZLQGRZ ZLOO open the U-menu with 12 different spaces on each page to VDYH SHUVRQDOL]HG VWLWFKHV 7RXFK D VSDFH EHORZ D QXPEHU ZKHUH \RX ZDQW WKH VWLWFK WR EH VDYHG $OO \RXU SUHYLRXVO\ VDYHG VWLWFKHV ZLOO EH VKRZQ
4 Sewing SPECIAL SEWING TECHNIQUES 7KH VWLWFK PHQX ; 6SHFLDOW\ 6WLWFKHV LQFOXGHV VSHFLDO VHZLQJ WHFKQLTXH VWLWFKHV OLNH FDQGOHZLFNLQJ DQG HGJH VWLWFKHV 7KHVH WHFKQLTXHV PD\ UHTXLUH VRPH VSHFLDO presser feet and accessories. This is indicated by the 2SWLRQDO 3UHVVHU )RRW LFRQ Optional Presser Foot icon 1RWH 8VH WKH 4XLFN +HOS WR ÀQG GHWDLOHG LQIRUPDWLRQ IRU HDFK stitch.
4 Sewing DIMENSIONAL STITCHES- MENU Y 0HQX < 'LPHQVLRQDO 6WLWFKHV LQFOXGHV WZR W\SHV RI VWLWFKHV DSSOLTXp DQG SRS XS VWLWFKHV DQG FRPELQDWLRQV RI WKHVH WZR W\SHV 6LQFH HYHU\ VWLWFK LV XQLTXH WKHVH VWLWFKHV ZLOO JLYH GLIIHUHQW GHFRUDWLYH HIIHFWV GHSHQGLQJ RQ which stitch is selected and what type of fabric you will choose. Appliqué stitches 8VH IDEULF VWDELOL]HU DQG IDEULF IRU DSSOLTXp FXW LQ VPDOO SLHFHV [ FP [ FP &KRRVH D IDEULF WKDW doesn’t fray too much.
4 Sewing SEWING POP-UP MESSAGES System busy $Q KRXU JODVV LV VKRZQ ZKHQ WKH PDFKLQH LV ORDGLQJ VDYLQJ PRYLQJ ÀOHV RU DQ\WKLQJ WKDW WDNHV WLPH Bobbin thread low When the bobbin thread is running low, a pop-up message DSSHDUV JLYLQJ \RX DQ DGYDQFHG QRWLFH WKDW \RX·OO VRRQ QHHG WR FKDQJH WKH EREELQ 7KLV JLYHV \RX DQ RSSRUWXQLW\ to plan when you want to change your bobbin. If you want to continue sewing without changing the bobbin, touch the foot control, but do not close out the pop -up.
4 Sewing Twin Needle The following pop-up message appears when you turn on the machine and choose a stitch not suitable for twin QHHGOH RU \RX KDG WKH 7ZLQ 1HHGOH DFWLYDWHG EHIRUH turning the machine off. Stitch Width Safety :KHQ 6WLWFK :LGWK 6DIHW\ LV DFWLYDWHG WKH IROORZLQJ SRS up message appears when you choose a stitch not suitable for 6WLWFK :LGWK 6DIHW\ Machine needs to rest If the machine stops and this pop-up appears on the VFUHHQ WKH PDFKLQH QHHGV WR UHVW :KHQ WKH 2.
5 PROGRAM
5 Programming PROGRAM
5 Programming TO PROGRAM IN SEWING MODE 7R HQWHU WKH 3URJUDP ZLQGRZ WRXFK WKH 352* LFRQ 7RXFK WKH 6WLWFK RU )RQW 0HQX WR RSHQ WKH VWLWFK RU D font you wish to use. 7KH DFWLYH SRVLWLRQ LV PDUNHG E\ D FXUVRU DQG WKH selected stitch or letter will be marked in red. Inserted VWLWFKHV ZLOO EH SODFHG DW WKH FXUVRU 2QO\ WKH VHOHFWHG VWLWFK FDQ EH DGMXVWHG 0RYH WKH FXUVRU WKURXJK WKH stitch program using the scroll arrows.
5 Programming EDIT YOUR STITCH OR LETTERING PROGRAM Insert a stitch or letter 0RYH WKH FXUVRU ZKHUH \RX ZDQW WR DGG D VWLWFK RU OHWWHU 6HOHFW WKH GHVLUHG VWLWFK \RX ZDQW WR LQVHUW ,W ZLOO EH placed at the cursor.
5 Programming SAVE TO “MY STITCHES” 7RXFK WKH 6DYH WR 0\ 6WLWFKHV LFRQ WR RSHQ WKH GLDORJXH IRU VDYLQJ D VWLWFK SURJUDP RU DQ DGMXVWHG VWLWFK LQ ´0\ 6WLWFKHVµ WKH 8 PHQX 7KHUH DUH IRXU 8 PHQXV ZKLFK \RX can step between using the arrows. Save on Free Position 3UHYLRXVO\ VDYHG VWLWFKHV RU VWLWFK SURJUDPV DUH VKRZQ LQ WKH 8 PHQX 7KH QHZ VWLWFK RU SURJUDP FDQ EH VDYHG DW DQ\ IUHH SRVLWLRQ 6LPSO\ WRXFK D IUHH SRVLWLRQ DQG \RXU stitch or stitch program is stored there.
5 Programming STITCH PROGRAM COMMANDS
5 Programming IMPORTANT PROGRAM MODE INFORMATION 3URJUDP FDQ EH XVHG LQ HLWKHU 6HZLQJ 0RGH RU (PEURLGHU\ 0RGH $ VWLWFK SURJUDP FUHDWHG ZKHQ (PEURLGHU\ 0RGH LV DFWLYH ZLOO EHFRPH DQ HPEURLGHU\ GHVLJQ ZKHQ VDYHG DQG FDQQRW EH VHZQ DV D VWLWFK LQ 6HZLQJ 0RGH To save a stitch program ,I 6HZLQJ 0RGH LV DFWLYH \RX FDQ VDYH \RXU VWLWFK SURJUDP LQ 0\ )LOHV ,I (PEURLGHU\ 0RGH LV DFWLYH \RXU VWLWFK program will be loaded to Embroidery Edit, and can then EH VDYHG DV D GHVLJQ $ VWLWFK SURJUDP FUHDWHG LQ
5 Programming PROGRAM POP-UP MESSAGES Not a programmable stitch 6RPH VWLWFKHV DUH QRW SRVVLEOH WR LQVHUW LQ D VWLWFK SURJUDP IRU H[DPSOH EXWWRQKROHV DQG ZD\ 6WLWFKHV Stitch program out of range The stitch you are trying to add will make the stitch program too long.
6 EMBROIDERY SET UP
6 Embroidery Set Up 50 47 52 48 49 50 51 EMBROIDERY UNIT OVERVIEW W\SH %( 48. 49. 51. 52.
6 Embroidery Set Up DESIGNS 2YHU GHVLJQV DUH LQFOXGHG LQ WKH PHPRU\ LQ \RXU PDFKLQH 7KHVH GHVLJQV DUH VKRZQ LQ WKH '(6,*1(5 ',$021' Royale™ 6DPSOHU ERRN $OVR LQFOXGHG LV WKH &ODVVLF &ROOHFWLRQ &' 7KH &' LV DWWDFKHG DW WKH EDFN RI the sampler book. DESIGNER DIAMOND Royale™ SAMPLER BOOK 3DJH WKURXJK WKH '(6,*1(5 ',$021' Royale™ 6DPSOHU ERRN IRU GHVLJQV DQG IRQWV 7KH GHVLJQ QXPEHU VWLWFK FRXQW QXPEHU RI VWLWFKHV LQ WKH GHVLJQ DQG WKH GHVLJQ VL]H DUH GLVSOD\HG QH[W WR HDFK design.
6 Embroidery Set Up TO HOOP THE FABRIC )RU WKH EHVW HPEURLGHU\ UHVXOWV SODFH D OD\HU RI stabilizer beneath the fabric. When hooping stabilizer and fabric make sure that they are smooth and securely hooped.
6 Embroidery Set Up GETTING STARTED EMBROIDERING $OZD\V DWWDFK WKH 6HQVRU 4 IRRW WR JHW WKH EHVW result. Read more about attaching the presser foot RQ SDJH $IWHU DWWDFKLQJ WKH HPEURLGHU\ IRRW DQG embroidery unit, insert a bobbin with embroidery bobbin thread. 2. Touch the 'HVLJQV 0HQX WR VHOHFW D GHVLJQ 7RXFK the design you want to stitch out and it will load to Embroidery Edit. +RRS D SLHFH RI IDEULF DQG VOLGH WKH KRRS RQWR WKH embroidery arm. 4.
6 Embroidery Set Up &OHDU VXIÀFLHQW VSDFH DURXQG WKH PDFKLQH WR DFFRPPRGDWH PRYHPHQW RI WKH HPEURLGHU\ DUP DQG WKH KRRS +ROG WKH QHHGOH WKUHDG DQG WRXFK WKH 6WDUW 6WRS EXWWRQ RU WKH IRRW FRQWURO 7KH PDFKLQH VWDUWV embroidering. Note: If Automatic Jump Stitch Trim is not activated the machine will stop after stitching a few stitches. A pop-up message will appear on the screen asking you to cut the thread end. Cut the thread and press Start/Stop to continue embroidering.
7 EMBROIDERY EDIT
7 Embroidery Edit EMBROIDERY EDIT When you toggle between the 6HZLQJ (PEURLGHU\ 0RGH RQ WKH WRROEDU WR DFWLYDWH (PEURLGHU\ 0RGH RU WXUQ WKH machine on with the embroidery unit attached, Embroidery Edit will be opened.
7 Embroidery Edit MAIN FUNCTIONS IN THE EMBROIDERY EDIT TOOLBAR 3UHVV WKH IXQFWLRQ \RX ZDQW WR DFWLYDWH 7RXFK WKH 'LDPRQG 0HQX LFRQ WR RSHQ WKH ([WHQGHG WRROEDU Designs Menu Stitch Menu Diamond Menu Font Menu File Manager LOAD A DESIGN 7R ORDG D GHVLJQ WRXFK WKH 'HVLJQV 0HQX LFRQ WR DXWRPDWLFDOO\ RSHQ WKH GURSGRZQ OLVW 6HOHFW GHVLJQV IURP WKH GURSGRZQ OLVW
7 Embroidery Edit SET MENU ,Q WKH 6(7 0HQX \RX FDQ RYHUULGH DXWRPDWLF VHWWLQJV DQG PDNH PDQXDO DGMXVWPHQWV WR WKH 6HZLQJ 6HWWLQJV 0DFKLQH 6HWWLQJV 6RXQG 6HWWLQJV DQG 6FUHHQ DQG /LJKW 6HWWLQJV 7RXFK WKH LFRQV WR DFWLYDWH D IXQFWLRQ RU RSHQ D OLVW RI FKRLFHV 5HDG PRUH DERXW WKH 6(7 0HQX LQ FKDSWHU EXCLUSIVE EMBROIDERY ADVISOR™ 7KH ([FOXVLYH (0%52,'(5< $'9,625™ feature recommends the best presser foot, needle, stabilizer DQG WKUHDG UHFRPPHQGDWLRQ IRU \RXU IDEULF 6HOHFW the fabric you want to e
7 Embroidery Edit TOUCH FUNCTIONS $ VHOHFWHG GHVLJQ KDV D UHG ER[ DURXQG LW 7R VHOHFW D GHVLJQ WRXFK LW RQ WKH VFUHHQ
7 Embroidery Edit FOLD OUT TOOLBAR ,Q (PEURLGHU\ 0RGH VHYHUDO RI WKH IXQFWLRQV FDQ EH IRXQG RQ WKH )ROG RXW 7RROEDU 7R KLGH WKH IXQFWLRQV WRXFK WKH )ROG RXW 7RROEDU LFRQ WR WKH ORZHU ULJKW 7KH )ROG RXW Toolbar is unfolded by default. HOW TO SELECT DESIGNS Diamond Menu Step Through Designs Select All When loading designs into Embroidery Edit, the last design loaded is selected by default.
7 Embroidery Edit Selection Modes There are three different ways a design can be chosen on WKH VFUHHQ 7KLV JLYHV \RX WKH RSSRUWXQLW\ WR VHOHFW D VXEVHW of the loaded designs and apply changes only to those designs. 1. 2. 3. 6HOHFWHG GHVLJQ 7KH GHVLJQ LV PDUNHG ZLWK D VROLG UHG OLQH
7 Embroidery Edit SELECT DESIGNS EXERCISE Font Menu In this exercise you will learn how to select two out of four designs to be able to make changes to them. *R WR \RXU )RQW 0HQX RQ WKH WRROEDU 7RXFK .DOOLJUDSKLD 7KH )RQW (GLW ZLQGRZ ZLOO RSHQ 2. Go to your number menu and select 1, 2, 3 and 4. 7RXFK 2.
7 Embroidery Edit Duplicate 7RXFK WKH 'XSOLFDWH LFRQ WR PDNH D FRS\ RI WKH VHOHFWHG GHVLJQ V ,I \RX ZDQW PRUH WKDQ RQH FRS\ 7RXFK +ROG WKH LFRQ and a pop-up window will open where you can enter the desired number of copies. 6HH SDJH IRU LQIRUPDWLRQ DERXW VHOHFWLQJ DQG deselecting designs. Mirror End-to-End and Side-to-Side 7R PLUURU D GHVLJQ KRUL]RQWDOO\ WRXFK WKH 0LUURU 6LGH WR 6LGH LFRQ 7R PLUURU YHUWLFDOO\ WRXFK WKH 0LUURU (QG WR End icon.
7 Embroidery Edit MY HOOPS 7R VHOHFW WKH FRUUHFW KRRS VL]H WRXFK WKH 0\ +RRSV LFRQ $ SRS XS ZLOO DSSHDU ZLWK WKH KRRS FKRLFHV LQFOXGLQJ KRRSV WKDW DUH DYDLODEOH WR SXUFKDVH IURP \RXU DXWKRUL]HG +8649$51$ 9,.,1*® retailer. $IWHU VHOHFWLQJ \RXU KRRS VL]H WKH SRS XS ZLOO FORVH automatically. PREFERENCES Background Color 7RXFK WKH 3UHIHUHQFHV LFRQ DQG WKHQ WRXFK %DFNJURXQG &RORU WR FKDQJH WKH DFWLYH EDFNJURXQG FRORU $ ZLQGRZ will appear where you can select from 64 different colors.
7 Embroidery Edit ZOOM OPTIONS Zoom In Zoom Out =RRP LQ RU RXW RI WKH HPEURLGHU\ ÀHOG 8VH =RRP ,Q to get a close-up of an area within the embroidery design.
7 Embroidery Edit DESIGN SHAPING 'HVLJQ 6KDSLQJ LV D XQLTXH ZD\ WR WDNH \RXU FUHDWLYLW\ WR DQRWKHU OHYHO 8VH \RXU EHDXWLIXO VWLWFK SURJUDPV RU HPEURLGHU\ GHVLJQV WR IRUP RQH RI VHYHUDO VKDSHV 6HOHFW WKH GHVLJQV RU VWLWFKHV RQ VFUHHQ WKDW \RX ZDQW WR VKDSH 7RXFK WKH 'HVLJQ 6KDSLQJ LFRQ IRXQG LQ Embroidery Edit.
7 Embroidery Edit Select line positioning Touch the select line positioning icon to open a pop-up.
7 Embroidery Edit Design Shaping - example ,Q (PEURLGHU\ (GLW RSHQ WKH 'HVLJQV 0HQX DQG select design 98 to load to Embroidery Edit.
7 Embroidery Edit COLOR EDIT 7RXFK WKH &RORU (GLW LFRQ WR HQWHU WKH &RORU (GLW 6FUHHQ Thread Color Change In Thread Color Change you can edit the colors in your GHVLJQ (DFK FRORU EORFN LV GHVFULEHG LQ WKH &RORU %ORFN OLVW on the right hand side of the screen. Example: 1:2, thread number 2417, RaRa 40, 1:2 means the VHFRQG WKUHDG FRORU LQ WKH ÀUVW ORDGHG GHVLJQ LV 5RELVRQ $QWRQ weight. ,Q WKH &RORU %ORFN /LVW WRXFK WKH FRORU EORFN WKDW \RX want to change.
7 Embroidery Edit Shapes, letters, numbers DESIGN APPLIQUÉ ,Q (PEURLGHU\ (GLW WRXFK WKH 'HVLJQ $SSOLTXp LFRQ WR RSHQ WKH 'HVLJQ $SSOLTXp SRS XS ZLQGRZ 7R WKH ULJKW LQ WKH IROG RXW VFUROO OLVW \RX ZLOO ÀQG GLIIHUHQW shapes, letters and numbers to choose from when creating \RXU DSSOLTXp :KHQ FUHDWLQJ \RXU DSSOLTXp WKHUH DUH WKUHH GLIIHUHQW GHFRUDWLYH VWLWFKHV ZLWK WZR GLIIHUHQW ZLGWKV WR FKRRVH IURP WKDW ZLOO JLYH WKH DSSOLTXp D GHFRUDWLYH HGJH 6DWLQ 6WLWFK QDUURZ 7KLV VWLW
7 Embroidery Edit RESIZE 5HVL]H FDQ UHGXFH DQ HPEURLGHU\ GHVLJQ XS WR ÀYH WLPHV smaller than the original design or increase it up to eight times larger than the original design. The machine recalculates the number of stitches in the design so the original stitch density remains. Note: To reduce or increase the design less than 20%, use Scale function. The Scale function does not change the stitch count. Resize adjustments 6HOHFW WKH GHVLJQ \RX ZDQW WR UHVL]H 2SHQ WKH 5HVL]H window.
7 Embroidery Edit IMPORTANT RESIZE INFORMATION 6LQFH GHVLJQV DUH GLJLWL]HG IRU D VSHFLÀF GHVLJQ VL]H LW LV LPSRUWDQW WR consider the following information about Resize. Always embroider a test sample of your resized design before embroidering on a project. 7:18 5HVL]H LV DOZD\V SURSRUWLRQDO ,I \RX UHGXFH D GHVLJQ 30%, it will be 30% smaller in both length and width.
7 Embroidery Edit EDIT STITCH PROGRAM ,I \RX ZDQW WR HGLW D VWLWFK SURJUDP WKDW \RX KDYH FUHDWHG DQG ORDGHG WR (PEURLGHU\ (GLW WRXFK WKH (GLW 6WLWFK Program icon. The Program window will open to let you PDNH DGMXVWPHQWV
7 Embroidery Edit EMBROIDERY EDIT POP-UP MESSAGES Exceeded maximum number of stitches The design combination you are trying to make contains WRR PDQ\ VWLWFKHV
8 EMBROIDERY STITCH-OUT
8 Embroidery Stitch-Out TO ENTER EMBROIDERY STITCH-OUT 7R HPEURLGHU \RXU GHVLJQ V HQWHU (PEURLGHU\ 6WLWFK 2XW E\ WRXFKLQJ WKH *2 LFRQ LQ WKH ORZHU ULJKW FRUQHU RI the Embroidery Edit window.
8 Embroidery Stitch-Out SMART SAVE ,I \RX ZDQW WR VWRS HPEURLGHULQJ DQG VDYH \RXU FXUUHQW SRVLWLRQ WRXFK 6WDUW 6WRS WR VWRS WKH HPEURLGHU\ 7KHQ WRXFK WKH 6PDUW 6DYH LFRQ WR VDYH WKH FXUUHQW SRVLWLRQ
8 Embroidery Stitch-Out PREFERENCES Background Color 7RXFK %DFNJURXQG &RORU WR FKDQJH WKH DFWLYH EDFNJURXQG FRORU $ ZLQGRZ ZLOO DSSHDU ZKHUH \RX FDQ VHOHFW IURP different colors. Background Fabric 7RXFK %DFNJURXQG )DEULF WR DFWLYDWH GHDFWLYDWH WKH LPDJH RI EDFNJURXQG IDEULF RQ WKH 8OWLPDWH ,QWHUDFWLYH 6FUHHQ 2-dimensional/3-dimensional view toggle ,Q GLPHQVLRQDO YLHZ WKH GHVLJQV ORDG IDVWHU RQ WKH screen and it is easier to see the color blocks in the design.
8 Embroidery Stitch-Out FOLD OUT TOOLBAR Color Block List ,Q (PEURLGHU\ 6WLWFK 2XW \RX ZLOO ÀQG WKH &RORU %ORFN /LVW &RORU )XQFWLRQV DQG %DVWH LQ +RRS RQ WKH )ROG RXW 7RROEDU 7RXFK WKH )ROG RXW 7RROEDU LFRQ WR WKH ORZHU right to access these functions. To hide the functions touch WKH )ROG RXW 7RROEDU LFRQ DJDLQ 7KH )ROG RXW 7RROEDU LV unfolded by default. Scroll bar Color Block COLOR BLOCK LIST $OO FRORUV LQ WKH ORDGHG GHVLJQ V DUH VKRZQ LQ WKH RUGHU they will be embroidered.
8 Embroidery Stitch-Out BASTE IN HOOP %DVWLQJ HQDEOHV \RX WR VHFXUH \RXU IDEULF WR D KRRSHG stabilizer. It is especially useful when the fabric to be HPEURLGHUHG FDQQRW EH KRRSHG %DVWLQJ SURYLGHV VXSSRUW for stretchy fabrics. 7RXFK WKH %DVWH LQ +RRS LFRQ WR DFWLYDWH EDVWLQJ 7RXFK and hold to open the embroidery basting window. Note: Touch the FIX button on your machine to activate or deactivate the selected basting techniques.
8 Embroidery Stitch-Out DESIGN POSITIONING Design Positioning 7RXFK WKH 'HVLJQ 3RVLWLRQLQJ LFRQ WR RSHQ WKH 'HVLJQ 3RVLWLRQLQJ VFUHHQ 'HVLJQ 3RVLWLRQLQJ DOORZV \RX WR SODFH a design on an exact location on your fabric. It is also used ZKHQ \RX ZDQW WR HPEURLGHU D GHVLJQ QH[W WR D SUHYLRXVO\ embroidered design. Note: If you just want to move your embroidery in Embroidery Stitch-Out, open the Design Positioning window and move your design using the Control or your stylus.
8 Embroidery Stitch-Out HOW TO USE DESIGN POSITIONING 'HVLJQ 3 RVLWLRQLQJ LV XVHG WR SRVLWLRQ D GHVLJQ RQ DQ H[DFW VSRW RQ WKH IDEULF
8 Embroidery Stitch-Out DESIGN POSITIONING EXERCISE :KHQ DGGLQJ RQH GHVLJQ WR D SUHYLRXVO\ HPEURLGHUHG design, or when matching a design to an exact location on \RXU IDEULF 'HVLJQ 3RVLWLRQLQJ LV YHU\ XVHIXO 6HOHFW 'HVLJQ DQG HPEURLGHU RQH LQ WKH XSSHU OHIW corner of the hoop. Touch number 1.
8 Embroidery Stitch-Out NUMBER OF STITCHES IN EMBROIDERY COMBINATION Current Stitch in Embroidery The current stitch in embroidery position in the design or FRPELQDWLRQ LV VKRZQ QH[W WR WKH ÁRZHU 7KH QXPEHU LQ brackets shows the total number of stitches in the design or combination.
8 Embroidery Stitch-Out deLuxe™ STITCH SYSTEM The deLuxe™ 6WLWFK 6\VWHP KDV WZR ZD\V WR FRQWURO WKH needle thread, Thread Tension and Thread Portioning. The deLuxe™ 6WLWFK 6\VWHP LPSURYHV WKH FRUUHFW EDODQFH EHWZHHQ QHHGOH WKUHDG DQG EREELQ WKUHDG
8 Embroidery Stitch-Out Start/Stop Speed + and STOP Stitch Re-Start (bobbin access) (Monochrome) Needle Stop Up/Down (Trim position) FIX Selective Thread Cutter (Baste) Sensor Foot Up and Extra Lift Sensor Foot Down and Pivot FUNCTION BUTTONS IN EMBROIDERY STITCH-OUT START/STOP Touch this button to start and stop the machine sewing or HPEURLGHULQJ ZLWKRXW WKH IRRW FRQWURO 7RXFK 67$57 6723 WR EHJLQ DQG WRXFK DJDLQ WR VWRS SPEED + AND 7RXFK 6SHHG RU 6SHHG WR LQFUHDVH RU GHFUHDVH WKH embroider
8 Embroidery Stitch-Out EMBROIDERY STITCH-OUT POPUP MESSAGES Embroidery unit calibration When the embroidery unit is attached, a pop-up message asks you to slide off the hoop and clear the machine DUHD IRU FDOLEUDWLQJ WKH HPEURLGHU\ DUP
8 Embroidery Stitch-Out Cut thread end $IWHU FKDQJLQJ WKH WKUHDG WKH PDFKLQH ZLOO VHZ D IHZ stitches and then stop so you can cut the thread end. Note: When Automatic Jump Stitch Trim is selected in the SET Menu, the thread end will be cut automatically. Simply remove the thread tail that has been cut. (PEURLGHU\ LV ÀQLVKHG $ SRS XS PHVVDJH DQG VRXQG LQIRUPV \RX WKDW \RXU HPEURLGHU\ LV ÀQLVKHG 7RXFK 2.
9 FILE MANAGER
9 File Manager FILE MANAGER 7KH )LOH 0DQDJHU LV XVHG WR RSHQ RUJDQL]H DGG PRYH UHPRYH DQG FRS\ \RXU GHVLJQV IRQWV DQG VWLWFK ÀOHV 8VH HLWKHU EXLOW LQ PHPRU\ RU DQ H[WHUQDO GHYLFH FRQQHFWHG WR \RXU PDFKLQH IRU VWRULQJ GHVLJQV DQG ÀOHV FILE MANAGER - OVERVIEW OF ICONS Information Menu Quick Help List view Drop down menu Selection Area Move up one folder My Designs Open folder My Fonts 5HQDPH ÀOH RU IROGHU My Files Create new folder Built-In Designs External Devices Delete 1DPH RI VHOHFW
9 File Manager AVAILABLE MEMORY The built-in memory can store designs, fonts, stitches and RWKHU ÀOHV 7R FKHFN KRZ PXFK PHPRU\ LV VWLOO DYDLODEOH LQ WKH EXLOW LQ PHPRU\ JR LQWR )LOH 0DQDJHU WRXFK 4XLFN +HOS DQG WKHQ WRXFK HLWKHU 0\ )LOHV 0\ )RQWV RU 0\ 'HVLJQV $ SRS XS PHVVDJH VKRZV KRZ PXFK PHPRU\ LV DYDLODEOH 1RWH ,I WKH ÀOH W\SH RU ÀOH YHUVLRQ LV QRW VXSSRUWHG E\ \RXU PDFKLQH RU WKH ÀOH LV GDPDJHG LW LV VKRZQ LQ WKH VHOHFWLRQ DUHD DV DQ XQUHFRJQL]HG ÀOH FILE FORMATS
9 File Manager My Files /RDG 0\ )LOHV ZLWK GHVLJQV IRQWV \RXU FXVWRPL]HG GHVLJQV VWLWFK SURJUDPV WH[W ÀOHV RU DQ\ ÀOH WKDW \RX ZDQW WR VWRUH &UHDWH IROGHUV WR NHHS \RXU ÀOHV RUJDQL]HG 7KLV FKDSWHU ZLOO GLVFXVV KRZ WR DUUDQJH 0\ )LOHV VR WKDW \RX FDQ ÀQG \RXU IDYRULWHV HDVLO\ Built-in Designs This folder contains the designs that are stored in the SHUPDQHQW VHZLQJ PDFKLQH PHPRU\ 1R ÀOHV FDQ EH DGGHG RU UHPRYHG IURP WKLV IROGHU EXW WKH\ FDQ EH FRSLHG DQG SDVWHG LQ DQRWKHU IROGHU
9 File Manager Open a folder 7R RSHQ D IROGHU VHOHFW LW DQG WRXFK WKH 2SHQ )ROGHU LFRQ RU 7RXFK +ROG WR RSHQ LW 7KH FRQWHQWV RI WKH IROGHU ZLOO be shown in the selection area. 2SHQ D ÀOH 7R RSHQ D ÀOH FOLFN RQ WKH ÀOH ZLWK \RXU VW\OXV DQG WRXFK 2.
9 File Manager ORGANIZE Create a new folder Touch the create new folder icon to create a new folder. $ SRS XS PHVVDJH RSHQV ZKHUH \RX FDQ HQWHU D QDPH IRU your folder. 5HQDPH D ÀOH RU IROGHU To change the name of a folder, touch the folder then WRXFK WKH 5HQDPH ÀOH RU IROGHU LFRQ $ SRS XS PHVVDJH RSHQV ZKHUH \RX FDQ HQWHU WKH QHZ QDPH IRU D ÀOH RU folder. 5HQDPH ÀOH or folder Create new folder 0RYH D ÀOH RU IROGHU 8VH FXW DQG SDVWH WR PRYH D ÀOH RU IROGHU WR DQRWKHU storage location.
9 File Manager FILE MANAGER POP-UP MESSAGES Audio Player 6RXQG ÀOHV FDQ EH VDYHG LQ 0\ )LOHV :KHQ RSHQLQJ D VRXQG ÀOH LQ )LOH 0DQDJHU LW ZLOO RSHQ LQ WKH $XGLR 3OD\HU DSSOLFDWLRQ 7RXFK WKH 6WDUW LFRQ WR SOD\ the sound.
9 File Manager System busy :KHQ WKH PDFKLQH LV ORDGLQJ VDYLQJ PRYLQJ ÀOHV RU performing a function that takes time, an hour glass is shown.
10 MAINTENANCE
10 Maintenance CLEANING THE MACHINE To keep your sewing machine operating well, clean it often. 1R OXEULFDWLRQ RLOLQJ LV QHHGHG Wipe the exterior surface of your machine with a soft cloth WR UHPRYH DQ\ GXVW RU OLQW EXLOW XS Wipe the screen with a clean, soft and damp cloth. Cleaning the bobbin area Note: Lower the feed teeth by pressing Presser Foot Up and Extra Lift. Turn off the machine.
10 Maintenance TROUBLESHOOTING ,Q WKLV WURXEOHVKRRWLQJ JXLGH \RX ZLOO ÀQG VROXWLRQV WR WKH SUREOHPV \RX PD\ KDYH ZLWK \RXU PDFKLQH )RU IXUWKHU LQIRUPDWLRQ SOHDVH FRQWDFW \RXU ORFDO DXWKRUL]HG +8649$51$ 9,.,1*® retailer who will be happy to help you. Problem/cause Remedy General problems 7KUHDG FXWWHU GRHV QRW FXW WKH WKUHDG" Clean lint from bobbin area and use only the original +8649$51$ 9,.
10 Maintenance Bobbin thread breaks 'LG \RX LQVHUW WKH EREELQ SURSHUO\" Check the bobbin thread. ,V WKH QHHGOH SODWH KROH GDPDJHG" Change the needle plate. ,V WKH EREELQ DUHD IXOO RI OLQW" Clean lint from bobbin area and use only the original bobbins DSSURYHG IRU WKLV PRGHO Wind a new bobbin. ,V WKH EREELQ ZRXQG FRUUHFWO\" The seam has uneven stitches ,V WKH 7KUHDG 7HQVLRQ FRUUHFW" Check needle Thread Tension and the threading. $UH \RX XVLQJ WRR WKLFN RU VOXEEHG WKUHDG" Change the thread.
10 Maintenance INDEX A $FFHVVRULHV .............................................................................1:8 $FFHVVRU\ WUD\ ................................................................ 1:7, 2:3 $FFHVVRU\ WUD\ HPEURLGHU\ XQLW.................................. 6:2, 6:4 $GG D OHWWHU LQWR D WH[W ........................................................7:19 $GG 5HPRYH 6HOHFWLRQ ................................................ 7:2, 7:7 $GMXVWDEOH ( /,*+7 ......................................
10 Maintenance &RORU 6RUW ...............................................................................8:5 Common icons/functions .................................................3:16 &RPSOLPHQWDU\ VRIWZDUH 3& ..........................................2:14 Computer ...............................................................................9:4 Connectors for power cord .................................................1:6 Connect the embroidery unit ..............................................
10 Maintenance )LOH 0DQDJHU SRS XS PHVVDJHV ...........................................9:7 ),; .......................................................................1:6, 3:14, 8:12 ),; $XWR ................................................................................3:8 )ODW PHWDOOLF WKUHDGV ..............................................................2:7 )ROGHU DOUHDG\ H[LVWV..............................................................9:7 )ROGHU 6WUXFWXUH.............................................
10 Maintenance N 1DPH RI VHOHFWHG ÀOH............................................................9:2 Needle area .............................................................................1:7 Needle bar ..............................................................................1:7 Needle, changing ...................................................................2:9 Needle clamp .........................................................................1:7 Needle plate ................................
10 Maintenance 6FUHHQ DQG /LJKW 6HWWLQJV........................................... 3:6, 3:12 6FUHHQ 6DYHU .........................................................................3:12 6FUHZGULYHU .............................................................................1:8 6FULSW $OSKDEHW ....................................................................1:18 6FUROO EDU................................................................3:16, 8:2, 8:5 6FUROO 7KURXJK 0HQXV...................................
10 Maintenance Tension discs.................................................................. 2:5, 2:6 Tension/Portioning Compensations........................ 3:10, 4:9 Text........................................................................................3:13 Thread Color Change .........................................................7:15 Thread cutter ................................................ 1:6, 2:3, 2:8, 3:15 Thread cutter for bobbin winding ......................................
10 Maintenance INTELLECTUAL PROPERTY Patents protecting this product are listed on a label positioned underneath the 6HZLQJ 0DFKLQH 9,.,1* .((3,1* 7+( :25/' 6(:,1* 'HVLJQ '(6,*1(5 '(6,*1(5 ',$021' '(6,*1(5 ',$021' 52<$/( '(/8;( 3,&72*5$0 6(:,1* $'9,625 (0%52,'(5< $'9,625 (;&/86,9( 6(1625 6<67(0 DQG ( /,*+7 DUH WUDGHPDUNV RI .
www.husqvarnaviking.com $ (QJOLVK ,Q+RXVH .