
Operation Manual


Stitch Menus
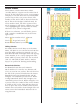
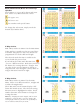
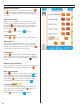
Touch Menu A in the Main Menu. Menu
“A Utility Stitches” appears on the Color Touch
Screen. To the left on the screen, your Designer
I displays a selected stitch and a recommended
presser foot, in this case presser foot A. The
number of the stitch (A02) is shown below the
stitch. This is the Designer I default stitch. To
select an other stitch, touch the picture of the
stitch. De sig ner I will always confi rm your choi-
ce by highlighting the selected stitch in white,
otherwise it has yellow background.
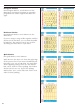
If there is a submenu, you will fi nd a picture
with a number combination on, in the lower
right corner.
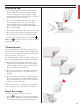
Select stitches number 24-36, submenu.
Touch
. To go back touch .
Return to Main Menu by touching
.
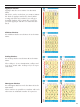
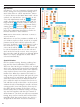
Utility Stitches
For Utility Stitches touch Menu A in the Main
Menu. On Menu A you can fi nd several stitches
used for utility sewing. For example you can
fi nd different kinds of straight stitch and zig-zag
(stitch number 15 is a 4 step zigzag with max-
i mum width of 9 mm). There are also overlock
(A16-17) and fl atlock (A20) stitches. Stitches
A33-36 are perfect for darning and mending.
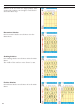
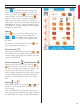
Buttonhole Stitches
For Buttonhole stitches touch Menu B.
Stitch number 16 is used to sew buttons and
17-19 are used to sew eyelets. The red wheel to
the left of the presser foot indicates the Sensor
Buttonhole Foot. For buttonhole B6 and B7,
De sig ner I recommends presser foot C. When
sewing buttonhole B14 to B15, Designer I re-
commends presser foot A. When using the A or
C presser foot, the symbol of the reverse button
is visible on the screen. This indicates that you
have to press the reverse button when the but-
tonhole has reached the desired length. The red
arrow next to the buttonhole indicates the se-
wing direction.
21
Learn your Designer I