
Operation Manual


8:8
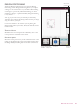
1
4
3
2
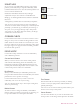
HOW TO USE DESIGN POSITIONING
6WLWFKRXWGHVLJQ55BYSLQDODUJHKRRS7RXFK
Design Positioning icon to position the next design.
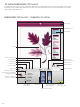
Design Positioning Wizard
Touch the numbered Design Positioning icons to position
\RXUGHVLJQVWHSE\VWHS)RULQIRUPDWLRQDERXWDVWHS
touch Quick Help and the numbered icon.
1. To select a Locking Point on Screen
Touch number 1 to select a locking point. Place the red
cursor where you would like the locking point to be in your
embroidery.
2. Move Locked Point on Fabric
Touch number 2. The red cursor will be locked on the
screen. It will change color from red to grey with a ring
around the center of the locking point. Now you can place
the design exactly where you want it on the fabric by using
the stylus or the Control. Watch the hoop as it moves when
you use the arrows to get the design placed exactly where
you want it. The position of the needle will show where the
locking point will be placed on the fabric. Use the Control
WRÀQHWXQH
Note: If you are happy with the placement of your design, touch OK
in the bottom right corner. If you also need to adjust the angle of the
design, continue with step 3.
3. Set Matching Point on Screen
7RXFKQXPEHUWRDFWLYDWHWKHPDWFKLQJSRLQW<RXFDQ
use a second position within the design to make sure your
design is lined up properly and make further adjustments if
necessary.
Watch the cursor on the screen to select a matching point.
Place the red cursor where you would like the matching
point to be in your embroidery.
4. Rotate Design on Fabric
Touch number 4. The rotate function is automatically
selected. Use the stylus or Control to rotate the design
around the locking point. Look at your fabric and rotate
the design until the needle is exactly where you want the
matching point. Touch OK.