Gasoline containing up to 10% ethanol (E10) is acceptable for use in this machine. The use of any gasoline exceeding 10% ethanol (E10) will void the product warranty. Vous pouvez utiliser de l’essence contenant jusqu’à 10 % d’éthanol (E10) avec cet appareil. L’utilisation d’essence contenant plus de 10 % d’éthanol annulera la garantie du produit.
SAFETY RULES Safe Operation Practices for Walk-Behind Powered Rotary Tillers TRAINING • • • • • Read the Manual carefully. Be thoroughly familiar with the controls and the proper use of the equipment. Know how to stop the unit and disengage the controls quickly. Never allow children to operate the equipment. Never allow adults to operate the equipment without proper instruction. Keep the area of operation clear of all persons, particularly small children, and pets.
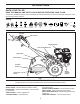
PRODUCT SPECIFICATIONS Gasoline Capacity: Unleaded Regular 3.2 Quarts (3.0L) Oil (API:SG-SL): (Capacity: 20 oz./0.6L) SAE 30 Above 32°F/0°C SAE 5W30 Below 32°F/0°C Spark Plug : Champion RC12YC (Gap: .030"/0.76mm) CUSTOMER RESPONSIBILITIES • • Read and observe the safety rules. Follow a regular schedule in maintaining, caring for and using your tiller. • Follow instructions under “Maintenance” and “Storage” sections of this Manual.
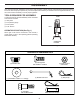
ASSEMBLY Your new tiller has been assembled at the factory with exception of those parts left unassembled for shipping purposes. To ensure safe and proper operation of your tiller all parts and hardware you assemble must be tightened securely. Use the correct tools as necessary to insure proper tightness. TOOLS REQUIRED FOR ASSEMBLY FRONT A socket wrench set will make assembly easier. Standard wrench sizes are listed.
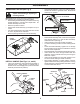
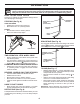
ASSEMBLY UNPACKING CARTON (See Fig. 2) • CAUTION: Be careful of exposed staples when handling or disposing of cartoning material. Grasp handle assembly. Hold in “up” position. Be sure handle lock remains in gearcase notch. Slide handle assembly into position. HANDLE ASSEMBLY "UP" POSITION IMPORTANT: WHEN UNPACKING AND ASSEMBLING TILLER, BE CAREFUL NOT TO STRETCH OR KINK CABLES.
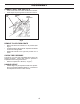
ASSEMBLY CONNECT SHIFT ROD (See Fig. 6) • • Insert end of shift rod into hole of shift lever indicator. Insert hairpin clip through hole of shift rod to secure. SHIFT ROD SHIFT LEVER INDICATOR HAIRPIN CLIP Fig. 6 REMOVE TILLER FROM CRATE • • • Make sure shift lever indicator is in “N” position (See Fig. 6) Tilt tiller forward by lifting handle. Separate cardboard cover from leveling shield. Rotate tiller handle to the right and pull tiller out of carton.
OPERATION KNOW YOUR TILLER READ THIS MANUAL AND SAFETY RULES BEFORE OPERATING YOUR TILLER. Compare the illustrations with your tiller to familiarize yourself with the location of various controls and adjustments. Save this manual for future reference. These symbols may appear on your Tiller or in literature supplied with the product. Learn and understand their meaning.
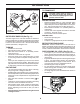
OPERATION 00155 The operation of any tiller can result in foreign objects thrown into the eyes, which can result in severe eye damage. Always wear safety glasses or eye shields before starting your tiller and while tilling. We recommend a wide vision safety mask for over spectacles or standard safety glasses. HOW TO USE YOUR TILLER Know how to operate all controls before adding fuel and oil or attempting to start engine. STOPPING (See Fig. 8) TINES AND DRIVE • Release tine control to stop movement.
OPERATION DEPTH STAKE PIN “RELEASED” POSITION TO TRANSPORT CAUTION: Before lifting or transporting, allow tiller engine and muffler to cool. Disconnect spark plug wire. Drain gasoline from fuel tank. AROUND THE YARD • Release the depth stake pin. Move the depth stake down to the top hole for transporting the tiller. Place depth stake pin in hole of depth stake to lock in position. This prevents tines from scuffing the ground. • Place shift lever indicator in “F” (forward) position for transporting.
OPERATION IMPORTANT: Do not crank engine more than five continuous seconds between each time you try to start. Wait 1 minute between each attempt. • When engine starts, release the starter button and slowly move choke control to "RUN" position as engine warms up. • Disconnect the extension cord from the receptacle first, then from the engine. NOTE: A warm engine requires less choking to start. • Move throttle control to desired running position.
OPERATION TILLING HINTS (See Fig. 14) CAUTION: Until you are accustomed to handling your tiller, start actual field use with throttle in slow position (mid-way between “FAST” and “IDLE”). • • • • Tilling is digging into, turning over, and breaking up packed soil before planting. Loose, unpacked soil helps root growth. Best tilling depth is 4" to 6" (10-15 cm). A tiller will also clear the soil of unwanted vegetation. The decomposition of this vegetable matter enriches the soil.
MAINTENANCE N YS EA SO OU RS RS 0H ER SERVICE DATES EV Y5 ER EV EV ER Y2 5H OU UR HO CH Y5 EA ER RE EV FO BE FILL IN DATES AS YOU COMPLETE REGULAR SERVICE S US E MAINTENANCE SCHEDULE Check Engine Oil Level Change Engine Oil 1,2 Oil Pivot Points Inspect Spark Arrester / Muffler Inspect Air Screen Clean or Replace Air Cleaner Cartridge 2 Clean Engine Cylinder Fins Replace Spark Plug RH Gear Case Grease Fitting (1oz.
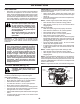
MAINTENANCE Disconnect spark plug wire before performing any maintenance (except carburetor adjustment) to prevent accidental starting of engine. Prevent fires! Keep the engine free of grass, leaves, spilled oil, or fuel. Remove fuel from tank before tipping unit for maintenance. Clean muffler area of all grass, dirt, and debris. Do not touch hot muffler or cylinder fins as contact may cause burns. ENGINE AIR FILTER (See Fig.
MAINTENANCE COOLING SYSTEM (See Fig. 21) SPARK PLUG Your engine is air cooled. For proper engine performance and long life keep your engine clean. • Clean air screen frequently using a stiff-bristledbrush. • Remove blower housing and clean as necessary. • Keep cylinder fins free of dirt and chaff. Replace spark plugs at the beginning of each tilling season or after every 50 hours of use, whichever comes first. Spark plug type and gap setting is shown in “PRODUCT SPECIFICATIONS” on page 3 of this manual.
SERVICE AND ADJUSTMENTS CAUTION: Disconnect spark plug wire from spark plug and place wire where it cannot come into contact with plug. TILLER TO ADJUST HANDLE HEIGHT (See Fig. 22) Select handle height best suited for your tilling conditions. Handle height will be different when tiller digs into soil. • First loosen handle lock lever. • Handle can be positioned at different settings between “HIGH” and “LOW” positions. • Retighten handle lock lever securely after adjusting.
SERVICE AND ADJUSTMENTS GROUND DRIVE BELT ADJUSTMENT (See Fig. 25) TO REPLACE GROUND DRIVE BELT (See Figs. 24 and 25) • • • • • • Remove belt guard as described in “TO REMOVE BELT GUARD”. Remove old belt by slipping off engine pulley first then remove from transmission pulley. Place new belt in groove of transmission pulley and into engine pulley. BELT MUST BE IN GROOVE ON TOP OF IDLER PULLEY. NOTE POSITION OF BELT TO GUIDES. Check belt adjustment as described below. Replace belt guard.
SERVICE AND ADJUSTMENTS • TINE REPLACEMENT (See Figs. 26, 27 and 28) CAUTION: Tines are sharp. Wear gloves or other protection when handling tines. • A badly worn tine causes your tiller to work harder and dig more shallow. Most important, worn tines cannot chop and shred organic matter as effectively nor bury it as deeply as good tines. A tine this worn needs to be replaced.
SERVICE AND ADJUSTMENTS ENGINE TO ADJUST CARBURETOR TO ADJUST THROTTLE CONTROL CABLE (See Fig. 29) The carburetor has been preset at the factory and adjustment should not be necessary. However, engine performance can be affected by differences in fuel, temperature, altitude or load. If the carburetor does need adjustment, contact your nearest authorized service center/department The throttle control has been preset at the factory and adjustment should not be necessary.
STORAGE Immediately prepare your tiller for storage at the end of the season or if the unit will not be used for 30 days or more. ENGINE OIL Drain oil (with engine warm) and replace with clean oil. (See “ENGINE” in the Maintenance section of this manual). CAUTION: Never store the tiller with gasoline in the tank inside a building where fumes may reach an open flame or spark. Allow the engine to cool before storing in any enclosure.
TROUBLESHOOTING POINTS PROBLEM CAUSE Will not start 1. 2. 3. 4. 5. Out of fuel. Engine not “CHOKED” properly. Engine flooded. Dirty air cleaner. Water in fuel. 1. 2. 3. 4. 5. 6. 7. 8. 9. Clogged fuel tank. Loose spark plug wire. Bad spark plug or improper gap. Carburetor out of adjustment. 6. 7. 8. 9. 1. 2. 3. 4. Throttle control not set properly. Dirty air cleaner. Bad spark plug or improper gap. Stale or dirty fuel. 1. 2. 3. 4. 5. 6. Loose spark plug wire. Carburetor out of adjustment. 5. 6.