
Product Manual


English – 9
ASSEMBLY
• Drill a hole for the expander/anchor at a distance of 335
mm (13.2”) from the centre of the hole.
• Bolt down the base plate. Check carefully that the
e
xpander is secured correctly.
• The bottom plate can be adjusted to the surface by using
the le
veling adjustment screws. Use the feed lever.
Fixing with threaded rod, washer and lock
nut
If the mounting surface is inadequate for drilling in roofs or
walls, the base plate can be fixed using a threaded rod, which
is mounted on the backside with a washer and lock nut.
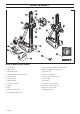
Assembly of drill motor
• Always remove the drill bit before the motor is mounted or
dismounted.
• Lock the feed housing lock.
DS 150
• Fasten the drill spindle on the drill motor support. Use the
feed lever.
DS 250
• Fit the drill motor on the quick mount (A).
• Mount the quick mounting and drilling machine in the track
on the loc
king clamp. Make sure that the quick-mount is
pushed all the way to the bottom (B) of the rail on the
locking clip.
• Secure with the locking screws (C).
Adjust the column tilt
Loosen the locking screws for column tilt and set the desired
drill angle. Tighten the locking screws. Use the feed lever. The
column can be tilted 0-60°.
The angle indicator can be used for approximate adjustment.
If higher precision is required, alter
native measuring methods
should be used.
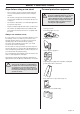
Drilling in the ceiling
IMPORTANT! Always pull out the plug from the outlet
socket before cleaning, maintenance or assembly.
!
WARNING! Use a water collector to avoid
water penetrating into the machine. The
machine must be covered with plastic or the
like in order to prevent water penetrating
into the machine, but do not cover the air
intakes and air outlets.