6 LE389 1.1997 Spare Parts Piéces Dètachées Owner's Manual 601 00 22 32 Reference No.
SAFETY RULES THESE SAFETY RULES ARE FOR YOUR PROTECTION. READ THEM CAREFULLY. IMPORTANT Safety standardsrequire operator presence controls to minimize the risk of injury. Your Edger/ Trimmer is equipped with such controls. Do not attempt to defeat the function of the operator presence control under any circumstances. Look for this symbol to point out important safety precautions. It means ATTENTION!!! BECOME ALERT!!! YOUR SAFETY IS INVOLVED.
OWNER'S INFORMATION Record the following information about your unit so that you will be able to provide it in case of loss or theft. (Enter complete 8 digit number MODEL NUMBER: from model plate on unit) SERIAL NO.: CODE NO.
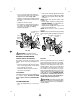
ASSEMBLY CAUTION: Always wear safety glasses or eye shields while assembling Edger/Trimmer. Clutch Lever Fig.1-ASSY to the right shows the Edger/ Trimmer completely assembled. References to the right or left hand side of the Edger/Trimmer are from the viewpoint of the operator's position behind the unit. Control Rod Handle Panel TO REMOVE EDGER/TRIMMER FROM CARTON Blade Guard Upper Handle • Remove the lower handle, control rod, upper handle and packing material from the carton.
• Attach the front wheels to the Edger/Trim- Upper Handles mer shown in Fig. 5-ASSY with a 5/16-18 (in operating position) Hair Pin x 4.50 inch hex head screw, four 11/32 x 11/16 inch flatwashers, two spacers and a 5/16-18 hex head wide flange locknut found in parts bag. Note position of wheels in Fig. 5-ASSY.
OPERATION KNOW YOUR EDGER/TRIMMER READ THIS OWNER’S MANUAL AND SAFETY RULES BEFORE OPERATING YOUR EDGER/TRIMMER. Compare the illustrations with your EDGER/TRIMMER to familiarize yourself with the location of various controls and adjustments. Save this manual for future reference.
HOW TO USE YOUR EDGER WARNING: The operation of this Edger/ Trimmer can result in foreign objects being thrown into the eyes, which can cause severe eye damage. Always wear safety glasses or eye shields while operating the Edger/Trimmer. We recommend standard safety glasses or Wide Vision Safety Mask for over your glasses. TO STOP EDGER/TRIMMER • To stop the engine, make sure the clutch lever is all the way back or up and move the throttle control lever to the STOP positon.
• Remove the oil fill cap-dipstick and fill the crankcase to FULL line on dipstick. See Fig. 5-OP. Check frequently when filling the crankcase. NOTE: Engine may already contain some residual oil. • Fill the engine crankcase, pouring slowly. DO NOT OVERFILL. For approximate capacity see your engine manual. • Tighten the fill cap-dipstick securely each time you check the oil level. NOTE: Check oil before each use. Add if needed.
• To stop the engine, make sure the clutch TO START THE ENGINE lever is all the way back or up and move the throttle control lever to the STOP position. Before starting the engine, be sure you have read and understood all the instructions on the preceding pages. The Edger/Trimmer is equipped with a recoil starter. The operation of the engine is controlled by the throttle control lever. • Pull the clutch lever all the way back or up to the rearmost hole to raise and disengage the blade.
GENERAL RECOMMENDATIONS • Clean the cover and the flange thoroughly. • Insert the new air filter into the cover. • Push the cover firmly against the flange and turn it to the right clockwise as far as it will go as shown in Fig. 2-MAINT below. Be sure the retainers are locked around the flange. • Reconnect the spark plug wire. The warranty on this Edger/Trimmer does not cover items that have been subjected to operator abuse or negligence.
CAUTION: Always stop the engine and disconnect the spark plug wire before making any repairs to the Edger/Trimmer. SERVICE AND ADJUSTMENTS V-BELT REPLACEMENT Your Edger/Trimmer is equipped with a V-belt made of a special compound. If the belt becomes worn or breaks, replace it with an orignal equipment belt as shown in the Repair Parts section of this manual. Never use a substitute. • Disconnect the spark plug wire. • Put the clutch lever back or up to release the tension from the belt.
adjusting, see your nearest Authorized Service Center. Tightening Wrench IMPORTANT: Never tamper the engine governor, which is factory set for proper engine speed. Overspeeding the engine above the factory high speed setting can be dangerous. If you think the engine-governed high speed needs adjusting, contact your nearest Service Center which has the proper equipment and experience to make any necessary adjustments. Holding Wrench Blade Locknut FIG.
TROUBLE SHOOTING TROUBLE Difficult starting or Engine runs erratic CAUSE CORRECTION Stale fuel Drain fuel tank.