Gasoline containing up to 10% ethanol (E10) is acceptable for use in this machine. The use of any gasoline exceeding 10% ethanol (E10) will void the product warranty. Esta máquina puede utilizar gasolina con un contenido de hasta el 10% de etanol (E10). El uso de una gasolina que supere el 10% de etanol (E10) anulará la garantía del producto.
SAFETY RULES IMPORTANT: THIS CUTTING MACHINE IS CAPABLE OF AMPUTATING HANDS AND FEET AND THROWING OBJECTS. FAILURE TO OBSERVE THE FOLLOWING SAFETY INSTRUCTIONS COULD RESULT IN SERIOUS INJURY OR DEATH. The American Academy of Pediatrics recommends that children be a minimum of 12 year of age before operating a pedestrian controlled lawn mower and a minimum of 16 years of age before operating a riding lawn mower. Tragic accidents can occur if the operator is not alert to the presence of children.
• Never operate machine in wet grass. Always be sure of your footing: keep a firm hold on the handle; walk, never run. • Disengage the drive system, if so equipped, before starting the engine (motor). • If the equipment should start to vibrate abnormally, stop the engine (motor) and check immediately for the cause. Vibration is generally a warning of trouble. • Always wear eye protection when operating machine.
PRODUCT SPECIFICATIONS CONGRATULATIONS on your purchase of a new lawn mower. It has been designed, engineered and manufactured to give you the best possible dependability and performance. Should you experience any problem you cannot easily remedy, please contact your nearest authorized service center/department. We have competent, well-trained technicians and the proper tools to service or repair this lawn mower. Please read and retain this manual.
ASSEMBLY Read these instructions and this manual in its entirety before you attempt to assemble or operate your new lawn mower. IMPORTANT: THIS LAWN MOWER IS SHIPPED WITHOUT OIL OR GASOLINE IN THE ENGINE. Your new lawn mower has been assembled at the factory with the exception of those parts left unassembled for shipping purposes. All parts such as nuts, washers, bolts, etc., necessary to complete the assembly have been placed in the parts bag.
ASSEMBLY INSTALL STARTER ROPE (See Fig. 3) TO PREPARE BATTERY (See Fig. 4) 1. Loosen T-knob. 2. Hold control bar against upper handle. 3. Slowly pull engine starter rope out until rope will slip into loop of rope guide. 4. Tighten T-knob. NOTE: Your battery must be charged before you can start your lawn mower. 1. Open port on electric start housing. 2. Connect battery charger connector (male) to battery connector (female). 3. Plug battery charger into 110 volt A.C. outlet.
OPERATION KNOW YOUR LAWN MOWER. READ THIS OWNER'S MANUAL AND SAFETY RULES BEFORE OPERATING YOUR LAWN MOWER. Compare the illustrations with your lawn mower to familiarize yourself with the location of various controls and adjustments. Save this manual for future reference. These symbols may appear on your lawn mower or in literature supplied with the product. Learn and understand their meaning.
OPERATION The operation of any lawn mower can result in foreign objects thrown into the eyes, which can result in severe eye damage. Always wear safety glasses or eye shields while operating your lawn mower or performing any adjustments or repairs. We recommend standard safety glasses or a wide vision safety mask over spectacles. HOW TO USE YOUR LAWN MOWER Use ear protectors to avoid damage to hearing. 3. Operate mower to test drive speed. Readjust as required. 4.
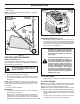
OPERATION • To convert to mulching or discharging operation, remove grass catcher and close rear door. REAR DOOR VERTICAL POSITION GRASS BAG BRACKET GRASS CATCHER HANDLE UNLOCK LATCH OPEN MULCHER DOOR GRASS CATCHER FRAME HOOK INSTALL DISCHARGE DEFLECTOR FIG. 8 SIDE DISCHARGING (See Fig. 9) • Rear door must be closed. • Open mulcher door and install discharge deflector under door as shown. • Mower is now ready for side discharging operation.
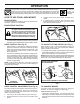
OPERATION 5. Empty clippings from bag using both frame handle and bag handle. NOTE: Do not drag the bag when emptying; it will cause unnecessary wear. OPERATOR PRESENCE CONTROL BAR (MOVE FORWARD TO UNLOCK) ENGINE OIL CAP GASOLINE FILLER CAP VERTICAL POSITION GRASS CATCHER FRAME HANDLE HANDLE REAR DOOR FIG. 11 ADD GASOLINE (See Fig.
OPERATION MULCHING MOWING TIPS IMPORTANT: DO NOT CRANK ENGINE MORE THAN FIVE CONTINOUS SECONDS BETWEEN EACH TIME YOU TRY TO START. WAIT 5 TO 10 SECONDS BETWEEN EACH ATTEMPT. • IMPORTANT: FOR BEST PERFORMANCE, KEEP MOWER HOUSING FREE OF BUILT-UP GRASS AND TRASH. SEE “CLEANING” IN MAINTENANCE SECTION OF THIS MANUAL. To start engine using the rope starter, hold operator presence control bar down to the handle and pull starter handle quickly. Do not allow starter rope to snap back.
MAINTENANCE BEFORE EACH USE AFTER EACH USE EVERY 10 HOURS EVERY 25 HOURS OR SEASON EVERY 100 HOURS BEFORE STORAGE Check for Loose Fasteners Clean / Inspect Grass Catcher * Check Tires Check Drive Wheels *** Clean Lawn Mower **** Clean under Drive Cover *** Check Drive Belt / Pulleys *** Check / Sharpen / Replace Blade Lubrication Clean and Recharge Battery ** Check Engine Oil level Change Engine Oil Clean Air Filter Inspect Muffler Replace Spark Plug Replace Air Filter Paper Cartridge Empty fuel syste
MAINTENANCE LAWN MOWER 2. Install debris shield. 3. Position blade on the blade adapter. Always observe safety rules when performing any maintenance. IMPORTANT: TO ENSURE PROPER ASSEMBLY, CENTER HOLE IN BLADE MUST ALIGN WITH STAR ON BLADE ADAPTER. TIRES • • 4. Be sure the trailing edge of blade (opposite sharp edge) is up toward the engine. 5. Install the blade bolt with the lock washer and hardened washer into blade adapter and crankshaft. 6.
MAINTENANCE TO CHANGE ENGINE OIL (See Fig. 17) NOTE: Before tipping lawn mower to drain oil, empty fuel tank by running engine until fuel tank is empty. 1. Disconnect spark plug wire from spark plug and place wire where it cannot come in contact with plug. 2. Remove engine oil cap; lay aside on a clean surface. 3. Tip lawn mower on its side as shown and drain oil into a suitable container. Rock lawn mower back and forth to remove any oil trapped inside of engine. CENTER HOLE 5/8" BOLT OR PIN BLADE FIG.
MAINTENANCE WATER WASHOUT FEATURE (See Fig. 19) Your lawn mower is equipped with a fitting that allows quick and easy cleaning of the underside of the housing. To use this feature, proceed as follows: 1. Move lawn mower to an area of cut grass or another hard surface. NOTE: Water, grass and other debris will drain from beneath the mower housing during the washout process. 2. Remove grass catcher and discharge chute assembly from lawn mower. 3. Close mulcher door (if equipped). 4.
SERVICE AND ADJUSTMENTS CAUTION: TO AVOID SERIOUS INJURY, BEFORE PERFORMING ANY SERVICE OR ADJUSTMENTS: 1. Release control bar and stop engine. 2. Make sure the blade and all moving parts have completely stopped. 3. Disconnect spark plug wire from spark plug and place where it cannot come in contact with plug. LAWN MOWER TO REMOVE DRIVE BELT (See Figs. 20 & 21) NOTE: Before tipping lawn mower to remove drive belt, empty fuel tank by running engine until fuel tank is empty. 1.
SERVICE AND ADJUSTMENTS 5. Disconnect return spring from rear baffle / rear gearcase belt keeper. 6. Disconnect cable from rear gearcase. 7. Remove drive cover. 8. Remove front belt keeper. 9. Remove belt from front gearcase pulley. 10. Remove all three idler pulleys from idler assembly. 11. Remove belt from blade adapter/engine pulley and idler assembly. 12. Remove rear gearcase pulley by clamping locking pliars to input shaft (beneath pulley) and loosening pulley with a 9/16" box wrench. 13.
SERVICE AND ADJUSTMENTS ENGINE TO ADJUST HANDLE (See Fig. 22) The upper handle may be adjusted to three (3) different height positions. 1. Move operator presence control bar forward to unlock the handle. 2. Lift handle to desired adjustment position. ENGINE SPEED Your engine speed has been factory set. CARBURETOR Your carburetor is not adjustable. IMPORTANT: NEVER TAMPER WITH THE ENGINE GOVERNOR, WHICH IS FACTORY SET FOR PROPER ENGINE SPEED.
STORAGE Immediately prepare your mower for storage at the end of the season or if the unit will not be used for 30 days or more. ENGINE LAWN MOWER IMPORTANT: IT IS IMPORTANT TO PREVENT GUM DEPOSITS FROM FORMING IN ESSENTIAL FUEL SYSTEM PARTS SUCH AS CARBURETOR, FUEL FILTER, FUEL HOSE, OR TANK DURING STORAGE. ALCOHOL BLENDED FUELS (CALLED GASOHOL OR USING ETHANOL OR METHANOL) CAN ATTRACT MOISTURE WHICH LEADS TO SEPARATION AND FORMATION OF ACIDS DURING STORAGE.
TROUBLESHOOTING POINTS PROBLEM Does not start CAUSE 1. Dirty air filter. 2. Out of fuel. 3. Stale fuel. 4. 5. 6. 7. 8. 9. 10. 11. 12. Loss of power CORRECTION 1. Clean/replace air filter. 2. Fill fuel tank. 3. Empty fuel tank and refill tank with fresh, clean gasoline. Water in fuel. 4. Empty fuel tank and refill tank with fresh, clean gasoline. Spark plug wire is disconnected. 5. Connect wire to plug. Bad spark plug. 6. Replace spark plug. Loose blade or broken blade adapter. 7.
REGLAS DE SEGURIDAD IMPORTANTE: ESTA MAQUINA CORTADAORA ES CAPAZ DE AMPUTAR LAS MANOS Y LOS MANOS Y LOS PIES Y DE LANZAR OBJETOS. SI NO SE OBSERVAN LAS INSTRUCCIONES DE SEGURIDAD SIGUIENTES SE PUEDEN PRODUCIR LESIONES GRAVES O LA MUERTE. La Academia Americana de Pediatría recomienda que los cortacésped de conductor a pie sean manejados por personas de al menos 12 años de edad, mientras que los cortacésped de conductor montado sean operados por personas de al menos 16 años de edad.
• Nunca opere la maquina cuando la hierba esté mojada. Asegúrese siempre de tener buena tracción en sus pies; mantenga el mango firmemente y camine; nunca corra. • Desconecte el sistema de tracción, si la máquina cuenta con él, antes de arrancar el motor. • Si el equipo empezara a vibrar de una manera anormal, pare el motor y revise de inmediato para averiguar la causa. Generalmente la vibración suele indicar que existe alguna avería. • Utilice protección para los ojos siempre que trabaje con la máquina.
ESPECIFICACIONES DEL PRODUCTO FELICITACIONES por la compra de su segadora. Ha sido diseñado, planificado y fabricado para darle la mejor confiabilidad y el mejor rendimiento posible. En el caso de que se encuentre con cualquier problema que no pueda solucionar fácilmente, haga el favor de ponerse en contacto con un centro de servicio cualificado. Cuenta con técnicos bien capacitados y competentes y con las herramientas adecuadas para darle servicio o para reparar este tractor.
MONTAJE / PRE-OPERACIÓN Lea estas instrucciones y el manual completamente antes de tratar de montar u operar su segadora nueva. IMPORTANTE: Este cortacesped viene SIN ACEITE O GASOLINA en el motor. Su segadora nueva ha sido montada en la fábrica con la excepción de aquellas partes que se dejaron sin montar por razones de envío. Todas las partes como las tuercas, las arandelas, los pernos, etc., que son necesarias para completar el montaje han sido colocadas en la bolsa de partes.
MONTAJE / PRE-OPERACIÓN INSTALACIÓN DEL CORDÓN ARRANCADOR (Vea Fig. 3) 1. 2. 3. 4. PARA PREPARAR LA BATERÍA (Vea Fig. 4) AVISO: Su batería tiene que estar cargada antes de que pueda hacer arrancar su segadora. 1. Abra la puerta del bastidor de arranque eléctrico. 2. Conecte el conector del cargador de la batería (macho) al conector de la batería (hembra). 3. Enchufe el cargador de la batería dentro del enchufe de 110 volt C.A.
OPERACIÓN FAMILIARÍCESE CON SU SEGADORA. LEA ESTE MANUAL DEL DUEÑO Y LAS REGLAS DE SEGURIDAD ANTES DE OPERAR SU SEGADORA. Compare las ilustraciones con su segadora para familiarizarse con la ubicación de los diversos controles y ajustes. Guarde este manual para referencia en el futuro. Estos símbolos pueden apareser sobre su segadora o en la literatura proporcionada con el producto. Aprenda y comprenda sus significados.
OPERACIÓN La operación de cualquier segadora puede hacer que salten objetos extraños dentro de sus ojos, lo que puede producir daños graves en éstos. Siempre use anteojos de seguridad o protección para los ojos mientras opere su segadora o cuando haga ajustes o reparaciones. Recomendamos gafas o una mascara de seguridad de visión amplia de seguridad usada sobre las gafas. COMO USAR SU SEGADORA 1. 2. La velocidad del motor se estableció en la fábrica para un rendimiento óptimo.
OPERACIÓN PARA CONVERTIR LA SEGADORA Su segadora fue enviada lista para usarse como acolchadora de capa vegetal. Para convertirla a una operación de ensacado o de descarga: DESCARGA TRASERA (Vea Fig. 8): • Levante el mango a la posición vertical. La puerta trasera se levantará para permitir la fácil remoción y reemplazo del recogedor de césped. Colocar los ganchos del armazón de la recolectora de hierba en los soporte del recogedor de césped.
OPERACIÓN 5. Vacíe los recortes de la bolsa. AVISO: No arrastre la bolsa cuando la vacíe; se producirá un desgaste innecesario. BARRA DE CONTROL QUE EXIGE LA PRESENCIA DEL OPERADOR (MOVER HACIA ADELANTE PARA DESBLOQUEAR) TAPA DEL DEPOSITO DE ACEITE TAPA DEL RELLENADOR DE GASOLINA POSICIÓN VERTICAL MANGO DEL BASTIDOR DEL RECOGEDOR PUERTA DE CÉSPED TRASERA MANGO FIG. 11 AGREGUE GASOLINA (Vea Fig. 11) • MANGO DE CÉSPED PRECAUCIÓN: Limpie el aceite o el combustible derramado.
OPERACIÓN PARA PARAR EL MOTOR • PARA HACER ARRANCAR EL MOTOR • • Para parar el motor, suelte la barra de controles que exigen la presencia del operador. AVISO: Debido a las capas protectoras del motor, una cantidad pequeña de humo puede estar presente durante el uso inicial del producto y se debe considerar normal. • Quite el botón del arrancador del bolso accesorio e insértelo en la cubierta del arrancador atada a la manija superior.
MANTENIMIENTO RECOMENDACIONES GENERALES TABLA DE LUBRICACIÓN La garantía de esta segadora no cubre los artículos que han estado sujetos al abuso o a la negligencia del operador. Para recibir todo el valor de la garantía, el operador tiene que mantener la segadora según las instrucciones descritas en este manual. Hay algunos ajustes que se tienen que hacer en forma periódica para poder mantener su unidad adecuadamente.
MANTENIMIENTO SEGADORA 3. Ponga la cuchilla en el adaptador. IMPORTANTE: PARA ASEGURAR LA INSTALACION APROPIADA, POSICIONE EL AGUJERO CENTRAL DE LA CUCHILLA CON LA ESTRELLA DEL CONJUNTO DEL ADAPTADOR. 4. Asegúrese de que el borde de salida de la cuchilla (opuesto al borde afilado) esté hacia arriba hacia el motor. 5. Instale el perno de la cuchilla con la arandela de seguridad y la arandela endurecida en el adaptador de la cuchilla y el cigueñal. 6.
MANTENIMIENTO PARA CAMBIAR EL ACEITE DEL MOTOR (Vea Fig. 17) AVISO: Antes de inclinar la segadora para drenar el aceite, drene el tanque de combustible haciendo correr el motor hasta que el tanque esté vacio. 1. Desconecte el alambre de la bujía y póngalo de modo que no pueda entrar en contacto con ésta. 2. Remueva la tapa del depósito del aceite; déjela a un lado en una superficie limpia. 3. Incline la cortadora de césped por este costado tal como se muestra y purgue el aceite en un recipiente idóneo.
MANTENIMIENTO DERRUBIO DEL AGUA (Vea Fig. 19) Su cortacéspedes de césped se equipa de una guarnición que permita la limpieza rápida y fácil del superficie inferior de la cubierta. Para utilizar esta característica, siga de la forma siguiente: 1. Mueva el cortacéspedes de césped a un área de la hierba cortada o de otra superficie dura. NOTA: El agua, la hierba y la otra ruina escurrirán debajo de la cubierta del cortacéspedes durante el proceso del derrubio. 2.
SERVICIO Y AJUSTES ADVERTENCIA: Para evitar lesiónes serias, antes de dar calquier servico o de hacer ajustes: 1. Suelte la barra de control y pare el motor. 2. Asegúrese que la cuchilla y que todas las partes movibles se hayan detenido completamente. 3. Desconecte el alambre de la bujía y póngalo en donde no pueda entrar en contacto con ésta. SEGADORA PARA REMOVER CORREA DE IMPULSIÓN (Vea Figs.
SERVICIO Y AJUSTES 5. Remueva la resorte de vuelta de la bafle posterior / fijador de la correa posterior. 6. Remueva la cable de la caja de engranajes posterior. 7. Remueva la cubierta de la impulsión. 8. Remueva la fijador de la correa delantero. 9. Remueva la correa de la polea de la correa delantero. 10. Remueva todas las tres poleas del conjunto de la poleas. 11. Remueva la correa del polea del motor y conjunto de la poleas. 12.
SERVICIO Y AJUSTES MOTOR PARA AJUSTAR EL MANGO (Vea Fig. 22) El mango superior quede ser ajustado a tres (3) distintas posiciones de altura. 1. Mover barra de control hacia adelante para desbloquear el mango. 2. Levante el mango a la posición deseada. El mantenimiento, la reparación, o el reemplazo de cualquier dispositivos o sistemas del control de la emisión, los cuales sean hechos al costo del cliente, pueden ser realizados por cualquier individuo o establecimiento de reparación de motor.
ALMACENAMIENTO Inmediatamente prepare su segadora para el almacenamiento al final de cada temporada o si la unidad no se va a usar por 30 días o más. • Vaciar el depósito del carburante poniendo en marcha el motor y dejándolo funcionar hasta que el carburante termine y el carburador esté vacío. • Nunca use los productos para limpieza del carburador o del motor en el estanque de combustible pues se pueden producir daños permanentes. • Use combustible nuevo la próxima temporada.
SOLUCIÓN DE PROBLEMAS PROBLEMA No arranca CAUSA 1. 2. 3. Filtro de aire sucio. Sin combustible. Combustible rancio. 1. 2. 3. 4. Agua en el combustible. 4. 5. 6. 7. Alambre de la bujía desconectado. Bujía mala. Cuchilla suelta o adaptador de la cuchilla quebrado. Barra de control en la posición suelta. Barra de control defectuosa. Válvula del combustible (si equipada) está en la posición OFF. Batería débi (si equipada). Desconecte el conector de la batería (si equipada). Fusible quemado. 5. 6. 7.
11/16/2015 BY