Gasoline containing up to 10% ethanol (E10) is acceptable for use in this machine. The use of any gasoline exceeding 10% ethanol (E10) will void the product warranty. Esta máquina puede utilizar gasolina con un contenido de hasta el 10% de etanol (E10). El uso de una gasolina que supere el 10% de etanol (E10) anulará la garantía del producto. 115 79 30-96 Rev.
SAFETY RULES IMPORTANT: THIS CUTTING MACHINE IS CAPABLE OF AMPUTATING HANDS AND FEET AND THROWING OBJECTS. FAILURE TO OBSERVE THE FOLLOWING SAFETY INSTRUCTIONS COULD RESULT IN SERIOUS INJURY OR DEATH. The American Academy of Pediatrics recommends that children be a minimum of 12 year of age before operating a pedestrian controlled lawn mower and a minimum of 16 years of age before operating a riding lawn mower. Tragic accidents can occur if the operator is not alert to the presence of children.
• Never operate machine in wet grass. Always be sure of your footing: keep a firm hold on the handle; walk, never run. • Disengage the drive system, if so equipped, before starting the engine (motor). • If the equipment should start to vibrate abnormally, stop the engine (motor) and check immediately for the cause. Vibration is generally a warning of trouble. • Always wear eye protection when operating machine.
PRODUCT SPECIFICATIONS CONGRATULATIONS on your purchase of a new lawn mower. It has been designed, engineered and manufactured to give you the best possible dependability and performance. Should you experience any problem you cannot easily remedy, please contact your nearest authorized service center. We have competent, well-trained technicians and the proper tools to service or repair this lawn mower. Please read and retain this manual.
ASSEMBLY TO ASSEMBLE GRASS CATCHER (See Fig. 2) INSTALL STARTER ROPE (See Fig. 3) 1. Loosen T-knob. 2. Hold control bar against upper handle. 3. Slowly pull engine starter rope out until rope will slip into loop of rope guide. 4. Tighten T-knob. 1. Put grass catcher frame into grass bag with rigid part of bag on the bottom. Make sure the frame handle is outside of the bag top. 2. Slip vinyl bindings over frame. NOTE: If vinyl bindings are too stiff, hold them in warm water for a few minutes.
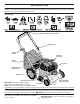
OPERATION KNOW YOUR LAWN MOWER. READ THIS OWNER'S MANUAL AND SAFETY RULES BEFORE OPERATING YOUR LAWN MOWER. Compare the illustrations with your lawn mower to familiarize yourself with the location of various controls and adjustments. Save this manual for future reference. These symbols may appear on your lawn mower or in literature supplied with the product. Learn and understand their meaning.
OPERATION The operation of any lawn mower can result in foreign objects thrown into the eyes, which can result in severe eye damage. Always wear safety glasses or eye shields while operating your lawn mower or performing any adjustments or repairs. We recommend standard safety glasses or a wide vision safety mask over spectacles. HOW TO USE YOUR LAWN MOWER PIVOT PINS ENGINE SPEED Use ear protectors to avoid damage to hearing.
OPERATION BEFORE STARTING ENGINE ADD OIL (See Fig. 9) Your lawnmower is shipped without oil in the engine. For type and grade of oil to use, see “ENGINE” in the Maintenance section of this manual. CAUTION: DO NOT overfill engine with oil, or it will smoke heavily from the muffler on startup. 1. Be sure lawnmower is level. 2. Remove oil dipstick from oil fill spout. 3. You receive a container of oil with the unit. Slowly pour the entire container down the oil fill spout into the engine.
OPERATION Alcohol blended fuels (called gasohol or using ethanol or methanol) can attract moisture which leads to separation and formation of acids during storage. Acidic gas can damage the fuel system of an engine while in storage. To avoid engine problems, the fuel system should be emptied before storage of 30 days or longer. Empty the gas tank, start the engine and let it run until the fuel lines and carburetor are empty. Use fresh fuel next season. See Storage Instructions for additional information.
MAINTENANCE BEFORE EACH USE AFTER EACH USE EVERY 10 HOURS EVERY 25 HOURS OR SEASON EVERY 100 HOURS BEFORE STORAGE Check for Loose Fasteners Clean / Inspect Grass Catcher * Check Tires Check Drive Wheels *** Clean Lawn Mower **** Clean under Drive Cover *** Check Drive Belt / Pulleys *** Check / Sharpen / Replace Blade Lubrication Clean and Recharge Battery ** Check Engine Oil level Change Engine Oil Clean Air Filter Inspect Muffler Replace Spark Plug Replace Air Filter Paper Cartridge Empty fuel syste
MAINTENANCE LAWN MOWER • Always observe safety rules when performing maintenance. TIRES • • Keep tires free of gasoline, oil, or insect control chemicals which can harm rubber. Avoid stumps, stones, deep ruts, sharp objects and other hazards that may cause tire damage. To check blade balance, drive a nail into a beam or wall. Leave about one inch of the straight nail exposed. Place center hole of blade over the head of the nail. If blade is balanced, it should remain in a horizontal position.
MAINTENANCE TO CHANGE ENGINE OIL (See Fig. 13) NOTE: Before tipping lawn mower to drain oil, empty fuel tank by running engine until fuel tank is empty. 1. Disconnect spark plug wire from spark plug and place wire where it cannot come in contact with plug. 2. Remove engine oil cap; lay aside on a clean surface. 3. Tip lawn mower on its side as shown and drain oil into a suitable container. Rock lawn mower back and forth to remove any oil trapped inside of engine. TAB SLOT CARTRIDIGE FILTER COVER FIG.
SERVICE AND ADJUSTMENTS CAUTION: TO AVOID SERIOUS INJURY, BEFORE PERFORMING ANY SERVICE OR ADJUSTMENTS: 1. Release control bar and stop engine. 2. Make sure the blade and all moving parts have completely stopped. 3. Disconnect spark plug wire from spark plug and place where it cannot come in contact with plug. LAWN MOWER MOWING POSITION TO ADJUST CUTTING HEIGHT See “TO ADJUST CUTTING HEIGHT” in the Operation section of this manual.
STORAGE ENGINE HANDLE (See Figs. 17 and 18) FUEL SYSTEM You can fold your lawn mower handle for storage. 1. Remove bolts and nuts. 2. Squeeze the bottom ends of the lower handle toward each other until the lower handle clears the handle bracket, then move handle forward. 3. Loosen upper handle mounting bolts enough to allow upper handle to be folded back.
TROUBLESHOOTING POINTS PROBLEM Does not start CAUSE 1. Dirty air filter. 2. Out of fuel. 3. Stale fuel. 4. 5. 6. 7. 8. 9. 10. 11. 12. Loss of power CORRECTION 1. Clean/replace air filter. 2. Fill fuel tank. 3. Empty fuel tank and refill tank with fresh, clean gasoline. Water in fuel. 4. Empty fuel tank and refill tank with fresh, clean gasoline. Spark plug wire is disconnected. 5. Connect wire to plug. Bad spark plug. 6. Replace spark plug. Loose blade or broken blade adapter. 7.
REGLAS DE SEGURIDAD IMPORTANTE: ESTA MAQUINA CORTADAORA ES CAPAZ DE AMPUTAR LAS MANOS Y LOS MANOS Y LOS PIES Y DE LANZAR OBJETOS. SI NO SE OBSERVAN LAS INSTRUCCIONES DE SEGURIDAD SIGUIENTES SE PUEDEN PRODUCIR LESIONES GRAVES O LA MUERTE. La Academia Americana de Pediatría recomienda que los cortacésped de conductor a pie sean manejados por personas de al menos 12 años de edad, mientras que los cortacésped de conductor montado sean operados por personas de al menos 16 años de edad.
• Nunca opere la maquina cuando la hierba esté mojada. Asegúrese siempre de tener buena tracción en sus pies; mantenga el mango firmemente y camine; nunca corra. • Desconecte el sistema de tracción, si la máquina cuenta con él, antes de arrancar el motor. • Si el equipo empezara a vibrar de una manera anormal, pare el motor y revise de inmediato para averiguar la causa. Generalmente la vibración suele indicar que existe alguna avería. • Utilice protección para los ojos siempre que trabaje con la máquina.
ESPECIFICACIONES DEL PRODUCTO FELICITACIONES por la compra de su segadora. Ha sido diseñado, planificado y fabricado para darle la mejor confiabilidad y el mejor rendimiento posible. En el caso de que se encuentre con cualquier problema que no pueda solucionar fácilmente, haga el favor de ponerse en contacto con un centro de servicio cualificado. Cuenta con técnicos bien capacitados y competentes y con las herramientas adecuadas para darle servicio o para reparar este tractor.
MONTAJE / PRE-OPERACIÓN PARA MONTAR EL RECOGEDOR DE CÉSPED (Vea Fig. 2) INSTALACIÓN DEL CORDÓN ARRANCADOR (Vea Fig. 3) 1. 1. 2. 3. Ponga el bastidor del recogedor de césped en la bolsa del césped con la parte rígida de la bolsa en la parte inferior. Asegúrese que el mango del bastidor esté en el exterior de la parte superior de la bolsa. 2. Deslice los sujetadores de vinilo sobre el bastidor. AVISO: Si los sujetadores de vinilo están muy duros, métalos en agua caliente por algunos minutos.
OPERACIÓN FAMILIARÍCESE CON SU SEGADORA. LEA ESTE MANUAL DEL DUEÑO Y LAS REGLAS DE SEGURIDAD ANTES DE OPERAR SU SEGADORA. Compare las ilustraciones con su segadora para familiarizarse con la ubicación de los diversos controles y ajustes. Guarde este manual para referencia en el futuro. Estos símbolos pueden apareser sobre su segadora o en la literatura proporcionada con el producto. Aprenda y comprenda sus significados.
OPERACIÓN La operación de cualquier segadora puede hacer que salten objetos extraños dentro de sus ojos, lo que puede producir daños graves en éstos. Siempre use anteojos de seguridad o protección para los ojos mientras opere su segadora o cuando haga ajustes o reparaciones. Recomendamos gafas o una mascara de seguridad de visión amplia de seguridad usada sobre las gafas. COMO USAR SU SEGADORA PASADOR DEL QUINCIO VELOCIDAD DEL MOTOR Utilice las protecciones auditivas para evitar daño a la audiencia.
OPERACIÓN ANTES DE HACER ARRANCAR EL MOTOR AGREGUE ACEITE (Vea Fig. 9) IMPORTANTE: Su segadora fue enviada sin aceite en el motor. Para el tipo y el grado del aceite a utilizar, vea el “MOTOR” en la sección del Mantenimiento de este manual. PRECAUCIÓN: NO sobrellene el motor con aceite, o fumará pesa demante del silenciador cuando lo valla a arrancar. AVISO: El terraplén inicial del aceite requiere solamente 18 onzas debido al aceite residual en el motor de la prueba de calidad de 100% del fabricante.
OPERACIÓN Los combustibles mezclados con alcohol (conocidos como gasohol, o el uso de etanol o metanol) pueden atraer la humedad, la que conduce a la separación y formación de ácidos durante el almacenamiento. La gasolina acídica puede dañar el sistema del combustible de un motor durante el almacenamiento. Para evitar los problemas con el motor, se debe vaciar el sistema del combustible antes de guardarlo por un período de 30 días o más.
MANTENIMIENTO RECOMENDACIONES GENERALES TABLA DE LUBRICACIÓN La garantía de esta segadora no cubre los artículos que han estado sujetos al abuso o a la negligencia del operador. Para recibir todo el valor de la garantía, el operador tiene que mantener la segadora según las instrucciones descritas en este manual. Hay algunos ajustes que se tienen que hacer en forma periódica para poder mantener su unidad adecuadamente.
MANTENIMIENTO SEGADORA Se tiene que tener cuidado de mantenerla balanceada. Una cuchilla que no está balanceada va a producir eventualmente daño en la segadora o en el motor. • La cuchilla puede afilarse con una lima o en una rueda rectificadora. No trate de afilarla mientras se encuentra en la segadora. • Para revisar el balance de la cuchilla, clave un clavo en una viga o en la pared. Deje alrededor de una pulgada de un clavo recto expuesto.
MANTENIMIENTO 4. PARA CAMBIAR EL ACEITE DEL MOTOR (Vea Fig. 13) Instale el cartucho, luego vuelva a poner la cubierta. AVISO: Antes de inclinar la segadora para drenar el aceite, drene el tanque de combustible haciendo correr el motor hasta que el tanque esté vacio. 1. Desconecte el alambre de la bujía y póngalo de modo que no pueda entrar en contacto con ésta. 2. Remueva la tapa del depósito del aceite; déjela a un lado en una superficie limpia. 3.
SERVICIO Y AJUSTES ADVERTENCIA: Para evitar lesiónes serias, antes de dar calquier servico o de hacer ajustes: 1. Suelte la barra de control y pare el motor. 2. Asegúrese que la cuchilla y que todas las partes movibles se hayan detenido completamente. 3. Desconecte el alambre de la bujía y póngalo en donde no pueda entrar en contacto con ésta. SEGADORA POSICIÓN PARA SEGAR PARA AJUSTAR LA ALTURA DE CORTE Vea “PARA AJUSTAR LA ALTURA DE CORTE” en la sección de Operación de este manual.
ALMACENAMIENTO MOTOR MANGO (Vea Figs. 17 y 18) SISTEMA DE COMBUSTIBLE Puede doblar el mango de su segadora para el almacenamiento. 1. Remueva los pernos y los teurcas. 2. Apriete los extremos inferiores del mango inferior entre sí hasta que el mango inferior quede separado del puntal del mango, luego muévalo hacia adelante. 3. Suelte los pernos de montaje del mango superior lo suficiente como para permitir que el mango superior se pueda doblar hacia atrás.
SOLUCIÓN DE PROBLEMAS PROBLEMA No arranca CAUSA 1. 2. 3. Filtro de aire sucio. Sin combustible. Combustible rancio. 1. 2. 3. 4. Agua en el combustible. 4. 5. 6. 7. Alambre de la bujía desconectado. Bujía mala. Cuchilla suelta o adaptador de la cuchilla quebrado. Barra de control en la posición suelta. Barra de control defectuosa. Válvula del combustible (si equipada) está en la posición OFF. Batería débi (si equipada). Desconecte el conector de la batería (si equipada). Fusible quemado. 5. 6. 7.
SERVICE NOTES 30
NOTAS SERVICIO 31
06/28/2016 BY