S DISKMASKIN QB 513 822 945 962 - 00 - 0202
Till våra kunder, läs igenom den här bruksanvisningen noggrant. Iaktta framför allt säkerhetsanvisningarna på de första sidorna i bruksanvisningen! Förvara bruksanvisningen väl för att vid ett eventuellt ägarbyte kunna överlämna även den. 1 Med varningstriangeln och/eller signalorden (Varning!, Se upp!, OBS!) framhävs informationer som är viktiga för din säkerhet och för maskinens funktionsduglighet. Iaktta dessa informationer under alla omständigheter.
Innehåll Säkerhetsanvisningar . . . . . . . . . . . . . . . . . . . . . . . . . . . . . . . . . . . . . . . . . . . . . . . . . . . . . . . . . . . . . . . . . . . 5 Spärra diskmaskinsluckan . . . . . . . . . . . . . . . . . . . . . . . . . . . . . . . . . . . . . . . . . . . . . . . . . . . . . . . . . . . . . . . . . 6 Avfallshantering . . . . . . . . . . . . . . . . . . . . . . . . . . . . . . . . . . . . . . . . . . . . . . . . . . . . . . . . . . . . . . . . . . . . . . . .
Innehåll Installations- och anslutningsinstruktioner . . . . . . . . . . . . . . . . . . . . . . . . . . . . . . . . . . . . . . . . . . . . . . . . . 27 Installation av diskmaskinen . . . . . . . . . . . . . . . . . . . . . . . . . . . . . . . . . . . . . . . . . . . . . . . . . . . . . . . . . . . . 27 Integrerbar diskmaskin . . . . . . . . . . . . . . . . . . . . . . . . . . . . . . . . . . . . . . . . . . . . . . . . . . . . . . . . . . . . . . . . 27 Inbyggd diskmaskin . . . . . . . . . . . . . . . . .
1 Säkerhetsanvisningar De elektriska apparaterna från HUSQVARNA uppfyller tillämpade tekniska regler och säkerhetsnormer. Som tillverkare känner vi oss trots detta förpliktade att uppmärksamma på följande säkerhetsanvisningar. • Uppställning, anslutning, start • • • • Diskmaskinen får endast transporteras stående. Kontrollera att diskmaskinen inte har fått några transportskador. En skadad maskin får under inga omständigheter anslutas. Vid skador som uppstått – kontakta leverantören.
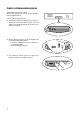
Spärra diskmaskinsluckan Diskmaskinens lucka har en spärr. Denna spärr hindrar barn från att av misstag öppna luckan till diskmaskinen. Ställ in spärren på följande sätt: 1. Till vänster om luckans handtag finns en spärr (1). Genom att skjuta denna spärr åt höger (t.ex. med hjälp av ett skedskaft) hindrar du att luckan kan öppnas av misstag. 2. När du aktiverat spärren, gör du på följande sätt för att öppna diskmaskinsluckan – För luckans handtag åt vänster (2) tills du känner ett lätt motstånd.
2 Avfallshantering Avfallshantering för emballaget Diskmaskinens emballagematerial måste avfallshanteras på sakkunnigt och på föreskrivet sätt. Allt material som emballaget är tillverkat av är miljövänligt och kan återanvändas. • Plastdelar är märkta med internationellt standardiserade förkortningar: – >PE< för polyetylen, t.ex. förpackningsfolier – >PS< för polystyren, t.ex. dämpningsdelar (principiellt fluorklorkolväte-fri) – >POM< för polyoxymetylen, t.ex.
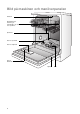
Bild på maskinen och manöverpanelen Takdusch Gummitätning för anslutning av vattentilloppet till den övre spolarmen Spolarmar Fack för specialsalt Fack för sköljmedel Fack för diskmedel Typskylt 8 Silar
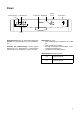
Panel Funktionsknapp Avhärdarknapp Luckhandtag Multidisplay Ställa in starttid Kontrollampor Panel Reglagepanelen består av TILL/FRÅN-strömbrytare ON/OFF och programknapparna med lysdiodslampor. Avhärdar- och funktionsknapp: förutom angivna diskprogram kan diskmaskinens vattenavhärdare ställas in genom en kombination av dessa knappar. Multidisplay kan visas, – vilken hårdhetsgrad som avhärdaren är inställd på. – vilken starttid som är inställd.
Före den första diskningen Innan du sätter igång diskmaskinen ska alla klämmor för korgarnas transportsäkring avlägsnas. Därefter skall töljande göras: 1. Inställning av vattenavhärdaren 2. Påfyllning av specialsalt för vattenavhärdaren 3. Påfyllning av sköljmedel Inställning av vattenavhärdaren För att förhindra kalkavlagringar på disken och i diskmaskinen, måste disken diskas med mjukt, dvs kalkfattigt vatten. Därför är diskmaskinen utrustad med en vattenavhärdare, där ledningsvatten fr.o.m.
Påfyllning av specialsalt för vattenavhärdaren 1 Använd endast specialsalt för diskmaskiner. Fyll aldrig på andra salttyper (t.ex. livsmedelssalt) eller diskmedel i saltfacket. Detta skulle förstöra vattenavhärdaren. Se till att du verkligen fyller på specialsalt. Fyll på specialsalt: • • Första gången maskinen används. När kontrollampan lyser på manöverpanelen. 3 V Om vattnets hårdhetsgrad ligger under 4 °d i ditt bostadsområde behöver du inte fylla på specialsalt. 1.
Påfyllning av sköljmedel Med sköljmedlet blir glas och övrig disk fläckfri, glänsande och klar. 1 Använd endast sköljmedel för diskmaskiner. Fyll aldrig på andra medel (t.ex. ättiksessens) eller diskmedel i facket för sköljmedlet. Maskinen kan ta skada. Fyll på sköljmedel: • • Första gången maskinen används. När kontrollampan lyser på manöverpanelen. à Sköljmedelsfacket befinner sig på diskmaskinluckans insida. 1. Öppna luckan. 2. Tryck på sköljmedelsfackets öppningsknapp med fingrarna. 3.
Vid dagligt bruk • • • • • Måste grovt salt eller sköljmedel fyllas på? Sortera bestick och övrig disk i diskmaskinen Fyll på diskmedel Välj lämpligt diskprogram för bestick och övrig disk Starta diskprogrammet Sortering av bestick och övrig disk 1 Rengöringssvampar, hushållstrasor och samtliga föremål som kan suga upp vatten får inte rengöras i diskmaskinen.
Sortering av besticken 1 Långa, spetsiga besticksdelar i bestickskorgen är farliga, i synnerhet för barn (se säkerhetsanvisningar). De måste därför läggas i överkorgen. För att alla besticksdelar ska spolas med vatten, bör du 1. sätta gallerinsatsen på bestickskorgen 2. placera korta knivar, gafflar och skedar i bestickskorgens gallerinsats med skaftet nedåt. Några diskmaskinsmodeller har bestickkorgar utan bestickgaller.
Sortera grytor, pannor och stora tallrikar Större och starkt nedsmutsad disk sorteras i den undre korgen. 3 För att lättare kunna sortera större föremål kan - den bakre tallriksinsatsen tas ut ur underkorgen. - bestickkorgen i underkorgen skjutas i sidled. Sortera muggar, glas och kaffeservis Små, ömtåliga föremål och långa, spetsiga besticksdelar sorteras i den övre korgen. • • • • Sortera disken på och under de uppfällbara ytorna för muggar så att diskvattnet kan nå all disk.
Överkorgen kan ställas in på o lika höjder Diskens maximala höjd i överkorgen underkorgen vid upplyft överkorg 22 cm 31 cm vid nedsänkt överkorg 24 cm 29 cm Variant 1 3 Höjdinställningen kan även företas när korgarna är fulla. Diskmaskinen är, beroende på modell, utrustad med överkorg enligt "Variant 1" eller "Variant 2": Nedsänkning av överkorgen: 1. Dra ut överkorgen helt. 2. Lyft överkorgen i handtaget bak på höger sida och sänk ner den. Lyftning av överkorgen: 1. Dra ut överkorgen helt. 2.
Påfyllning av diskmedel 1 Använd endast maskindiskmedel. Fyll på diskmedel: Innan ett diskprogram startar (inte för fördiskprogram). Diskmedlet avges till vattnet under programmet. 2 Beakta tillverkarens rekommendationer för dosering och förvaring av diskmedlet på förpackningen. Diskmedelsfacket befinner sig på luckans insida. 1. Om luckan är stängd: Tryck på öppningsknappen (1). Luckan öppnas. 2. Fyll på diskmedel i diskmedelsbehållaren.
Välj diskprogram (programtabell) Välj ut lämpligt diskprogram med hjälp av den här tabellen: Typ av diskgods: Extra: Typ av smuts: Lämpligt diskprogram: Programförlopp: 1) Förbrukningsvärden Kaffe- och dessertporslin Mat- och kokkärl kraftigt nedsmutsat, intorkade matrester, särskilt äggvita och stärkelse - Alla typer av diskgods för disk som är känslig för värme normalt normalt nedsmutsat, nedsmutsat intorkade matressärskilt lämpligt ter för kompaktdiskmedel lätt nedsmutsat Använt porslin som st
Starta diskprogrammet 1. Kontrollera om bestick och den övriga disken är så sorterad i diskmaskinen att sprutarmarna kan röra sig fritt. 2. Öppna vattenkranen helt. 3. Stäng luckan. 4. Tryck på till/från-knappen ON/OFF. Till/från-knappens ON/OFF lampa lyser. 5. Tryck på programknappen för önskat program (se "programtabell"). Programindikeringen lyser. Efter ungefär 6 sekunder startar det valda diskprogrammet.
Diskmängdidentifiering När ett diskprogram startas och det endast finns lite disk i den övre och/eller den undre korgen, så anpassas diskvattenmängden och diskprogrammets längd till diskmängden med hjälp av en intelligent elektronik. Därigenom kan man snabbt och ekonomiskt diska även mindre mängder disk. Vid den halva mängden disk (servis för 6 personer) sparas upp till 2 liter vatten och 0,2 kWh energi.
Skötsel och rengöring Använd under inga omständigheter repanderengöringsmedel eller aggressiva rengöringsmedel. Rengör vid behov diskmaskinens manöverdelar endast med en mjuk trasa och varmt, rent vatten. Spolarmarna behöver inte rengöras. Kontrollera med jämna mellanrum om diskmaskinens diskutrymme, lucktätningen och vattentilloppet är nedsmutsade – rengör vid behov. 1 • • • Silarnas rengöring 3 Silarna i botten på maskinens diskutrymme är i hög grad självrenande.
Vad gör man när... Försök att åtgärda mindre störningar på diskmaskinen själv med hjälp av den här anförda informationen. Om du ändå anlitar AB Elektroservice för en av de störningar som finns upplistade här eller för fel som uppstått pga felaktig betjäning, debiteras service-besök även under reklamationstiden. ...felmeddelanden visas. • Om programindikeringen för det valda diskprogrammet blinkar eller om felkod (1 eller (2 syns på multidisplayen, så kan du eventuellt åtgärda felet själv.
...problem med diskmaskinens drift uppstått. Störning Möjlig orsak Avhjälpande Diskmaskinens lucka är inte stängd ordentligt. Stäng luckan. Stickkontakten är inte ansluten till vägguttaAnslut stickkontakten till vägguttaget. get. Programmet startar inte. Säkringen är defekt. Byt ut säkringen. Vid diskmaskinsmodeller med startfördröjning: En starttid har förinställts. Om du vill starta diskmaskinen meddetsamma: - Ställ starttiden på 0 timmar på maskiner med multidisplay.
Tekniska data Kapacitet: Servis för 12 personer inklusive serveringsdelar Tillåtet vattentryck: 1-10 bar (=10-100 N/cm2 = 0.1-1.0 MPa) Elektrisk anslutning: Uppgifter om den elektriska anslutningen framgår av typskylten som befinner sig innanför diskmaskinsluckan på dess högra sida. Integrerbara och inbyggda diskmaskiner. Mått: 820 – 880 x 596 x 570 (h x b x d i mm) max. vikt: 50 kg Fullt integrerbara diskmaskiner. Mått: 820 – 880 x 596 x 546 - 550 (h x b x d i mm) max.
Anvisningar för kontrollinstitut Kontrollen enligt EN 60704 måste göras med testprogrammet (se programtabellen) vid full maskin. Kontrollerna enligt EN 50242 måste göras med testprogrammet (se programtabellen) vid full vattenavhärdarbehållare och full sköljmedelsbehållare.
Placeringsexempel: Bestickkorg Vissa diskmaskinsmodeller har bestickkorgar utan galler.
INSTALLATIONS- OCH ANSLUTNINGSINSTRUKTIONER Installation av diskmaskinen • • • • • Ställ diskmaskinen på ett fast underlag så att den står stabilt och justera den så att den står i våg. Genom att skruva ut skruvfötterna kompenserar du för ojämnheter i golvet och anpassar höjden på diskmaskinen till annan inredning : – med en skruvmejsel. På inbyggda, integrerbara samt helintegrerbara diskmaskiner ställer du in de bakre fötterna framtill på maskinen, med hjälp av en skruvmejsel.
Inbyggd diskmaskin (se bifogad monteringsanvisning) Fristående maskiner 1 Kan installeras utan ytterligare fastsättning. Om du ställer diskmaskinen direkt bredvid en gas- eller fastbränsleeldad spis måste du sätta en värmeisolerad, inte brännbar platta mellan spisen och diskmaskinen i höjd med överkanten på bänkskivan (djup 57,5 cm). Den del av plattan som är riktad mot spisen ska vara försedd med aluminiumfolie.
Anslutning av diskmaskinen Vattenanslutning Diskmaskinen har säkerhetsanordningar för att förhindra att sköljvatten tränger tillbaka i dricksvattenledningen och uppfyller gällande vattentekniska säkerhetsföreskrifter. • Diskmaskinen kan anslutas till kallvatten och till varmvatten upp till max. 60 °C. • Diskmaskinen får inte anslutas till öppna varmvattenapparater och genomströmningsvärmare.
Avloppsanslutning Enligt Svensk Byggnorm skall avloppslangen vara monterad sä att den på ett ställe är förd upp tillten nivå motsvarande avloppsenhetens överkant. Slangen ska där varad fixerad på ett betryggande sett. Avloppsslang 1 • Avloppsslangen får inte vikas eller klämmas. Avloppsslangens anslutning: – maximalt tillåten höjd: 1 meter. – minsta nödvändiga höjd 30 cm över apparatens undre kant. Förlängningsslangen • • Förlängningsslangen erhålles i fackhandeln eller hos Distriparts.
Vattenskyddssystem För att skydda diskmaskinen mot vattenskador är den utrustad med ett vattenskyddssystem. I händelse av fel kopplas tömningspumpen in. Så kan inget vatten rinna ut. Restvattnet i apparaten pumpas automatiskt ur. 1 Vattenskyddssystemet fungerar också när apparaten är avstängd – den får emellertid inte vara bortkopplad från el-nätet.
Anslutningsteknik Tillopps- och avloppsslangar samt el-sladden måste anslutas till höger eller vänster om diskmaskinens sida då det inte finns plats för dessa bakom apparaten. Nedanstående exempel på en sanitär- och el-installation är endast en rekommendation. Avgörande är villkoren på uppställningsplatsen: (existerande anslutningar, el- resp. vattenverkets lokala anslutningsföreskrifter, etc...).
Konsumentkontakt Sverige Har du frågor angående produktens funktion eller användning ber vi dig att kontakta vår konsumentkontakt på tel. 08 - 672 53 50 eller via e-mail på vår hemsida www.husqvarna.se Reklamation Sverige Vid försäljning till konsument i Sverige gäller den svenska konsumentlagstiftningen. Kom ihåg att spara kvittot för eventuell reklamation. Garanti Finland Produkten har två (2) års garanti.
SERVICE OCH RESERVDELAR Har du frågor om eller vill beställa service eller reservdelar ber vi dig att kontakta återförsäljaren eller vår rikstäckande service på tel. 020 - 76 76 76 eller via e-mail på www.elektroservice.se. Se adressen till ditt närmaste servicekontor i telefonkatalogen Gula sidorna under Hushållsutrustning, vitvaror - service. 3 Innan du beställer service, kontrollera först om du kan avhjälpa felet själv.
822 945 962 - 00 - 0202 Husqvarna email: domestic@husqvarna.se www.husqvarna.