QCK8070W QCK8070X USER MANUAL EN User Manual Microwave combi-oven
www.husqvarna-electrolux.se CONTENTS 1. SAFETY INFORMATION................................................................................................... 3 2. SAFETY INSTRUCTIONS...................................................................................................5 3. PRODUCT DESCRIPTION.................................................................................................8 4. CONTROL PANEL........................................................................................
ENGLISH 1. 3 SAFETY INFORMATION Before the installation and use of the appliance, carefully read the supplied instructions. The manufacturer is not responsible for any injuries or damages that are the result of incorrect installation or usage. Always keep the instructions in a safe and accessible location for future reference. 1.
www.husqvarna-electrolux.se • • • • • • • • • • • • • • Always use oven gloves to remove or put in accessories or ovenware. Before carrying out any maintenance, disconnect the appliance from the power supply. Ensure that the appliance is switched off before replacing the lamp to avoid the possibility of electric shock. Do not use a steam cleaner to clean the appliance.
ENGLISH • • • • • • 5 warming pads, slippers, sponges, damp cloth and similar may lead to risk of injury, ignition or fire. If smoke is emitted, switch off or unplug the appliance and keep the door closed in order to stifle any flames. Microwave heating of beverages can result in delayed eruptive boiling. Care must be taken when handling the container. The contents of feeding bottles and baby food jars shall be stirred or shaken and the temperature checked before consumption, in order to avoid burns.
www.husqvarna-electrolux.se • • • • • • • • to be replaced, this must be carried out by our Authorised Service Centre. Do not let mains cables touch or come near the appliance door, especially when the door is hot. The shock protection of live and insulated parts must be fastened in such a way that it cannot be removed without tools. Connect the mains plug to the mains socket only at the end of the installation. Make sure that there is access to the mains plug after the installation.
ENGLISH 2.4 Care and cleaning WARNING! Risk of injury, fire, or damage to the appliance. • Before maintenance, deactivate the appliance and disconnect the mains plug from the mains socket. • Make sure the appliance is cold. There is the risk that the glass panels can break. • Replace immediately the door glass panels when they are damaged. Contact the Authorised Service Centre. • Make sure the cavity and the door are wiped dry after each use.
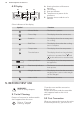
www.husqvarna-electrolux.se 3. PRODUCT DESCRIPTION 3.1 General overview 1 2 3 4 4 8 5 6 3 2 Control panel Display Heating element Microwave generator Lamp Fan Shelf support, removable Shelf positions 1 2 3 4 5 6 7 8 1 7 3.2 Accessories Baking tray Wire shelf For cakes and biscuits. For cookware, cake tins, roasts. 4. CONTROL PANEL 4.
ENGLISH 9 Use the sensor fields to operate the appliance. Sensor field 1 2 3 - Function Comment Display Shows the current settings of the appliance. ON / OFF To activate and deactivate the appliance. Heating Functions Touch the sensor field once to choose a heating or Assisted Cook- function or the menu: Assisted Cooking. Touch ing the sensor field again to switch between the menus: Heating Functions, Assisted Cooking. To activate or deactivate the light, touch the field for 3 seconds.
www.husqvarna-electrolux.se 4.2 Display A B C E D A. Heating function or Microwave function B. Time of day C. Heat-up indicator D. Temperature or power of the microwave E. Duration time or end time of a function Other indicators of the display: Symbol Function Minute Minder The function operates. Time of day The display shows the current time. Duration The display shows the necessary time for cooking. End Time The display shows when the cooking time is complete.
ENGLISH the language, the display contrast, the display brightness and the time of the day. 1. Press 2. Press or 11 to set the value. to confirm. 6. DAILY USE WARNING! Refer to Safety chapters. 6.1 Navigating the menus 1. Turn on the oven. 2. Press option. or to select the menu 3. Press to move to the submenu or accept the setting. Submenu for: Basic Settings Symbol / Menu item Set Time of Day Time Indication At each point you can go back to the main menu with Fast Heat Up . 6.
www.husqvarna-electrolux.se Symbol / Menu item Key Tones Alarm/Error Tones DEMO mode Service Factory Settings Description Activates and deactivates the tone of the touch fields. It is not possible to deactivate the tone of the ON / OFF touch field. Frozen Foods Activates and deactivates the alarm tones. Grill Activation / deactivation code: 2468. Resets all settings to factory settings.
ENGLISH Heating function Application To prepare tender, succulent roasts. Slow Cooking To bake bread. 13 6.5 Setting a heating function 1. Turn on the oven. 2. Select the menu: Heating Functions. 3. Press to confirm. 4. Select a heating function. 5. Press to confirm. 6. Set the temperature. 7. Press to confirm. Bread Baking Defrost This function can be used for defrosting frozen foods, such as vegetables and fruits. The defrosting time depends on the amount and size of the frozen food. 6.
www.husqvarna-electrolux.se The maximum setting of the time for the function: Duration is 90 minutes. You can change the microwave power (touch and then or ) and the function: Duration any time when the Microwave function operates. 5. When the set time ends, an acoustic signal sounds for 2 minutes. The Microwave function deactivates automatically. Touch any symbol to stop the acoustic signal. To deactivate the Microwave function, touch . If you touch or open the door, the function stops.
ENGLISH 15 7. CLOCK FUNCTIONS 7.1 Clock functions table Clock function Minute Minder 7.2 Setting the clock functions Application To set a countdown (max. 2 h 30 min). This function has no effect on the operation of the oven. You can also turn it on when the oven is turned off. Use to turn on the function. Press or to set the minutes and to start. Duration To set how long the oven works (max. 23 h 59 min). End Time To set the switch-off time for a heating function (max. 23 h 59 min).
www.husqvarna-electrolux.se 7.4 Time Extension The function: Time Extension makes the heating function continue after the end of Duration. Applicable to all heating functions with Duration or Weight Automatic. 1. When the cooking time ends, a signal sounds. Press any symbol. The display shows the message. 2. Press to turn on or to cancel. 3. Set the length of the function. 4. Press . 8. AUTOMATIC PROGRAMMES WARNING! Refer to Safety chapters. 8.
ENGLISH WARNING! Refer to "Hints and tips" chapter, Microwave suitable cookware and materials. 17 Wire shelf and baking tray together: Push the baking tray between the guide bars of the shelf support and the wire shelf on the guide bars above. Wire shelf: Push the shelf between the guide bars of the shelf support and make sure that the feet point down. Small indentation at the top increase safety. The indentations are also anti-tip devices.
www.husqvarna-electrolux.se 10. Press and hold to save. You can overwrite a memory position. When the display shows the first free memory position, press or and 10.4 Set + Go The function lets you set a heating function (or a programme) and use it later with one press of any symbol. press to overwrite an existing programme. 1. Turn on the oven. 2. Set a heating function. You can change the name of a programme in the menu: Edit Programme Name. 3.
ENGLISH display is lower between 10 PM and 6 AM. • Day brightness: – when the oven is turned on. – if you touch a symbol during the night brightness (apart from ON / OFF), the display goes back to the day brightness mode for the next 10 seconds. – if the oven os turned off and you set the function: Minute Minder. 19 When the function ends, the display goes back to the night brightness. 10.7 Cooling fan When the oven operates, the cooling fan turns on automatically to keep the surfaces of the oven cool.
www.husqvarna-electrolux.se 11.3 Microwave suitable cookware and materials For the microwave use only suitable cookware and materials. Use below table as a reference. Cookware / Material Microwave function Defrosting Heating, Cooking Microwave Combi function Ovenproof glass and porcelain with no metal components, e.g.
ENGLISH 11.4 Advice for special heating functions of the oven Keep Warm The function allows you to keep food warm. The temperature is set automatically to 80 °C. Plate Warming The function allows you to warm plates and dishes before serving. The temperature is set automatically to 70 °C. Place plates and dishes in stacks evenly on the wire shelf. Use the first shelf position. After half of the warming time switch their places. 21 11.5 Baking • Use the lower temperature the first time.
www.husqvarna-electrolux.se 11.
ENGLISH Food Function Temperature (°C) Time (min) Shelf position Swiss Roll1) Conventional Cooking 180 - 200 10 - 20 2 Cake with crumble topping (dry) True Fan Cook- 150 - 160 ing 20 - 40 1 Buttered almond cake / Conventional Cooking 190 - 210 20 - 30 2 sugar cakes1) Fruit flans (made with yeast dough / sponge True Fan Cook- 150 - 160 ing 35 - 55 1 Conventional Cooking 35 - 55 1 mixture)2) Fruit flans (made with yeast dough / sponge 170 mixture)2) Fruit flans made with short pas
www.husqvarna-electrolux.se Food Function Puff pastries1) Time (min) Shelf position True Fan Cook- 170 - 180 ing 20 - 30 1 Rolls1) Conventional Cooking 10 - 25 2 Small cakes / Small True Fan Cook- 160 ing 20 - 35 3 Conventional Cooking 20 - 35 2 cakes1) Small cakes / Small cakes1) Temperature (°C) 190 - 210 170 1) Preheat the oven. 11.
ENGLISH Food Temperature (°C) Time (min) Shelf position Dry streusel cake 150 - 160 30 - 45 1/3 25 1) Preheat the oven.
www.husqvarna-electrolux.se 11.
ENGLISH 27 Veal Food Function Quantity (kg) Power (Watts) Temperature (°C) Time (min) Shelf position Roast veal Turbo Grilling 1 200 160 - 180 50 - 70 1 1.5 - 2 200 160 - 180 75 - 100 1 Knuckle of Turbo veal Grilling Lamb Food Function Quantity (kg) Power (Watts) Temperature (°C) Time (min) Shelf position Leg of lamb, roast lamb Turbo Grilling 1 - 1.
www.husqvarna-electrolux.se Food Function Quantity (kg) Power (Watts) Temperature (°C) Time (min) Shelf position Savoury dishes with cooked ingredients (noodles, vegetables) True Fan Cooking - 400 - 600 160 - 180 20 - 45 1 Savoury dishes with raw ingredients (potatoes, vegetables) True Fan Cooking - 400 - 600 160 - 180 30 - 45 2 11.14 Grill • Always grill with the maximum temperature setting. • Set the shelf into the shelf position as recommended in the grilling table.
ENGLISH Food Temperature (°C) Time (min) Shelf position Pizza, chilled 210 - 230 13 - 25 3 Pizza Snacks, frozen 180 - 200 15 - 30 3 French Fries, thin1) 210 - 230 20 - 30 3 French Fries, thick1) 210 - 230 25 - 35 3 Wedges / Cro- 210 - 230 20 - 35 3 Hash Browns 210 - 230 20 - 30 3 Lasagne / Cannelloni, fresh 170 - 190 35 - 45 2 Lasagne / Cannelloni, frozen 160 - 180 40 - 60 2 Chicken Wings 190 - 210 20 - 30 3 29 quettes1) 1) Turn 2 or 3 times during roasting.
www.husqvarna-electrolux.se Food Quantity Defrosting time (min) Further deComments frosting time (min) Chicken 1 kg 100 - 140 20 - 30 Put the chicken on an upturned saucer in a big plate. Turn halfway through. Meat 1 kg 100 - 140 20 - 30 Turn halfway through. Meat 500 g 90 - 120 20 - 30 Turn halfway through.
ENGLISH 31 Vegetables Food Temperature (°C) Cooking time until simmering (min) Continue to cook at 100 °C (min) Carrots1) 160 - 170 50 - 60 5 - 10 Cucumbers 160 - 170 50 - 60 - Mixed pickles 160 - 170 50 - 60 5 - 10 Kohlrabi / Peas / Asparagus 160 - 170 50 - 60 15 - 20 1) Leave standing in the oven after it is deactivated. 11.
www.husqvarna-electrolux.se 11.20 Microwave cooking Tips for the Microwave Cooking/Defrosting Possible cause results Remedy The food is too dry. Next time select a lower power and a longer time. The power was too high. The time was too long. The food is still not The time was too short. defrosted, hot or cooked after the end of cooking time. Set a longer time. Do not increase the microwave power. The food is overheated at the edges but is still not ready in the middle.
ENGLISH Defrosting cakes / pastries Food Power (Watts) Time (min) Standing time (min) Yeast cake (1 piece) 200 2-3 15 - 20 Cheesecake (1 piece) 100 2-4 15 - 20 Dry cake (e.g. Pound cake) (1 200 piece) 2-4 15 - 20 Bread (1 kg) 200 15 - 20 5 - 10 Sliced bread (0,2 kg) 200 3-5 5 - 10 Bread rolls (4 pieces) 200 2-4 2-5 Food Power (Watts) Time (min) Standing time (min) Fruit (0.25 kg) 100 5 - 10 10 - 15 Food Power (Watts) Time (min) Standing time (min) Baby food in jars (0.
www.husqvarna-electrolux.se Cooking Food Power (Watts) Time (min) Standing time (min) Whole fish (0.5 kg) 500 8 - 10 2-5 Fish fillets (0.5 kg) 400 4-7 2-5 Vegetables, fresh (0.5 kg + 50 ml of water) 600 5 - 15 - Vegetables, frozen (0.5 kg + 50 ml of water) 600 10 - 20 - Jacked potatoes (0.5 kg) 600 7 - 10 - Rice (0.2 kg + 400 ml of water) 600 15 - 18 - Popcorn 1000 1:30 - 3 - Microwave Combi function Use this function to cook food in a shorter time and to brown it.
ENGLISH Power setting Use • 600 Watt • 500 Watt Defrosting and heating frozen meals Heating one-plate meals Simmering stews Cooking egg dishes • 400 Watt • 300 Watt Continuing to cook meals Cooking delicate food Heating baby food Simmering rice Heating delicate food Melting cheese, chocolate, butter • 200 Watt • 100 Watt Defrosting meat, fish Defrosting cheese, cream, butter Defrosting fruit and cakes Defrosting bread 35 11.
www.husqvarna-electrolux.se 12. CARE AND CLEANING WARNING! Refer to Safety chapters. 1 3 2 12.1 Notes on cleaning Clean the front of the oven with a soft cloth with warm water and a mild cleaning agent. To clean metal surfaces, use a dedicated cleaning agent. Clean the oven interior after each use. Fat accumulation or other food remains may result in a fire. Clean the cavity roof carefully from food residuals and fat. Clean all accessories after each use and let them dry.
ENGLISH 37 13.1 What to do if... Problem Possible cause Remedy You cannot activate or oper- The oven is not connected Check if the oven is correctly ate the oven. to an electrical supply or it is connected to the electrical connected incorrectly. supply (refer to the connection diagram if available). The oven does not heat up. The oven is deactivated. Activate the oven. The oven does not heat up. The clock is not set. Set the clock. The oven does not heat up. The necessary settings are not set.
www.husqvarna-electrolux.se We recommend that you write the data here: Model (MOD.) ......................................... Product number (PNC) ......................................... Serial number (S.N.) ......................................... 14. ENERGY EFFICIENCY 14.1 Energy saving Keep breaks between baking as short as possible when you prepare few dishes at one time. The oven contains features which help you save energy during everyday cooking.
ENGLISH 39
867336048-A-422017 www.husqvarna-electrolux.