Gebrauchs- & Pflegeanleitung Doppeltür-Kühlschrank 241737900 (0608)
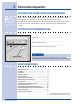
Informationsquellen BITTE DIESE ANLEITUNG LESEN UND AUFBEWAHREN Bitte heften Sie den Kaufbeleg an diese Seite, damit Sie ihn stets zur Verfügung haben. Vielen Dank, dass Sie Electrolux gewählt haben. Diese Gebrauchs- & Pflegeanleitung soll dazu beitragen, dass Sie lange Freude an Ihrem neuen Kühlschrank haben. Wir sehen diesen Verkauf als Beginn einer dauerhaften Beziehung zu Ihnen an. Bitte helfen Sie uns, Ihnen auch in Zukunft dienen zu können, indem Sie sich die folgenden Daten notieren.
Sicherheit WICHTIGE SICHERHEITSHINWEISE ! VORSICHT Bitte lesen Sie sämtliche Sicherheitshinweise, bevor Sie Ihren neuen Electrolux-Kühlschrank benutzen. Allgemeine Sicherheitsvorkehrungen • Bitte langern Sie kein Benzin und keine sonstige brennbare Flüssigkeiten in der Nähe dieses oder anderer Geräte. Suchen Sie auf den Produktetiketten nach Hinweisen bezüglich Flammbarkeit und sonstiger Gefahren. • Betreiben Sie den Kühlschrank nicht, wenn explosive Dämpfe präsent sind.
Sicherheit • Die Leistung kann gemindert sein, wenn die Spannung um mehr als 10% absinkt. Der Betrieb des Kühlschranks bei ungenügend hoher Spannung kann den Verdichter beschädigen. Ein solcher Schaden ist nicht von der Garantie gedeckt. • Benutzen Sie keine Steckdose, die durch einen Schalter stromlos gemacht werden kann, damit der Kühlschrank nicht aus Versehen ausgeschaltet wird. ! WICHTIG Wenn Sie den Kühlschrank stromlos machen möchten, ziehen Sie einfach den Netzstecker aus der Steckdose.
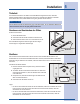
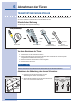
Installation 5 Türfreiheit Der Kühlschrank sollte in der Nähe einer Abstellfläche aufgestellt werden, damit die Nahrungsmittel einfacher herausgenommen können. Damit die Schubfächer und Körbe leicht zu benutzen sind, sollten beide Türen ganz geöffnet werden können. HINWEIS Soll der Kühlschrank mit den Scharnieren gegen eine Wand stehen, ist ein zusätzlicher Abstand zur Wand erforderlich, damit die Tür ganz geöffnet werden kann.
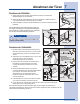
Abnehmen der Türen TRANSPORT DURCH ENGE STELLEN Wenn der Kühlschrank nicht durch eine Tür passt, können Sie seine Größe durch Abnehmen der Türen reduzieren. Messen Sie vorher die Breite der Tür.
Abnehmen der Türen 7 Abnehmen der Kühlteiltür: 1 Ziehen Sie eine Linie um das obere Scharnier. Diese Linie macht das Wiederanbringen der Tür einfacher. 2 Entfernen Sie die zwei Schrauben vom oberen Scharnier. Heben Sie die Tür vom unteren Scharnier und stellen Sie sie zur Seite. 3 Falls erforderlich, entfernen Sie die Schrauben vom unteren Scharnier und das Scharnier. Zum Wiederanbringen der Kühlschranktür folgen Sie den obigen Anweisungen in umgekehrter Reihenfolge.
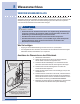
Wasseranschluss ÜBER DEN WASSERANSCHLUSS Der automatische Eis- & Wasserspender des Kühlschranks erfordert einen permanenten Wasseranschluss. Beim Aufstellen des Kühlschranks schließen Sie (oder ein Fachmann) die Wasserversorgung an, indem Sie vom Wasserleitungssystem des Hauses ein Kupferrohr zum Ventil auf der Rückseite des Kühlschranks verlegen. ! ACHTUNG Um Schäden zu vermeiden: • Verwenden Sie für den Wasseranschluss eine Kupferleitung (Plastikleitungen neigen zu Leckagen).
Wasseranschluss 9 8 Wickeln Sie das Kupferrohr wie gezeigt hinter dem Kühlschrank auf (etwa 2½ Windungen). Die Wicklung sollte den Kühlschrank oder andere Flächen nicht berühren, damit die Leitung nicht beschädigt wird. 9 Öffnen Sie das Wasserventil und ziehen Sie eventuell leckende Anschlüsse fest. HINWEIS Nach Fertigstellung des Wasseranschlusses entlüften Sie die Anlage (siehe Anweisung in dieser Anleitung).
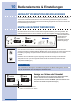
Bedienelemente & Einstellungen ABKÜHLZEIT VOR BENUTZUNG DES KÜHLSCHRANKS Damit die Nahrungsmittel nicht verderben, sollten Sie den Kühlschrank mit geschlossenen Türen 8 bis 12 Stunden laufen lassen, bevor Sie Nahrungsmittel darin lagern. Für diese Abkühlzeit sind die Bedienelemente bereits werkseitig eingestellt. Sie brauchen hierfür also keine Einstellungen vornehmen. EINSTELLEN KÄLTERER TEMPERATUREN Der Kühlschrank ist mit einem hochmodernen digitalen Bediensystem ausgestattet.
Bedienelemente & Einstellungen Einstellen der Temperatur Nachdem der Kühlschrank 24 Stunden gelaufen ist, können Sie die Temperaturen einstellen. Machen Sie kleine Änderungen und geben Sie dem Kühlschrank Zeit, sich auf die neue Temperatur zu stabilisieren. Im Folgenden finden Sie Hinweise zum Einstellen der Temperatur.
Bedienelemente & Einstellungen Reaktion auf Alarme (Tonsignale & Anzeigeleuchten) Folgende Alarme sind möglich: Alarm On Anzeigeleuchte Signalton (Leuchte ist aus) Stetig grün Zustand Maßnahme Das Alarmsystem ist nicht aktiv, während Gefrier- und Kühlteil auf die eingestellte Temperatur abkühlen. Wenn der Gefrier- und der Kühlteil die eingestellte Temperatur nicht in drei Stunden erreichen, ist ein anderer Alarm zu erwarten. Alarmsystem ist aktiviert. Keine Maßnahme erforderlich.
Bedienelemente & Einstellungen 13 Überprüfen des Luftfilters Der Frischhaltefilter des Kühlschranks muss von Zeit zu Zeit ausgewechselt werden. Wenn Sie Air Filter On/Off drei Sekunden lang drücken, wird der Status des Luftfilters angezeigt. Überprüfen des Status des Luftfilters: 1 Drücken Sie den Knopf Air Filter On/Off.
Lagerelemente FREITRAGENDE REGALE ! ACHTUNG Die Regale sind vorsichtig zu behandeln, damit sie nicht brechen und jemanden verletzen. Die Regale im Gefrierteil und im Teil für die frischen Nahrungsmittel können einfach verstellt werden. Die Regale werden von Trägern gehalten, die hinten an Langlöchern befestigt sind. Freitragendes Glasregal Verstellen der Regale: 1 Nahrungsmittel von dem zu verstellenden Regal entfernen. 2 Regal vorne anheben. 3 Regal herausziehen.
Lagerelemente 15 SCHUBFÄCHER Der Kühlschrank ist mit verschiedenen Schubfächern ausgestattet. Diese befinden sich normalerweise in festen Positionen im Kühlteil. Frischhaltefächer In den Frischhaltefächern wird Obst, Gemüse usw. aufbewahrt. Bevor Sie ein Nahrungsmittel in das Frischhaltefach legen: • Waschen Sie es in sauberem Wasser und lassen sie es abtropfen. Frischhaltefach • Wickeln Sie stark riechende und stark wässrige Nahrungsmittel ein.
Lagerelemente TÜREN Staufächer In die Tür des Gefrierteils und des Kühlteils sind verschiedene Staufächer integriert. Alle diese Staufächer sind abnehmbar und können darum leicht gereinigt werden. Einige sind in festen Positionen angebracht, während andere verstellt werden können. In diesen Türstaufächern lassen sich am besten Gläser, Flaschen, Dosen und große Getränkebehälter aufbewahren. Auch ist die schnelle Auswahl unter oft verwendeten Dingen hier sehr einfach.
Lagerelemente 17 ZUBEHÖR Halterung für hohe Flaschen Diese Halterung hindert hohe Behälter daran, beim Öffnen oder Schließen der Kühlschranktür nach vorn zu fallen. Die Halterung wird installiert, indem ihre Enden über die Kante des Staufachs geschoben wird (siehe Abbildung). Halterung für hohe Flaschen Spezialregal Die innovative Anordnung des Spezialregals erlaubt die Lagerung eines DosenSechspacks, einer Flasche Wein, einer Zweiliter-Getränkeflasche oder eines Eierkartons.
Automatischer Eis- & Wasserspender BENUTZUNG DES SPENDERS Zum automatischen Eis- & Wasserspender gehört eine Bedientafel, ein Spendefach und zwei Paddel, mit denen der Eis- oder der Wasserspender durch Gegendrücken mit einem Glas eingeschaltet wird. Die Bedientafel wird nur für den Eis- und nicht für den Wasserspender benötigt. Außerdem erfolgt von hier aus das Ein- und Ausschalten der Beleuchtung, die Filterüberwachung und die Einstellung der Geschwindigkeit der Eisproduktion und des Einfrierens.
Automatischer Eis- & Wasserspender BENUTZUNG DER SPENDER-BEDIENTAFEL Knopf und Anzeigeleuchte Cube Knopf drücken, um Eiswürfel zu entnehmen. Der Knopf leuchtet blau auf. Glas oben gegen den Eisspendepaddel drücken, um das Eis aufzufangen. Knopf und Anzeigeleuchte Crush Knopf drücken, um zerkleinerte Eiswürfel zu entnehmen. Der Knopf leuchtet blau auf. Glas oben gegen den Eisspendepaddel drücken, um das Eis aufzufangen.
Automatischer Eis- & Wasserspender ENTLÜFTEN DER WASSERVERSORGUNG Zum Wassersystem des Kühlschranks gehören verschiedene Rohrleitungen, ein Wasserfilter, ein Verteilerventil und ein Reservetank, der dafür sorgt, dass dem Eis- und Wasserspender stets genügend Wasser zur Verfügung steht. Wenn das System an die Hauswasserleitung angeschlossen wird, muss es entlüftet werden. ! ACHTUNG Der Wasserdruck muss zwischen 1,4 und 6,9 Bar liegen, damit der Spender richtig funktionieren kann.
Automatischer Eis- & Wasserspender Benutzung des Eisspenders nach Installation Vor der ersten Benutzung der Eismaschine muss das Wassersystem entlüftet werden (siehe oben). Wenn die neue Wasserzuleitung nicht entlüftet wird, läuft die Eismaschine zwei bis drei Mal ohne Eis zu produzieren. Außerdem können die ersten Eiswürfel schmutzig sein und schlecht schmecken. Ein- und Ausschalten des Eisspenders Die Eismaschine wird mit dem On/Off-Schalter ein- und ausgeschaltet.
Automatischer Eis- & Wasserspender Reinigen des Eisspenders Reinigen Sie die Eismaschine und den Eisbehälter regelmäßig, insbesondere vor einer Urlaubsreise und vor einem Umzug. ! ACHTUNG Beim Herausnehmen des Eisbehälters sollten Sie nicht die Eisrutsche (unter der Vorderseite des Behälters befindlich) als Griff benutzen. Die Eisrutsche kann scharfe Kanten haben. Reinigen des Eisspenders: 1 Schalten Sie die Eismaschine mit dem Off/On-Schalter aus.
Auswechseln der Filter WO DIE FILTER ZU FINDEN SIND Der Kühlschrank ist mit einem Wasserfilter und einem separaten Luftfilter ausgestattet. Der Wasserfilter filtert das Spenderwasser und das Wasser für die Eismaschine. Der Luftfilter entfernt Gerüche und Staub aus dem Kühlteil. Wasserfilter Wasserfilter Der Wasserfilter befindet sich oben im Kühlteil neben der Bedientafel. Informationen über das Auswechseln des Filters finden Sie weiter oben.
Auswechseln der Filter AUSWECHSELN DES WASSERFILTERS Normalerweise sollte der Wasserfilter alle sechs bis neun Monate gewechselt werden, damit eine gute Wasserqualität gewährleistet ist. Auf der Spender-Bedientafel befindet sich die Leuchte Filter Status, die nach Durchlauf von 1514 Litern Wasser anzeigt, dass der Filter gewechselt werden sollte. Wenn der Kühlschrank für längere Zeit nicht benutzt wurde (z. B. wegen eines Umzugs), erneuen Sie den Filter, wenn Sie den Kühlschrank wieder aufstellen.
Auswechseln der Filter 25 1 Schalten Sie die Eismaschine aus (siehe weiter oben). 2 Drücken Sie den Entriegelungsknopf rechts, um die Patrone zu entriegeln. 3 Ziehen Sie die Filterpatrone gerade aus dem Filtergehäuse heraus und entsorgen Sie sie. Filter-patrone Herausziehen 4 Nehmen Sie die neue Filterpatrone aus ihrer Verpackung und schieben Sie sie vorsichtig in das Filtergehäuse, bis sie einrastet. 5 Fest hineindrücken, bis die Patrone einrastet.
Lebensmittellagerung & Energieeinsparung Fleisch • Rohes Fleisch und Geflügel sollte so verpackt sein, dass es nicht lecken kann, damit andere Nahrungsmittel und der Kühlschrank nicht durch ausfließenden Saft verunreinigt werden. • Fleisch ist für kurze Zeit am besten im Fleischfach zu lagern. Soll Fleisch länger als zwei Tage aufbewahrt werden, sollte es eingefroren werden. Lagerung von gefrorenen Nahrungsmitteln • Die Temperatur im Gefrierteil sollte nicht über -18° C steigen.
Normale Betriebsgeräusche & normales Aussehen NORMALE GERÄUSCHE Mit dem neuen energiesparenden Kühlschrank kommen neue Geräusche ins Haus. Diese Geräusche weisen normalerweise darauf hin, dass der Kühlschrank normal arbeitet. Bestimmte Böden, Wände und Küchenschränke können diese Geräusche verstärken. HINWEIS Der Kühlschrank ist mit einem energiesparenden Schaum isoliert, der keine geräuschdämmenden Eigenschaften hat.
Pflege & Reinigung SCHÜTZEN SIE IHRE INVESTITION Halten Sie Ihren Kühlschrank sauber, dann sieht er immer gut aus und es bilden sich keine Gerüche. Wischen Sie verschüttete Flüssigkeiten sofort auf und reinigen Sie den Gefrier- und den Kühlteil mindestens zweimal im Jahr. Beim Reinigen sollten Sie Folgendes beachten: • Benutzen Sie keine Stahlwolle, Bürsten, Scheuermittel und starken Laugen. • Waschen Sie die abnehmbaren Teile nicht in der Geschirrspülmaschine.
Pflege & Reinigung TIPPS ZUR PFLEGE & REINIGUNG Teil Reinigungsmittel Tipps und Vorsichtsmaßnahmen Innenraum & Türverkleidung • Seifenwasser • Natronlauge • Zwei Esslöffel Natron in 1 Liter Wasser auflösen • Die Bedienelemente, Leuchten und sonstigen elektrischen Teile dürfen nicht mit einem triefend nassen Tuch gereinigt werden. Türdichtungen • Seifenwasser • Mit einem weichen Tuch reinigen. Schubfächer & Staufächer • Seifenwasser • Schienen mit einem weichen Tuch abwischen.
Pflege & Reinigung AUSWECHSELN DER GLÜHLAMPEN Sowohl der Gefrierteil als auch der Kühlteil haben eine Beleuchtung, deren Glühlampen ab und zu ausgewechselt werden müssen. Einige der Leuchten haben eine Abdeckung, die dafür entfernt werden muss. Verwenden Sie stets Glühlampen, die für Haushaltsgeräte vorgesehen sind. Auswechseln einer Glühlampe: ACHTUNG ! Beim Auswechseln einer Glühlampe sollten Sie Handschuhe tragen, damit Sie sich nicht schneiden.
Lösung einfacher Probleme BEVOR SIE UNS ANRUFEN . . . Wenn der Kühlschrank nicht richtig zu funktionieren scheint, lässt sich ein unnötiger Anruf beim Kundendienst oft vermeiden, indem Sie zuerst in diesem Abschnitt nach der Lösung des Problems suchen. Die Informationen beziehen sich auf häufig auftretende Probleme, Ursachen und Lösungen. Betrieb des Kühlschranks Problem Ursache Korrektur Verdichter läuft nicht. • Kühlsystem ist ausgeschaltet. • Kühlsystem einschalten.
Lösung einfacher Probleme Temperaturen sind zu kalt Problem Ursache Korrektur Gefrierteil zu kalt. Temperatur des Kühlteils ist normal. • Temperatur des Gefrierteils zu kalt eingestellt. • Wärmere Temperatur für den Gefrierteil wählen. Es braucht 24 Stunden, bis die Temperatur sich stabilisiert hat. Kühlteil zu kalt. Temperatur des Gefrierteils ist normal. • Temperatur des Kühlteils zu kalt eingestellt. • Wärmere Temperatur für den Kühlteil wählen.
Lösung einfacher Probleme Wasser, Feuchtigkeit oder Frost außen am Kühlschrank Problem Ursache Korrektur Außen am Kühlschrank oder zwischen den Türen schlägt sich Feuchtigkeit nieder. • Das Wetter ist schwül. • Tür ist nicht ganz geschlossen, sodass kalte Innenluft auf warme Außenluft trifft. • Bei hoher Luftfeuchtigkeit ist das normal. Wenn die Luftfeuchtigkeit absinkt, sollte die Feuchtigkeit verschwinden. • Siehe Problemabschnitt Öffnen und Schließen der Türen und Schubfächer.
Lösung einfacher Probleme Eisspender Problem Ursache Korrektur Spender spendet kein Eis. • Es wurde kein Wasseranschluss vorgesehen. • Der Eisbehälter ist leer. • Wasserversorgung anschließen. • Temperatur des Gefrierteils zu warm eingestellt. • Hauptwasserhahn geschlossen. • Tür des Gefrierteils ist nicht geschlossen. • Der Fühlerarm des Eisspenders wurde über 5 Minuten nach unten gedrückt. Eisspender ist blockiert.
Lösung einfacher Probleme Gerüche im Kühlschrank Problem Ursache Korrektur Das Innere ist schmutzig. • Das Innere bedarf einer Reinigung. • Es befinden sich stark riechende Nahrungsmittel im Kühlschrank. • Siehe „Tipps zur Pflege & Reinigung“. • Nahrungsmittel luftdicht einpacken. Öffnen und Schließen von Türen und Schubfächern Problem Ursache Korrektur Tür schließt nicht. • Eine Tür wurde zu fest zugeschlagen, sodass die andere sich leicht öffnete. • Kühlschrank steht nicht genau horizontal.