
Operation Manual


13
1
12
3
4
A
B
C
Getting ready to sew
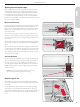
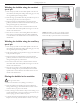
Needle threader
The needle must be in the up position to use the built-in needle
threader. We also recommend lowering the presser foot.
1. Use the handle to pull the needle threader all the way down,
catching the thread under the guide (A).
2. Push back to bring the needle threader forward until the metal
fl anges cover the needle. A small hook will pass through the
needle eye (B).
3. Place the thread under the fl anges in front of the needle, so
the thread catches into the small hook (C).
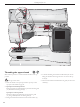
4. Let the needle threader gently swing back. The hook pulls the
thread through the needle eye and forms a loop behind the
needle. Pull the thread loop out behind the needle.
5. Place the thread under the presser foot.
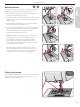
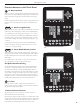
NOTE: The needle threader is designed to be used for size
70-120 needles. You cannot use the needle threader for
size 60 needles or smaller, the wing needle, twin needle,
triple needle or when the Sensor Buttonhole Foot is on.
There are also some other optional accessories that require
manual threading of the needle.
When threading the needle manually, make sure that the
needle is threaded from front to back. The white presser
foot ankle makes it easy to see the eye of the needle. The
bobbin case cover can be used as a magnifying glass.
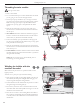
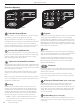
Cutting the thread
Once you have fi nished sewing, you can cut the threads by raising
the presser foot and draw the threads to the left side of the
machine through the thread cutter.