
Operation Manual

21
2
1
2
3
9
4
5
6
7
8
10
11
12
13
15
14
17
16
Operating the machine
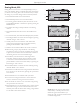
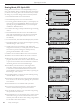
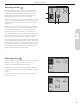
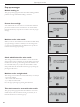
Sewing Mode, 830
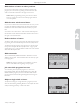
Sewing Mode is the fi rst view on the GraphicDisplay after you
turn on the machine. Here you will fi nd all the basic information
you need to start sewing. This is also the menu where you adjust
the settings of your stitch. Straight stitch is selected by default.
1. Recommended needle for the selected fabric.
2. Recommended presser foot for the selected stitch.
3. The sewing speed is indicated by three levels shown on the
GraphicDisplay. Reduce or increase the speed by pressing the
SPEED button.
4. The fabric and sewing technique selected on the Sewing
Advisor.
5. Recommended thread tension for the selected fabric and
stitch.
6. The selected stitch, both illustrated and displayed by number.
7. Stitch length. Reduce or increase the stitch length by pressing
the Stitch Length – and + buttons.
8. Needle position is shown instead of stitch width when
straight stitch is selected. Change the needle position by
pressing the Stitch Width – and + buttons.
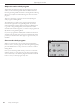
9. Indicates that the function Mirror side to side is activated.
10. When sewing a step by step buttonhole or the darning
program the reverse icon is shown to indicate that you need
to press the reverse button when the buttonhole columns or
the darning stitch are sewn to the desired length.
11. Stitch density is shown instead of stitch length when a
buttonhole, bartack or darning stitch is selected or when
a satin stitch is selected and the Alternate View button is
pressed. Reduce or increase the stitch density by pressing the
Stitch Length – and + buttons.
12. Stitch width. Reduce or increase the stitch width by pressing
the Stitch Width – and + buttons.
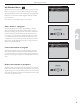
13. Buttonhole size indication when using the Sensor Buttonhole
Foot. Set the size of the button by pressing the up and down
arrow buttons.
14. Recommendation to use stabilizer under your fabric.
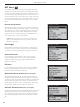
15. The icon for lowering the feed teeth is shown when free
motion is activated or sewing on buttons is selected.
16. Set the number of stitches to sew on the button by pressing
the up and down arrow buttons.
17. Recommendation to use the clearance plate to create a thread
shank when sewing on a button. Place the thin end of the
clearance plate under the button when sewing on light fabrics.
Use the thick end for heavier fabrics.
NOTE: When the value for stitch length/
width/density or needle position is set to
default the fi gures will be black. If you
change the value, the fi gures will be inverted
on a black background.
Sensor Buttonhole
Normal Sewing Mode, Straight stitch
Manual Buttonhole
Sewing on button
Normal Sewing Mode, Decorative stitch