
Manual

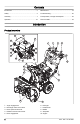


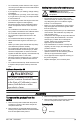
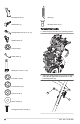


Table Of Contents
- Contents
- Introduction
- Safety
- Assembly
- Operation
- Before you start the product
- To fill the engine with oil
- To fill fuel
- To adjust the discharge chute and the chute deflector
- To start the engine, manual start
- To start the engine, electric start
- To operate the product
- To stop the product
- To use the throttle control
- To use the fuel switch
- To use the choke control
- To adjust the skid plates
- To prevent freeze-up after use
- To get a good result
- Maintenance
- Introduction
- Maintenance schedule
- To do a general inspection
- To do a check of the oil level
- To replace the engine oil
- To lubricate the product
- Muffler
- To examine the spark plug
- To inspect the augers and the scraper bar
- To replace the auger shear pins
- To replace the impeller shear pins
- To examine the tires
- To clear a clogged discharge chute deflector
- To replace the scraper bar
- Drive belts
- To adjust the tension of the cable for the discharge chute deflector
- To adjust the auger control cable
- To remove the wheels
- To clean the product
- Troubleshooting
- Transportation, storage and disposal
- Technical data

F
L
M
B
A
D
K
C
E
G
4. Attach the lever control knobs (N) by pressing
them down on the control levers (O).
O
N
Operation
Before you start the product
• Keep persons and animals away from the work
area.
• Do daily maintenance. See
Maintenance
schedule on page 14
.
• Make sure the ignition lead fits correctly on the
spark plug.
• Add oil or gasoline, if necessary. See
Technical
data on page 23
.
To fill the engine with oil
CAUTION: Do not rotate the dipstick
when you check the oil. Do not fill above
the mark.
1. Remove the oil cap and clean the dipstick. See
Product overview on page 2
for the location of
the dipstick.
2. Add oil to the top mark on the dipstick. Use the
dipstick to do a check of the oil level at regular
intervals.
3. Put the oil cap back.
To fill fuel
If available, use low-emission/alkylate gasoline. If
low-emission/alkylate gasoline is not available, use
good quality unleaded gasoline or leaded gasoline.
Use gasoline with an octane number of 90 RON out
of North America (87 AKI in North America) or
higher, and with a maximum of 10% ethanol (E10).
CAUTION:
Do not use gasoline with an
octane number less than 90 RON out of
North America (87 AKI in North
America). This can cause damage to the
product.
1. Open the fuel tank cap slowly to release the
pressure.
2. Fill slowly with a fuel can. If you spill fuel, remove
it with a cloth and let remaining fuel dry off.
3. Clean the area around the fuel tank cap.
4. Tighten the fuel tank cap fully. If the fuel tank cap
is not tightened, there is a risk of fire.
5. Move the product a minimum of 3 m (10 ft) from
the position where you filled the tank, before a
start.
To adjust the discharge chute and
the chute deflector
1. To adjust the discharge chute position, move the
discharge chute control lever (A) back and to the
left or right direction.
2. To adjust the snow throwing distance of the
chute deflector, move the deflector remote
control lever (B) down to decrease the distance
and up to increase the distance.
AB
10 694 - 006 - 12.05.2020