T540XP II EN Operator's manual 2-31
Contents Introduction..................................................................... 2 Troubleshooting............................................................ 27 Safety..............................................................................4 Transportation and storage...........................................28 Assembly........................................................................ 9 Technical data.............................................................. 28 Operation....
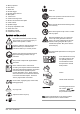
15. Bar tip sprocket 16. Saw chain 17. Guide bar 18. Throttle trigger 19. Throttle trigger lockout 20. Belt eyelet 21. Clutch cover 22. Chain tensioning screw 23. Product and serial number plate 24. Chain catcher 25. Spiked bumper 26. Oil pump adjustment screw 27. Guide bar cover 28. Operator's manual 29. Combination wrench Symbols on the product Be careful and use the product correctly. This product can cause serious injury or death to the operator or others.
EU V WARNING: Tampering with the engine voids the EU type-approval of this product. Safety Safety definitions The definitions below give the level of severity for each signal word. dealer or an experienced chainsaw user. Do not attempt any task that you feel unsure of! Safety instructions for operation WARNING: Read the warning instructions that follow before you use the product. WARNING: Injury to persons. • CAUTION: Damage to the product. Note: This information makes the product easier to use.
• • • • • or anything that could affect your vision, alertness, coordination or judgement. Do not use the product in bad weather such as dense fog, heavy rain, strong wind, intense cold, etcetera. Working in bad weather is tiring and often brings added risks, such as icy ground, unpredictable felling direction, etcetera.
exercise care and use your common sense. Avoid all situations which you consider to be beyond your capability. If you still feel uncertain about operating procedures after reading these instructions, you should consult an expert before continuing. Do not hesitate to contact your dealer or Husqvarna if you have any questions about the use of the chainsaw. We will willingly be of service and provide you with advice as well as help you to use your chainsaw both efficiently and safely.
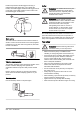
handle and press the throttle trigger lockout (A), it releases the throttle trigger (B). If you release the handle, the throttle trigger and the throttle trigger lockout move back to their initial positions. This function locks the throttle trigger at idle speed. Muffler WARNING: The muffler becomes very hot during/after operation and at idle speed. There is a risk of fire, especially when you operate the product near flammable materials and/or fumes.
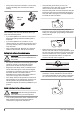
• Always move the product at least 3 m (10 ft) away from the refuelling area and fuel source before starting. • • Use protective gloves when you use or do maintenance on the saw chain. A saw chain that does not move can also cause injuries. Keep the cutting teeth correctly sharpened. Obey the instructions and use the recommended file gauge. A saw chain that is damaged or incorrectly sharpened increases the risk of accidents. Min. 3m (10 ft) • Keep the correct depth gauge setting.
Assembly Introduction 6. Align the hole in the guide bar with the chain adjuster pin and install the clutch cover. WARNING: Read and understand the safety chapter before you assemble the product. To assemble the guide bar and saw chain 1. Disengage the chain brake. 2. Loosen the bar nut and remove the clutch cover. Note: If the clutch cover is not easy to remove, tighten the bar nut, engage the chain brake and release. A click is heard if it is released correctly. 3.
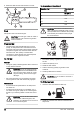
9. Make sure that the saw chain tension is correct. 2 3 Gasoline, liter 1 4 To mix gasoline and two-stroke oil Two-stroke oil, liter 2% (50:1) 9 5 7 6 5 0.10 10 0.20 15 0.30 20 0.40 8 Fuel This product has a two-stroke engine. CAUTION: Incorrect type of fuel can result in engine damage. Use a mixture of gasoline and two-stroke oil. CAUTION: Small errors can influence the ratio of the mixture drastically when you mix small quantities of fuel.
3. Tighten the fuel tank cap carefully. 4. Move the product 3 m/10 ft or more away from the refueling area and fuel source before starting. Note: To see where the fuel tank is on you product, refer to Product overview on page 2. To do a run-in • During the first 10 hours of operation, do not apply full throttle without load for extended periods. To use the correct chain oil WARNING: Do not use waste oil, which can cause injury to you and the environment.
Common questions about kickback • • • Will the hand always engage the chain brake during a kickback? 1. Move the front hand guard forward to engage the chain brake. No. It is necessary to use some force to push the front hand guard forward. If you do not use the force necessary, the chain brake will not be engaged. You must also hold the handles of the product stable with two hands during work. If a kickback occurs, it is possible that the chain brake does not stop the saw chain before it touches you.
1. Move the front hand guard forward to engage the chain brake. 2. Push the air purge bulb about 6 times or until fuel starts to fill the bulb. It is not necessary to fill the air purge bulb completely. 4. Pull the starter rope handle slowly with your right hand until you feel resistance. WARNING: Do not twist the starter cord around your hand. CAUTION: Do not pull the starter rope to full extension and do not let go of the starter rope handle.
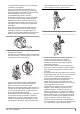
To start the product in the tree Note: Make sure that you have sufficient fuel before you start the product. 1. Engage the chain brake. 2. Hold the product on the left or right side of your body when you start the product. a) If you hold the product on your left side, put your left hand on the front handle. Hold the starter rope handle with your right hand and thrust the product away from your body when you start the product.
1. Before you disconnect the safety strop from the ascent tools, you must attach the product to the harness. Attach the product to the harness through the belt eyelet or a steel ring on the safety strop. To prepare the product for operation in the tree Ground operator As a ground operator, do the following steps. 1. Examine the product. 2. Fill the fuel and chain oil tanks. 3. Attach the end of an approved safety strop to the rope eyelet.
• Make sure that you are stable on your feet and keep a low lateral force when you cut vertical branches. Steer the safety line through a different connection point to remove or prevent increasing lateral forces. You can also use an adjustable strop directly from the harness to a different connection point. WARNING: You must engage the chain brake when you lower the product onto its strop. To remove a trapped product 1. Stop the product. 2.
Maintenance Introduction WARNING: Read and understand the safety chapter before you do maintenance on the product. Maintenance schedule Daily maintenance Weekly maintenance Monthly maintenance Clean the external parts of the product and make sure that there is no oil on the handles. Clean the cooling system. Refer to Do a check of the brake band. Refer to To do a check of the brake band on page 18. To clean the cooling system on page 26.
Daily maintenance Weekly maintenance Monthly maintenance Make sure that these are no fuel leaks from the engine, tank or fuel lines. Make sure that the saw chain does not rotate when the engine is at idle speed. Make sure that the muffler is correctly attached, has no damages and that no parts of the muffler are missing. Maintenance and checks of the safety devices on the product 2. Hold the product tightly. To do a check of the brake band 1.
To do a check of the throttle trigger and the throttle trigger lockout 2. Make sure that the chain catcher is stable and attached to the body of the product. 1. Make sure that the throttle trigger and throttle trigger lockout move freely and that the return spring works correctly. To do a check of the vibration damping system 1. Make sure that there are no cracks or deformation on the vibration damping units. 2.
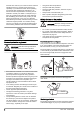
to weather conditions, altitude, gasoline and the type of two-stroke oil. CAUTION: If AutoTune™ does not work correctly, speak to your servicing dealer. The product adjusts correctly after some fuelings. 7. Pull the starter rope until 1 cm of the spring guide is shown. At the same time, press down the starter handle cover and remove it from the starter rope handle. To replace a broken or worn starter rope 1. Loosen the screws to the starter housing. 1 cm/0.5 in 2. Remove the starter housing.
14. Push down the knot into position in the spring guide (B). 3. Tighten the screws that hold the starter. 1 cm/0.5 in A B To clean the air filter 15. Pull the starter rope until 1 cm of the spring guide is shown. At the same time, assemble the starter handle cover. Clean the air filter from dirt and dust regularly. This prevents carburetor malfunctions, starting problems, loss of engine power, wear to engine parts and more fuel consumption than usual. 1.
2. Clean the spark plug if it is dirty. • Number of drive links. The number of drive links is decided by the type of guide bar. • Bar groove width, in/mm. The groove width in guide bar must be the same as the chain drive links width. • Chain oil hole and hole for chain tensioner. The guide bar must align with product. • Drive link width, mm/in. 3. Make sure that the electrode gap is 0.50 mm/0.020 in. 4. Replace the spark plug monthly or more frequently if necessary.
difference in height between the two gives the cutting depth (depth gauge setting). A To sharpen the cutters 1. Use a round file and a file gauge to sharpen the cutting teeth. B When you sharpen the cutter, think about the following: • Filing angle. Note: Refer to Filing equipment and filing angles on page 30 for information about which file and gauge that Husqvarna recommends for your saw chain. 2. Apply the file gauge correctly on to the cutter. Refer to the instruction supplied with the file gauge.
To adjust the depth gauge setting Before you adjust the depth gauge setting or sharpen the cutters, refer to Information about the guide bar and saw chain on page 22, for instructions. We recommend you to adjust the depth gauge setting after each third operation that you sharpen the cutting teeth. 3. Lift the front of the guide bar and turn the chain tensioning screw. Use a wrench. 4. Tighten the saw chain until it is tight against the guide bar but still can move easily.
4. If the saw chain lubrication does not operate correctly, do a check of the guide bar. Refer to To do a check of the guide bar on page 25 for instructions. Speak to your servicing dealer if the maintenance steps does not help. To examine the cutting equipment 1. Make sure that there are no cracks in rivets and links and that no rivets are loose. Replace if it is necessary. To do a check of the spur sprocket The clutch drum has a spur sprocket that is welded on the clutch drum. 2.
4. Examine the groove in the guide bar for wear. Replace the guide bar if it is necessary. To adjust the chain oil flow WARNING: Stop the engine before you make adjustments to the oil pump. 1. Turn the adjustment screw for the oil pump. Use a screwdriver or combination wrench. 5. Examine if the guide bar tip is rough or very worn. 6. Make sure that the bar tip sprocket turns freely and that the lubricating hole in the bar tip sprocket is not blocked. Clean and lubricate if it is necessary.
Troubleshooting The engine does not start Product part to examine Possible cause Action Starter pawls The starter pawls are blocked. Adjust or replace the starter pawls. Clean around the pawls. Speak to an approved service workshop. Fuel tank Ignition, no spark Incorrect fuel type. Drain the fuel tank and fill with correct fuel. The fuel tank is filled with chain oil. If you have tried to start the product, speak to your servicing dealer.
Transportation and storage Transportation and storage • • To prepare your product for long-term storage For storage and transportation of the product and fuel, make sure that there are no leaks or fumes. Sparks or open flames, for example from electrical devices or boilers, can start a fire. Always use approved containers for storage and transportation of fuel. Empty the fuel and chain oil tanks before transportation or before long-term storage.
Husqvarna T540XP II Sound power level, guaranteed LWA dB(A) 116 Sound levels 3 Equivalent sound pressure level at the operator’s ear, dB(A) 104 Equivalent vibration levels, a hveq 4 Front handle, m/s2 3.5 m/s2 4.2 Rear handle, Saw chain/guide bar Type of drive sprocket/number of teeth Spur 6 Saw chain speed at 133% of maximum engine power speed, m/s. 25.
Filing equipment and filing angles Use a Husqvarna file gauge to sharpen the saw chain. A Husqvarna file gauge makes sure that you get the correct filing angles. The part numbers are given in the table below. 30 If you are not sure how to identify the type of saw chain on your product, refer to www.husqvarna.com for more information. H37 5/32 in / 4.0 mm 579 65 36-01 0.025 in / 0.65 mm 30° 80° H36 5/32 in / 4.0 mm 505 24 37-01 0.025 in / 0.65 mm 30° 80° S93G 5/32 in / 4.
EC Declaration of Conformity EC Declaration of conformity Husqvarna AB, SE-561 82 Huskvarna, Sweden, tel: +46-36-146500, declares under sole responsibility that the chainsaw for tree-service Husqvarna T540XP II from 2016’s serial numbers and onwards (the year is clearly stated in plain text on the type plate with subsequent serial number), are in conformity with the requirements of the COUNCIL’S DIRECTIVES: • • • • of May 17, 2006 ”relating to machinery” 2006/42/EC.
www.husqvarna.