
User Guide


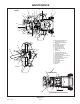
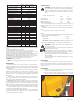
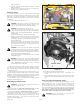

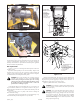
Table Of Contents

NOTES:
1. Initial oil change is after 5 hours of operation. Thereafter, change oil after every 40
hours operation. Change more often under dusty or dirty conditions and during hot weather
periods.
2. Torque initially and after first 2 hours of operation.
3. Perform initial hydraulic filter change after 50 hours (one week) of operation.
4. Change engine oil filter per the engine manufacturer’s recommendations. Refer to
Engine Owner’s Manual for recommendations and other maintenance items.
5. Service more often under dusty or dirty conditions. Use caution when servicing to prevent
dust contamination in the engine. Do not clean filter element. Replace with a new one.
6. Pump drive belt only - Inspect every 100 hours and replace if worn or cracking is
noticed. Otherwise, replace every 400 hours or 2 years whichever comes first.
7. Check fuel line hoses, fuel valve and grommet for any cracks or leaks.
REFERENCES:
a — Refer to Engine Owner’s Manual
NOTE: After completing maintenance cycle (500 hours), repeat cycle.
Introduction
Regular maintenance is the best prevention for costly downtime or
expensive, premature repair. The following pages contain suggested
maintenance information and schedules which the operator should follow
on a routine basis.
Remain alert for unusual noises, they could be signaling a problem.
Visually inspect the machine for any abnormal wear or damage. A good
time to detect potential problems is while performing scheduled
maintenance service. Correcting the problem as quickly as possible is the
best insurance.
Clear away heavy build-up of grease, oil and dirt, especially in the
engine and hydraulic reservoir area; minute dust particle are abrasive to
close-tolerance engine and hydraulic assemblies.
Daily inspect mower for grass clippings and wire and string tangles.
The underside of the mower deck will collect a build-up of grass clippings
and dirt, especially when grass is wet or has high moisture content. This
build-up will harden, restricting blade and air movement and will probably
show a poorer quality of cutting. Therefore it should be removed routinely.
To do this it will be necessary to raise and block the deck in the full up
position and scrape the build-up from underneath.
Some repairs require the assistance of a trained service mechanic and
should not be attempted by unskilled personnel. Consult your Hustler
service center when assistance is needed.
Torque values
WARNING: Particular attention must be given to tightening the
drive wheel lug nuts, wheel motor nuts, and blade spindle bolts.
Failure to correctly torque these items may result in the loss of a
wheel or blade, which can cause serious damage or personal
injury.
Torque values given below:
Ft-lbs. Nm
Wheel (lug) nuts..................................................65-75 ............88.14-101.7
Wheel motor nut ............................................290-310 ...........393.2-420.4
Blade spindle bolt top . . . . . . . . . . . . . . . . . . .118 ..................160.01
Blade spindle bolt bottom . . . . . . . . . . . . . . . .118 ..................160.01
It is recommended that these be checked after the first 2 hours of
operation, initially and every 50 hours following removal for repair or
replacement.
For all other torques refer to the tractor parts manual for standard torque
chart.
For engine torque values, see engine owner’s manual.
Tires
It is important for level mowing that the tires have the same amount of
air pressure. The recommended pressure are:
Drive wheels...................................................................8-10 psi
Gauge wheels .................................................................8-10 psi
Solid fill tires are not recommended for Hustler turf equipment. On
any machine, with solid filled tires, the warranty claim will be denied.
WARNING: Explosive separation of a tire and rim can cause
serious injury or death.
Do not attempt to mount a tire without the proper equipment and
experience to perform the task.
Always maintain the correct tire pressure and never over inflate.
Never weld or heat a wheel and tire assembly as an explosion
may occur. Welding can weaken or deform a wheel.
When inflating tires stand to one side and not in front of or over
the tire assembly.
Check tires for low pressure, blemishes, damaged rims or missing
lug bolts and nuts.
Hour meter
To recognize when your machine needs servicing, check the hour
meter and the maintenance schedule. The hour meter shows the number of
hours the engine has run and the maintenance schedule lists the service
intervals. Fig. 11-2
Lubrication
1. Grease the front gauge wheel bearings per the Maintenance
Schedule. Use SAE multi-purpose grease.
2. Grease the four deck lift pivots, located to the side of the
operator’s footrest per the Maintenance Schedule. Use SAE
11-8
302612_0606
Figure 11-2
Hour
meter
WEEKLY MONTHLY ANNUALLY OR
SERVICE AT OR 50 OR 100 500
INTERVALS INDICATED HOURS HOURS HOURS
Verify safety start interlock system Daily
Visually inspect unit for loose
hardware and/or damaged parts Daily
Visually inspect tires Daily
Check oil level, engine (1) Daily or every 4 hrs.
Clean air intake screen (5) Daily or every 4 hrs.
Check fuel level Daily
Blades - sharpen & securely fastened Daily
Discharge chute - securely in place &
in lowest position Daily
Clean engine and pump compartments Daily
Replace air cleaner paper element (5) As needed
Grease deck pusher arms x
Grease pump idler x
Grease deck height pivots x
Grease gauge wheel bearings x
Change engine oil & filter (1) (4) x
Clean cylinder and head fins (a) x
Check battery connections x
Check tire pressure with a gauge x
Check hydraulic oil level x
Clean engine exterior (a) x
Clean and regap spark plugs (a) x
Check pump and deck belt tension
& condition (6) x
Check fuel and hydraulic lines (7) x
Check fuel valve and grommet (7) x
Tighten lug nuts on wheels (2) x
Change fuel filter x
Clean or replace hydraulic fill cap x
Change hydraulic filter and oil (3) x
Replace spark plugs x