V BELT DRIVEN DRILLING MACHINES HU 18-2 TOPLINE HU 18-4 TOPLINE
1 2 4 3 5 Fig. A - Main parts Fig. 1 Fig. 3 Fig.
Fig. 4 Fig. 5 Fig. 7 Fig. 6 Fig. 8 Fig.
A A Fig. 10 Fig. 11 C Fig. 12 Fig. 13 Fig. 15 Fig.
Fig. 15A Fig. 15B Fig. 16 Fig. 18 Fig.
Fig. 19 Fig.
Table of contents 1. 2. 3. 4. 5. 5.1 5.2 5.3. 5.4 5.5 6. 6.1 6.2 6.3 7. 8. 8.1 9. 9.1 9.2 10.
Table drilling machines HU 18-2 Topline /HU 18-4 Topline 1. General safety rules for all machines N.B.: Read the instructions carefully in order to avoid any problems. As with all machinery there are certain hazards involved with operation and use of this machine. Using the machine with respect and caution will considerably lessen the possibility op personal injury. However, if normal safety precautions are overlooked or ignored, personal injury to the operator may occur.
Additional safety rules Always keep in mind that: • the machine must be switched off and disconnected from the power supply during maintenance and repairs, • clamped workpieces may only be measured when the machine is switched off. Never lean over the machine, mind loose clothing, ties, jewellery etc. and wear a cap. Do not remove safety devices or guards. Never use the machine while a guard is open. Always use safety glasses for machining rough materials.
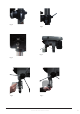
4. Assembly • • • • • • Place the column on the base and align the holes in the column support with the holes in the base (fig. 1). Secure the column with the bolts and washers. Take off the collar and the rack. (fig. 2) Install the bracket together with the rack. Install the collar and tighten firmly (fig. 3) Install the bracket handle and clamp bolt. Tighten the handle with the set screw and tighten the clamp bolt (fig. 4 and 5). Install the table and clamp it with two bolts (fig. 6).
5.4 Belt tension adjustment For proper belt tension: Use a light pressure on the V-belt. The distance should be ± 10%. 5.5 Quill spring adjustment Figure 16 • Pull the knob towards you and move it to the next or previous notch. • Check the quill while feeding for smooth and unrestricted movement. 6. Usage 6.1 Installing drills Insert the drill into chuck jaws about 25.4 mm long. When using a small drill, do not insert it so far that the jaws touch the flutes of the drill.
8. Maintenance Warning! Turn the machine off and disconnect it from the mains before maintenance or repairs are performed! • • • Frequently blow out any dust that may accumulate inside the motor. Apply a light coat of car wax to the table and column to keep the surfaces clean. If the power cord is worn, damaged or cut, have it replaced immediately by a qualified electrician. 8.1 Lubrication All ball bearings have been greased and do not require any further lubrication.
10. Parts list 59 60 58 56 57 54 55 61 62 53 63 52 64 51 65 66 50 67 49 47 48 68 46 45 44 43 42 41 69 70 115 116 117 114 111113 112 74 73 75 107 110 108 71 36 35 76 33 77 105 106 78 80 81 79 39 38 40 29 28 31 27 30 26 25 24 23 82 12 83 104 37 34 32 109 103 72 13 84 14 15 16 85 22 21 20 19 18 17 86 101-1 101-3 87 88 101 89 90 118 100 92 96 11 10 9 8 5 6 7 4 3 2 1 Fig.
No. Description No.
Our products are frequently updated and improved. Minor changes may not yet be incorporated in this manual. Always state the year of build, type and serial number of the machine in correspondence. Manufacturer and importer assume no responsibility for defects which result from not reading the manual carefully or wrong use of the machine. No rights can be derived from this manual. All rights reserved.
CHANGES AND T YPING ERRORS RESER VED
CHANGES AND T YPING ERRORS RESER VED 17
CHANGES AND T YPING ERRORS RESER VED
CHANGES AND T YPING ERRORS RESER VED 19
14 V1