
Mounting of stone cover


Mounting of soapstone set
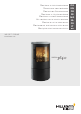
A1. HWAM 3640 with soapstone set
Contents:
Designation Pcs. Designation Pcs.
Soapstone top 1 Soapstone cover plate 1
Screws 16
Supports for soapstone cover plate
1
Washer 16 Soapstone sides 2 sets of 2 each
Spacers 2
For top outlet only: If you want to connect the smoke pipe and chimney before installing the soapstone set,
start by installing the soapstone top and raising it 10 mm as a minimum. To do so, place wooden blocks under
the soapstone top. This will allow the soapstone sides to be installed on the stove. Once the soapstone sides
have been installed, remove the wooden blocks and position the soapstone top by means of the guide pins.
1. Removing soapstone side holders
Lift one of the holders about 4 mm and pull it away from the stove so that it disengages from the guide pins
on the bottom plate of the stove. Repeat with the other holder. Put the holders aside and note which holder
belongs to the right and left side respectively.
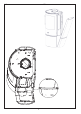
2. Fitting soapstone on soapstone side holders
Begin by fitting soapstone on the right-hand side holder. You need one slab of soapstone 35 cm in length (for
the bottom) and one slab of soapstone 72 cm in length (for the top). Place the upper slab on the floor with
the flat side up, and carefully lower the right-hand holder onto the slab so that it lies between the two steel
plates mounted at right angles on the holder (distance brackets). The soapstone must be installed so that its
form follows that of the distance bracket on the console (illustration 2A). Fasten the soapstone slab using the
four screws and the four washers (illustration 2B). Then install the lower soapstone side (length: 35 cm) in the
same way with four screws in each slab. The soapstone must also be installed so that its form follows that of
the distance bracket on the console. Important: All screws must be tightened as much as possible.
Repeat the process with the other holder. The soapstone sides have now been fitted (illustration 2C) and are
ready to be hung on the stove.
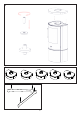
3. Installing soapstone sides
Place the soapstone side on the guide pins at the bottom (illustration 3A). Push the soapstone side in at the
top, making sure that the two fittings at the top touch each other. Lift the soapstone side up carefully (about 4
mm) and then in towards the stove until it falls into position in the fitting on the stove (illustration 3B). Repeat
the process with the other soapstone side.
4. Installing the soapstone top
Place one spacer on each of the two guide pins (illustration 4). Carefully position the soapstone top on the
stove, lowering it on to the two guide pins.
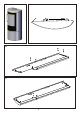
5. Installing the soapstone cover plate
If the stove is equipped with a rear outlet, the soapstone cover plate supplied can be used to cover the hole
in the soapstone top plate. The soapstone cover bracket goes into the hole in the soapstone top plate (il-
lustration 5), the four tabs (illustration 6) on the bracket facing upwards. Place the bent bracket corner in the
indentation in the soapstone top plate.
Squeeze the arms of the bracket lightly to fit the bracket in the hole in the soapstone top plate while maintain-
ing its elasticity.
Now rotate the bracket approx. 90 degrees to fix all three bracket corners properly in the hole in the soap-
stone top plate.
The soapstone cover plate can now be placed in the hole in the soapstone top plate.
english
8