
Installation Guide

Instructions for Installing
CHIMNEY COVERS
READ ALL INSTRUCTIONS AND CAUTIONS (ON BACK) BEFORE PROCEEDING
CONTENTS: ONE (1) PACKAGE OF FOUR (4) SCREWS
ONE (1) ASSEMBLED CHIMNEY COVER
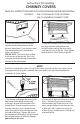
1. Insert one screw into the lower hole
located in each mitered corner of the
chimney cover band. (Just start the screw
into the hole a few turns, until all four
screws are started.)
SPECIAL NOTE: The screws are installed
at the corners of the ue tile. This is the
strongest part of the ue tile and the best
location for the attachment.
NOTE
If the tile is extended less than 3/4” out of the mortar, and will not allow the corner screws
to engage securely, a leg kit is available from your dealer. You may then complete the
installation as shown below.
2. Place the chimney cover on the ue tile
and align the base with the ue liner.
Partially tighten each of the four screws
until they are snug to the tile. Then tighten
each of the four screws rmly to the tile.
2. Insert two (2) legs into the liner no more
than 1”. By exerting pressure as shown,
force the other legs inside the liner. Push
cover straight down into the chimney liner
as far as possible. Tighten the screws on
all four (4) legs until the cover is held rmly
into the ue tile.
1. Slip the leg up through the lance inside
each corner of the band until the hole
in the leg is aligned with the hole in the
lanced band. Insert the mounting screw
(use the same four screws enclosed with
cover) through the hole in the leg and into
the hole in the lance. Tighten the screws
just enough to hold the legs into the lanced
slots on each corner of the cover. Do not
tighten fully at this time.