
Installation Instructions


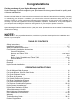


5
Hydro Massage Products LLC • 303-341-1845 | FAX: 303-341-1850 • www.hydromassageproducts.com • service@hydromassageproducts.com
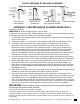
1A Drop-in Island or
Sunken Installation
1D Attached Tile Flange1B Construction of a
Apron/Skirt Wall
1C Integral Tile Flange with or
without Integral Skirt Installation
TYPICAL METHODS OF SEALING & FINISHING
MAKE SURE INTERIOR OF TUB IS PROTECTED DURING FINISHING
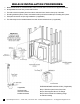
INTEGRALLY SKIRTED AND/OR FLANGED WHIRLPOOLS
Installation Procedures:
IMPORTANT!!! Before installation begins, make sure that:
Framed in alcove is of proper size, square and plumb; wall and oors meet re safety requirements of
local building code and/or FHA/HUD minimum property standards.
1. To avoid obstruction during installation, make sure water lines, spout pipes and valve plumbing do
not project into alcove.
2. Ledger Strip: Fasten a 1" x 3" (25mm x 75mm) ledger strip along rear and both sides of alcove.
3. If optional mortar bed is desired, mix a 3-gallon bucket of non-shrinking mortar or plaster
into a paste. Place three or four mounds of plaster away from drain hole in a line or square,
approximately twice as high as the cavity under the tub bottom. Place a layer of plastic on top
of the mounds. Before moving unit into alcove see and follow enclosed Electrical Connections
Procedures (electrical and air tube hook ups will be difcult to perform if unit is installed rst).
DO NOT USE MORTAR IF YOUR TUB HAS THE DELUXE AIR SYSTEMS WITH JETS ON THE
BOTTOM OF THE BATH. The EZ level base will support the unit with Deluxe Air Systems.
4. Place tub into alcove with front skirt rmly on oor and either depress into plaster mounds or assure
that EZ Level Feet are rmly on oor. Make certain that back ledge of tub rests rmly on ledger strip.
5. Pre drill ange then using 1 1/2" (40mm) galvanized roof nails or washer head screws: (a) spot
fasten the two bottom corners and the two top corners of the vertical side nailing anges. (b)
fasten at each stud through the top sides anges and back ange, working from both ends toward
back center (c) complete fastening vertical side anges. Pre drill holes through ange 1/8" larger
than diameter of screw.
6. When other than scratch coat is used, furring strips as thick as nailing anges are recommended for
installation on studs above the installed tub to assure drywall will be ush.
7. Removable skirt panel for integrally skirted models: These models are sometimes offered with
removable access panels. They provide a ush to wall installation (sheet rock overlaps skirt while
still providing access). The skirt features a decorative removable panel enabling easy access to
motor, pump and electrical hook ups. Pre mounted interlocking nylon fasteners (Velcro) or screws
with caps enable simple and quick removal of skirt access panel. A small bead of color matched or
clear silicone is required around the perimeter of the access panel to nish the installation.
IMPORTANT: Before installation of the access panel, ll the unit, test the whirlpool system for
proper operation and check for leaks, then drain.
Protect interior of tub throughout installation procedures.
Framing and supports will vary according to the Model selected. Follow dimensions for your specic unit.
Plumbing connection – (spout, handles, valves, etc.) should be made after unit is installed. When mounting
ttings on unit, drill holes from nished surface, using appropriate sized hole saw with ne tooth or abrasive grit
cutting edge.