
Installation Instructions


Hydro Massage Products LLC • 303-341-1845 | FAX: 303-341-1850 • www.hydromassageproducts.com • service@hydromassageproducts.com
4
STRUCTURAL PREPARATION
1. Literature dimensions are for reference only. Installation dimensions should be taken directly from the tub.
An access panel of 18" x 18" minimum must be provided at the pump end of the whirlpool, allowing sufcient
clearance to make nal connections and for servicing the pump and power panel. Access may be through the
wall or platform apron at the end of the unit. In the case of sunken installations, access should be made through
the ceiling below.
2. The bath should remain in its shipping carton/packaging until time of installation.
3. Install the drain tting to the bath. THE DRAIN FITTING SOMETIMES WILL PROTRUDE BELOW THE BASE
OF THE TUB APPROXIMATELY 1 1/2". Clearance must be provided for the drain by cutting away the sub oor
(where possible) or by blocking below the tub as may be required. WARNING: factory skirts do not allow for
blocking up of the tub base. All blocking must be solid and provide uniform support to the EZ Level Base or Legs.
4. Tub must rest entirely on the EZ Level Base or Legs. DO NOT SUPPORT THE WEIGHT OF THE TUB BY THE
RIM. To reduce vibration noise, a bed of wet mortar in area where tub is to be installed is optional. Carefully level
unit, ensuring that uniform support is given to all areas of the base and that no portion of the lip is bearing weight.
DO NOT USE MORTAR IF YOUR TUB HAS THE DELUXE AIR SYSTEMS WITH JETS ON THE BOTTOM OF
THE BATH. The EZ level base will support the unit with Deluxe Air Systems.
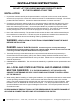
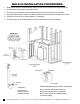
5. Frame out under the tub rim as shown in one of the illustrations below. NOTE: Due to the variety of installations
possible, framing procedures other than those described may be required. Plumb in selected location using a
level. Level front to back and across on both sides. A ledge under the rim, or an apron without a ledge may
be constructed as required (see diagram 1A & 1B). Where installations will be against a wall, stud wall framing
should run full length to the oor (see diagram 1C or 1D). Install tub rmly against sheathing as indicated
with blocking below rim to prevent deection or movement of tub. To prevent a rocking movement of tub after
installation, it is important to have rim in contact, but NOT supported by blocking material. When placing the tub
on a platform or cut out (see diagram 1A), the opening should be 2" smaller than the specied rim dimensions.
Extreme care must be taken in this type of installation to ensure the tub will come to rest entirely on the base.
WE DO NOT RECOMMEND DECK CUT OUT BE DONE UNTIL TUB IS ON SITE
IF YOU HAVE PURCHASED A WHIRLPOOL WITH AN INSTALLED TILE FLANGE, PROCEED AS FOLLOWS
CAUTION: THE TILE FLANGE DOES NOT SUPPORT THE TUB! A ledger board must be provided under the bath rim
as indicated in the installation instructions. Take care to ensure the tub is not hanging from the ledger boards, as this will
void your warranty. PRE DRILL THE FLANGE and use nails or screws to secure the ange into the studs around the
bath. Oversize the holes slightly to insure fastener does not damage tub ange. Install water resistant drywall against
the tile ange and 1/8"-1" above the top of the whirlpool deck. Install the tile or other nishing materials. Apply a second
bead of silicone sealant between the rst course of tile and the bath deck.
All dimensions should be taken from tub at job site and adjusted as necessary. Always refer to the
model specication sheet. Specications subject to change without notice and installations vary based
on model, and whirlpool plumbing systems.
L=1-1.5" less than overall length of tub
W=1-1.5" less than overall width of tub
DH=up to ½" higher than deck height
A=6" x 12" waste and over ow cut out
C=18" x 18" pump access 1 or 2, or 3
to allow removal of pump(s)
L=2" less than width for ledger board
W=1/8" – 1/4" larger than length of tub
LH=up to 1/2" higher than deck height
A=6" x 12" waste and over ow cut out
B=1" x 3" leveled ledger supports
C=18" x 18" pump access 1 or 2, or 3 to allow removal of pump(s)
NOTE: Before tub is used, the whirlpool system should be cleaned and disinfected. For proper procedure, please see the
Maintenance section of this manual pages 27-28.